5 Steps to Create a Patient Appointment Scheduling System

Patient scheduling is critical for your revenue because it directly influences clients in your practice management. In the past, it was done primarily through phone calls. Today, however, you can integrate multiple automation options and turn time-consuming patient scheduling into patient self scheduling. A patient appointment scheduling system can improve client satisfaction, boost your revenue, and increase staff efficiency of your medical office. We are sure you already know about these benefits, that’s why your next step is choosing the right medical appointment scheduler software and optimizing it for the workload of your clinic.
For our tutorial, we’ll be using BookingPress, a modern doctor appointment scheduling system for the WordPress platform. BookingPress offers you a set of tools to manage online patient scheduling, staff members and their schedule, payment options, and communication via automated emails and SMS. Whether you’re a solo practitioner or a bustling multi-staff operation, BookingPress has enough tools to simplify your day-to-day workflow. Follow the next steps to create a patient scheduling system and transform your clinic.
Step-1 Listing Out Medical Services for Patient Appointment System
To enable medical scheduling, firstly, you need to categorize and add your medical services. Routine checkups, specialized procedures, general consulting, etc.
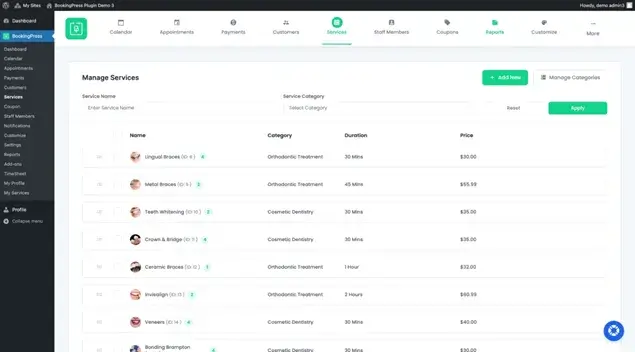
Thus, in the BookingPress Dashboard, go to Services Tab from the left hand panel. Click on Add New Service. You will have options to add complete details of a service. The BookingPress plugin has the option to craft compelling descriptions as well as upload visuals for every service to help you better sell them, of course!
If you are looking for hospital appointments online, you can create various categories like OBGYN, Dental appointment booking, ent appointment booking, and add varied services under each.
Do you have optional or necessary extra that patients need to buy before the service? BookingPress allows you to create extra services for extra revenue. Offer your clients to also book things like vaccinations, lab tests, or nutritional consultations when they schedule dr appt online.
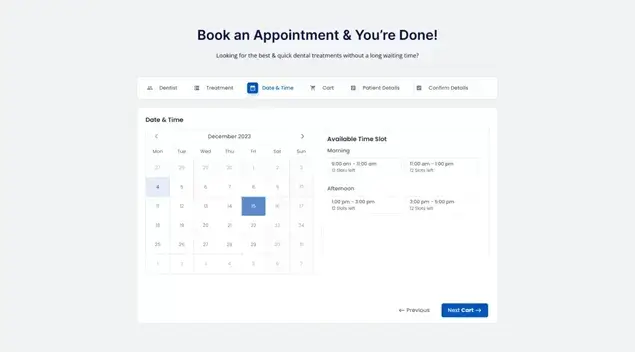
Flexible scheduling options are a true helper for some types of clinics, especially therapists. BookingPress makes it possible by providing custom time duration or multiple time duration options for dr appt online. Thus, create patient appointments based on preferred time as well as duration for the highest flexibility.
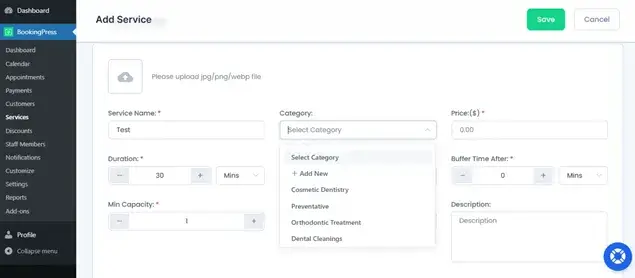
- Service Name and Category: Name your service and bifurcate it under varied categories. Create a new category directly from here.
- Define Price and Duration: Add specific price of your service along with its fixed duration.
- Buffer Time: Add buffer time before and after each booking so that the patients do not overlap and you have ample time to get ready for the next patient.
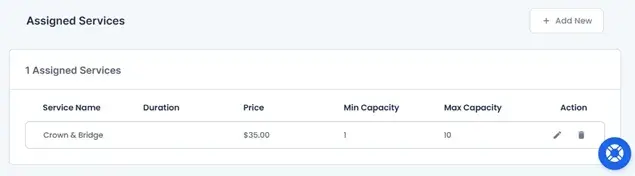
- Add Service Description with Capacity: How many people are you dealing with at the same time? Add minimum and maximum capacity to define that. Further, provide a self explanatory description of your service.
- Add Extra Services: If you want to sell a related product or service, you can add a service extra here itself.
- Enable Custom Duration and Pricing if required by your healthcare appointment scheduling.
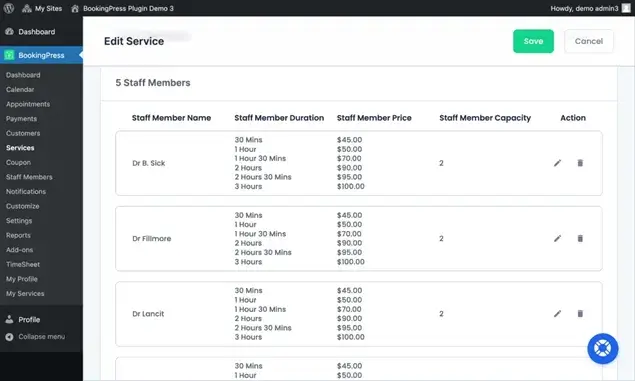
- Assign Staff Member: If you want to have a dedicated staff member for each patient scheduling service, define it right under the services.
- Add a minimum time range for booking, rescheduling, or cancelling an appointment.
With numerous payment options available right in the plugin or with free extensions, you can connect more than 20 payment gateways to your WordPress website through the BookingPress patient scheduling plugin. It enables full and partial payments online for chosen medical services. When a booking is placed by a patient, they are offered to add it to their preferred calendars.
Not a rare thing that patients plan their visit very ahead of time, that’s why this option will help them not forget about their plans and significantly reduce no-shows for your business.
Step-2 Adding Staff Members for Patient Scheduling
If you plan to schedule doctor appointment online for a clinic with multiple doctors, it’s time to add the staff members. You can view the option of staff members from the left side dashboard of WordPress BookingPress Plugin. Click on Add New to add a staff member one by one.
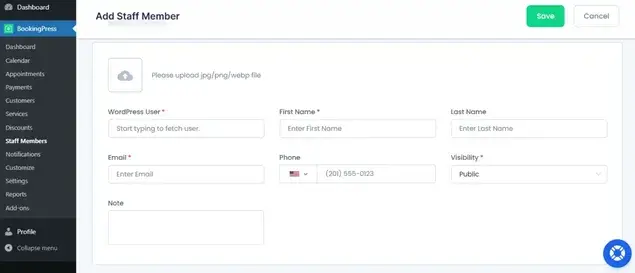
- Add the WordPress User: If your staff member is already a WordPress user, you can search their name and add them here.
- Personal Details: Mention all the basic details of your staff member. First name, last name, email address, phone number, their visibility, and any specific note. You can also add their photo.
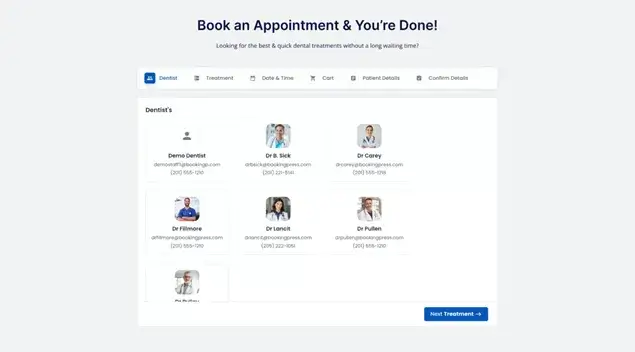
- Assign a Service: Now, if you have experts for varied medical practices, assign a specific service/s to each staff member. Thus, while online appointment booking for doctors, when a customer chooses a specific service, they get the option of a particular staff member.
Every employee can have an individual profile with their specialties and qualifications. In this profile, they can manage their appointments, clients, and schedules. Using the shift scheduling options, staff can build their own availability accommodating days off, holidays, and specific needs. There is a very intuitive interface for this offered by BookingPress. Of course, you will need to assign specific medical services to each provider, so that your clients always get to the right doctor.
It’s worth mentioning that through the main Staff menu, practitioners can seamlessly stay updated with appointments through their synced Google Calendars. The plugin’s flexibility doesn’t end there – you can create a schedule for every person individually as well as globally for the whole clinic.
Step-3 Set Up Multiple Locations or Rooms to Schedule Doctor’s Appointment Online
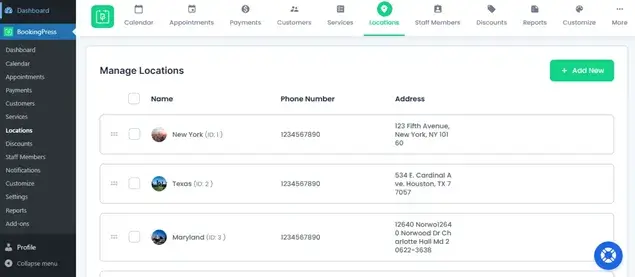
If you utilize the location addon, you can manage multiple locations of your clinic or hospital from a single dashboard using the BookingPress patient scheduling system. The locations menu is available on the dashboard at the top or the left side panel. Herein, you can add a new location very easily.
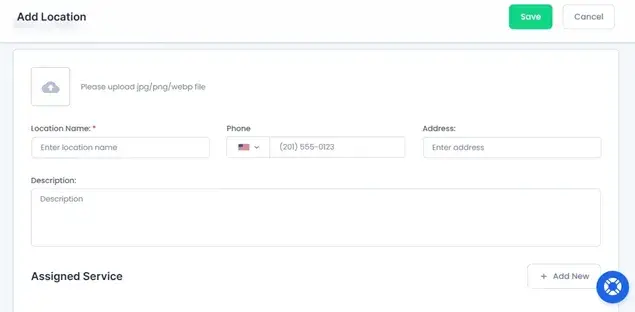
Herein, add a location name, phone number, address, and description. You can bifurcate your services in different locations by assigning a specific service to each location. This helps manage your services, locations, and patient scheduling very smoothly.
Step-4 Configure Payments, Notifications & More to Schedule Dr Appointment Online
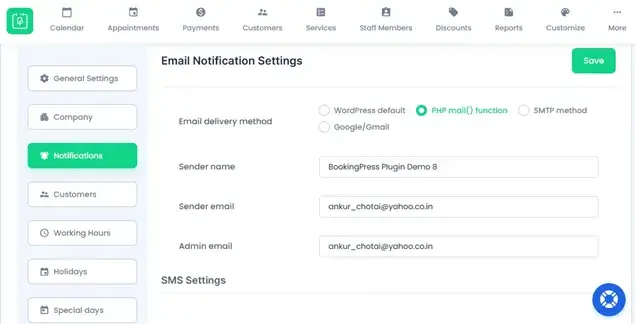
In the settings menu, there are multiple options to help you tailor the payment process – or even disable online transactions and register payment manually at the medical office. If you want to opt for a more reliable way to secure appointments, PayPal, Stripe, Klarna, and many more tools are offered for seamless transactions with BookingPress.
Moreover, you can manage partial deposits at checkout and define clear cancellation policies. To keep patients informed about all the steps of the booking process, make sure you edit the email templates for every interaction. It’s also possible to choose SMS and WhatsApp messages. Moreover, BookingPress offers a set of free add-ons to use in different aspects of your clinic business: manage invoices, taxes, deposits, coupons, waiting lists, and even such marketing-boosting features as online tips.
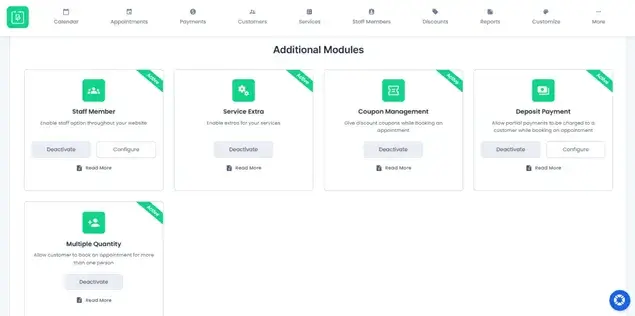
You’ll find all these awesome extensions in the Add-ons menu of the plugin: simply select the needed ones and enable them on your website!
Step-5 Add Online Scheduling for Doctor’s Appointment Form on Website
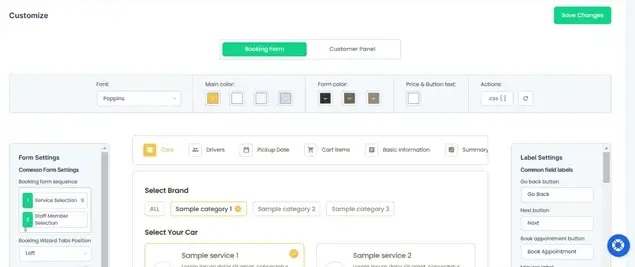
In WordPress, it’s easy to add a widget to any page, whether you are on Elementor, default block editor or the Classic Editor. Just add the shortcodes generated by the BookingPress plugin with the appropriate block, widget, or the [bookingpress_form] shortcode. Before you add the form, make sure to customize it to your needs by using the color palette options, fonts, etc. Make it look right on your WordPress site with simple edits!
To conclude: The Easiest way to Create Patient Appointment Scheduling System
Implement patient scheduling with the BookingPress software to experience almost immediate results – faster and error-free bookings, easier payment and reservation management, as well as more productive doctors. In particular, following our guide to use medical scheduling systems, it’s really easy to:
- Build a clinic booking form with a choice of location.
- Customize schedules for every professional.
- Control unlimited payments and appointments without fees, in one user-friendly dashboard.
- Enable patients to pay online with a choice of payment gateways.
- Manage cancellations and reschedules.
This will ultimately promise your clinic a better patient retention rate, more transparent revenue, and better interactions with your patients overall. You can set up recurring booking options for doctor follow up appointments.
FAQs
Can I use the BookingPress Lite version for patient scheduling?
If you are a solo medical or dental practitioner, BookingPress Lite, the free version, will be perfect for you. It lets you add multiple numbers of services and allows a smooth medical scheduling function.
I am a solo doctor looking for a doctor appointment booking system on a budget, what’s the best option?
If you do not require various staff accounts or multiple locations, you can use BookingPress Lite which is completely free! Herein, you can add multiple services and allow smooth patient scheduling for your clinic without requiring a personal assistant to manage bookings.
What’s the Perfect Booking Tool for Multispecility Clinics and Hospitals?
BookingPress is a perfect solution for hospital appointment online or multispeciality clinic bookings. You can add various categories for different specialities and list services under each. Further, you can also add multiple staff members and assign specific services to each. This helps streamline your doctor’s appointment online with ease.


Brian is a WordPress expert with a decade of developing experience & technical-writing. He enjoys blogging, movies & hiking.

Get BookingPress Premium
60+ Premium Addons
21+ Payment Gateways
Plan starts at just $89
Get Premium NowLike our insights? Click the badge to add BookingPress as your preferred source on Google.

Add as a Preferred
Source on Google