How to Create a Hotel Booking Website

If you operate a small hotel or holiday rental, having your own website for direct bookings is a great alternative – or even addition – to accepting reservations on third-party sites like Booking.com.
Moreover, creating it and starting to take online reservations directly can be done without significant investment and resources, especially if you work with WordPress, the most popular and budget-friendly site builder in the world.
Get ready, we’re showing you a step-by-step tutorial on how to create a hotel booking website with WordPress and BookingPress!
What Is BookingPress and When Should You Use It?
While WordPress is a site builder (or CMS, content management system), bookings can be accepted on your WordPress site only with extra tools – plugins. BookingPress is one such plugin.
More exactly, BookingPress – WordPress appointment plugin is a rather multipurpose booking tool, widely used for appointments and hourly scheduling. It has dozens of marketing and utility features to support any booking scenario, including one of the biggest choices of payment gateways (20+) for accepting payments from domestic and international travelers.
Before we dive into setup, here’s when BookingPress works best for hotel bookings:
- Rental units for hourly bookings – coworking spaces, day-use apartments or studios, home rentals for small events.
- Private garages and parking spots.
- Campings.
- Traditional hotels or vacation rentals should expect limitations of offering guests a maximum stay length of 1 day (24 hours).
Curious if this will work for you? So, here is your brief step-by-step tutorial of how to create a hotel booking site on WordPress.
Step 1. Install WordPress
For novices, WordPress can feel a bit too big because of its capabilities. However! At the current stage, there are many ways to get started with it in a user-friendly way. Like so:
1. Choose a hosting provider
Pick a host that offers 1-click WordPress install (like Bluehost, SiteGround, or any other suitable host for WordPress).
2. Register a domain
Many hosts include a free domain during signup. Choose your site name and register it.
3. Use the 1-click installer
In your hosting dashboard (like cPanel), find the “Install WordPress” option and follow the steps:
- Select your domain.
- Set your site name and admin login.
- Click Install.
4. Log Into WordPress
Go to yourdomain.com/wp-admin, log in, and you’re in!
5. Start Customizing
Pick a theme, install plugins, and build your pages.
Step 2. Pick a WordPress hotel theme
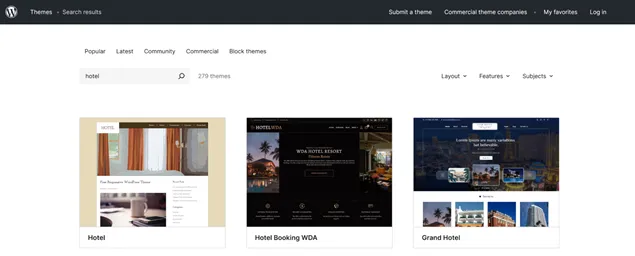
To start customizing your hotel site, it should have a pre-installed design. If you don’t have a custom design, pick a free theme or a commercial one from premium WordPress stores or big platforms like ThemeForest.
Quality hotel WordPress themes usually have:
- Clean, mobile-optimized design.
- Tech support.
- Ready-made pages for hotel business (rooms, amenities, gallery, etc.).
- A variety of color choices to create a brand-relevant online presence.
- Great social integration (e.g. an embedding option of your hotel Instagram).
Step 3. Customize BookingPress to enable bookings
Let’s go through the plugin’s system to help you set it up according to your hotel or rental needs!
First, make sure BookingPress is installed and activated. Then go to the plugin dashboard to begin your setup.
Add rooms
In BookingPress, rooms or rental units should be added as services through the respective menu: BookingPress → Services → Add New.
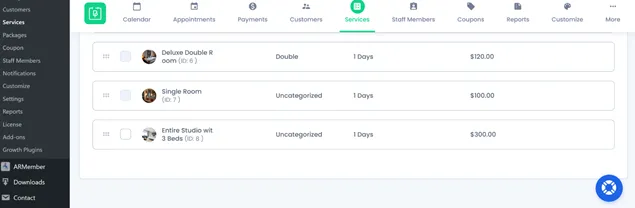
On the admin side, there are always ‘services’, but you can name them as needed so that guests see other labels on your site.
Each service will represent a different type of room or unit. For example, a King Room and a 2-Bedroom Apartment. BookingPress allows you to have unlimited room types and rental units.
For each room type, fill in:m availability. First, go to Book
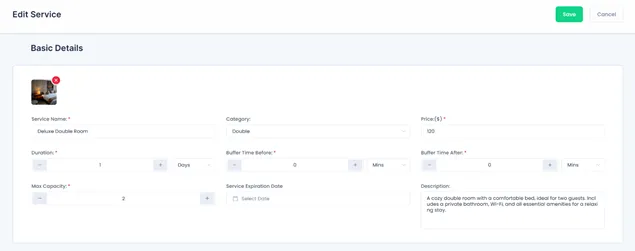
- Service name (e.g., “Double Room with Balcony”).
- Price per night/stay.
- Duration – set this to 1 day (24 hours is the max allowed) if you offer daily bookings. You can choose days as duration as well but then clients won’t be able to book more or less that this set duration.
- Buffer time – if you need cleaning time between bookings.
- Maximum capacity (e.g., 2 guests).
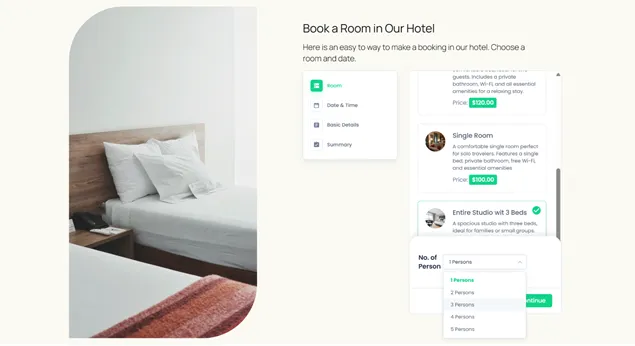
- Image and description of the room.
- Category – use categories to group room types (Suites, Studios) – guests can choose them when making a booking.
Later in Settings, you can add more customization using optional settings. For example, set up cancellation rules, minimum booking notice, or availability expiration.
Set up room availability
Since BookingPress needs to assign “staff” to a service, we’ll use this feature to simulate room availability. First, go to BookingPress → Staff Members → Add New.
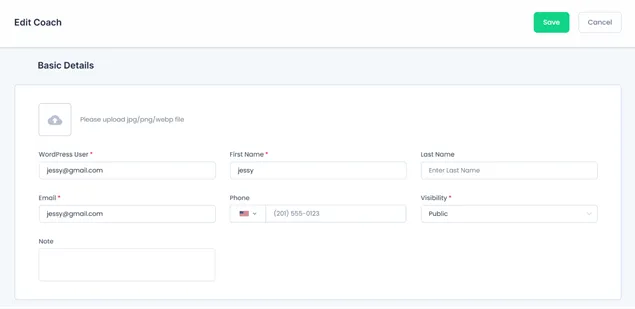
To use for hotel bookings, try the following setting:
- Create 1 staff member – many room types can be assigned to it unless they need to have different seasonal rules and availability.
- You don’t need to display staff to guests. It’s possible to hide staff selection in the booking form later (we’ll show you how).
Each staff member can have their own availability, making it possible to track bookings per unit. You can also set this availability via the service menu (room availability via the ‘Shift management’).
There are two ways to set when rooms can be booked:
Global hotel schedule
If all rooms are bookable year-round with the same check-in and check-out rules, go through these settings: BookingPress → Settings → Working Hours.
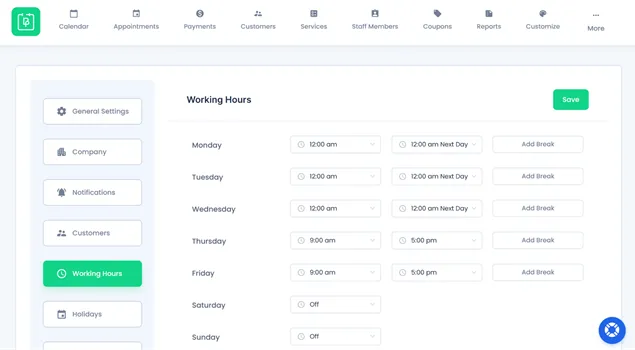
Here you can set general check-in/check-out times. Blocking times can also be added from this menu. For example, you can use ‘holiday’ availability to block rooms for dates when needed (e.g. room renovation).
Per-room hotel availability
For custom availability, seasonal availability, or special blackout dates, you need to change the ‘working hours’ for staff members or services (because room availability is attached to them, remember?).
- Go to BookingPress → Staff Members/Services.
- Choose a staff member/service → Click Shift Management.
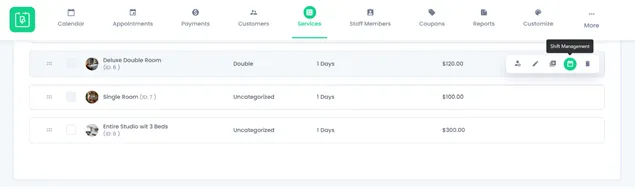
- Enable “Configure specific working hours”.
- Add custom booking times, holidays or closed dates as needed.
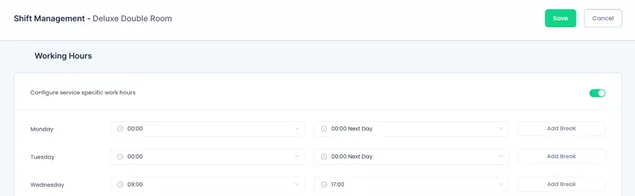
The custom availability you set will be applied to chosen rooms.
Important:
As noted earlier, BookingPress is currently limited to hourly reservations, with a cap of 24 hours per booking. For example, it doesn’t support bookings with specific times (like from 2 PM on one day to 10 AM the next day) out of the box.
If you do need to offer longer stays, you can use the Cart extension from BookingPress, which enables guests to add several days one by one to ‘cart’ (reservation). This way, they will be able to book more than a 24-hour stay, but will need to go through the booking form several times.
Set up payments
Guests can pay online for bookings with BookingPress – you can enable on-arrival payments.

To take online payments for room booking and customize other options (e.g. currency), go to BookingPress → Settings → Payments.
There are Stipe, PayPal, and more methods available from the Add-ons menu.
For your hotel booking site, BookingPress also supports deposits, taxes, coupons, and even POS systems – you can simply enable the needed features via add-ons.
Customize guest notifications
Send booking confirmations, reminders, and cancellations via email or SMS to your guests via this menu: BookingPress → Notifications.
- Edit and personalize message templates.
- Add WhatsApp or SMS notifications for extra convenience.
- Include check-in details or property access instructions.
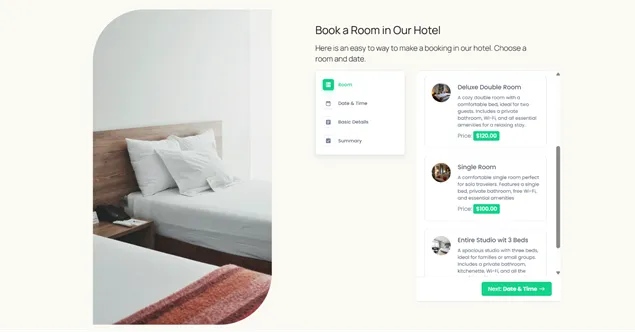
Style your booking form
BookingPress makes it easy to customize the appearance and steps of your booking form so it feels like a hotel reservation experience: go to BookingPress → Customize.
There are two important things that can serve you – rename labels of the fields to suit your hotel website on WordPress and hide unneeded selectors (like Staff).
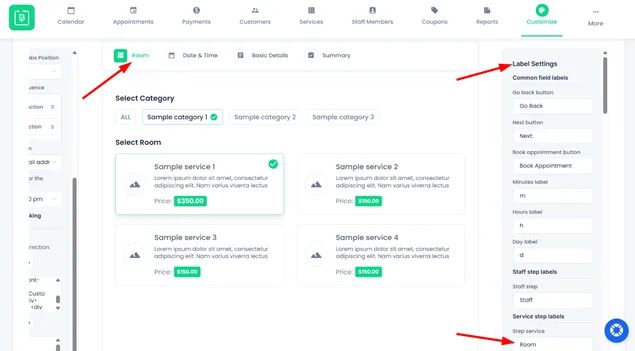
For instance, these might be the options suitable for hotel needs:
- Hide Staff selection.
- Enable date pickers – so users select their arrival date.
- Hide Duration picker – bookings will always be for 1 night (unless customized).
- Customize colors, fonts, and labels to build your branding and user experiences.
With these settings, you can choose whether guests select a room type or category first, or start by picking their desired check-in and check-out dates.
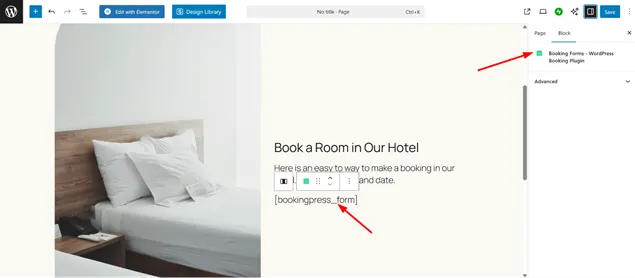
Add a booking form to your website
Add the booking widget to any page using your page builder or WordPress block editor.
If using Elementor, just drag the BookingPress widget into your layout (do the same for Gutenberg).
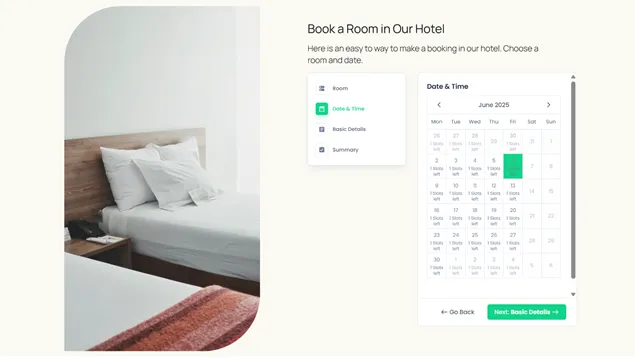
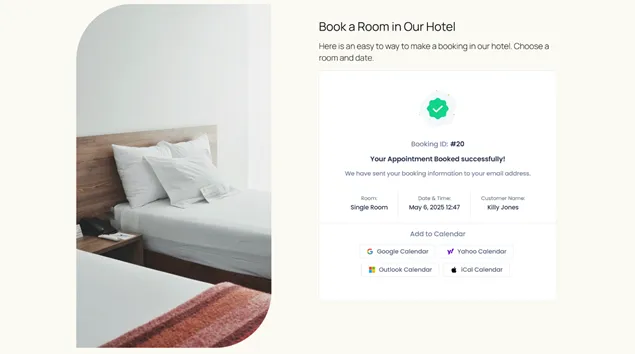
Guests will now be able to view room availability, select check-in/check-out dates, complete booking and payment, and receive confirmation emails.
Your hotel booking site is ready!
Summing Up on How to Build a Hotel Booking Website with WordPress & BookingPress
Use BookingPress as a booking solution for any rental item, from hourly reservations (offices, campsites) to traditional hotels and holiday homes.
However, please keep in mind the following features and limitations:
- By default, max stay duration is 24 hours – works best for single-night stays.
- Multi-day bookings require a workaround, such as using a Cart add-on from BookingPress.
- Staff = Room Logic may be tricky to scale if you have many room types with different rules.
- If you want to add a room with a selected suite of services, create Service packages in BookingPress.
- BookingPress doesn’t support booking sync with third-party travel platforms.
- You can connect Google email addresses of your hotel cleaning staff to get instant notifications about bookings of specific rooms.
Related articles:


Brian is a WordPress expert with a decade of developing experience & technical-writing. He enjoys blogging, movies & hiking.

Get BookingPress Premium
60+ Premium Addons
21+ Payment Gateways
Plan starts at just $79
Get Premium NowLike our insights? Click the badge to add BookingPress as your preferred source on Google.

Add as a Preferred
Source on Google