How to Set up Recurring Appointments in WordPress

BookingPress, made exclusively for appointment scheduling WordPress websites, accelerates your marketing activities with brilliant extensions for online tipping or pickable appointment duration by a customer, to name a few options.
But did you know that you can also set up recurring appointments in WordPress using the BookingPress plugin? It’s a great opportunity to have loyal customers who always can support your business. We’re breaking down how to do that with today’s brief tutorial.
More tips and tricks:
- How to Get Clients on Your WordPress Service Website
- How to Improve Customer Experience & Satisfaction with Online Bookings
- Best WordPress Appointment Plugins with SMS Integration
When to Use Recurring Appointments?
Regular manicures and pedicures from a nail technician, coaching relationships that often involve regular sessions, and, of course, students may need recurring tutoring sessions for academic support; there are tons of cases, you name it.
By offering recurring appointments to your clients, you won’t just have a chance to satisfy the needs of people, but also build a more stable and predictable revenue stream for your business thanks to loyal, long-term customers.
What’s Required to Set Up Recurring Appointments?
To allow your clients to book recurring appointments on your WordPress site with BookingPress, the following plugins must be installed and activated:
- BookingPress Lite – Download.
- Professional or Enterprise plan of BookingPress Premium – Purchase.
- The Recurring Appointments add-on. It’s free with one of the plans above.
Activate and use Recurring Appointments Addon for BookingPress
You will download the Recurring Appointments addon for BookingPress once you have access to the premium version. Let’s show you the key steps of how it works.
Downloading and installing:
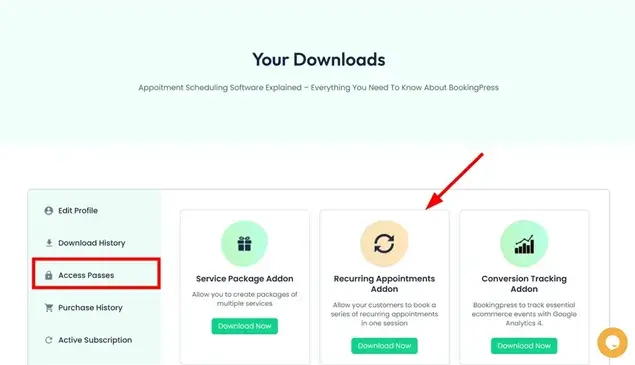
- Login to BookingPress and go to My Account > Access Passes.
- Click “View your downloads” and find the Recurring Appointments Addon.
- Download the addon and upload it to WordPress like any other plugin.
- Install and activate the addon.
Enabling Recurring Appointments for WordPress:
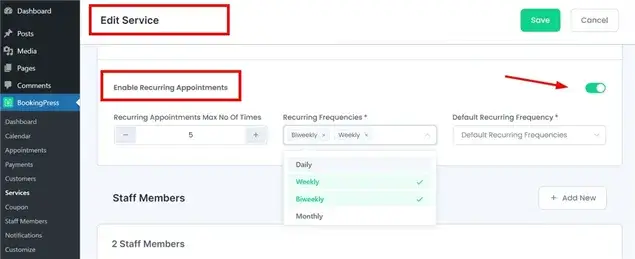
There are very simple settings – just turn on the option for individual services and set your preferences.
- Go to WordPress Dashboard > BookingPress > Services.
- Add a new service or edit an existing one.
- Tick the toggle that says ‘Enable Recurring Appointments’.
- Set options: Max number of bookings, recurring frequencies (daily, weekly, etc.), default frequency.
- Save.
Editing colors and labels for the booking form:
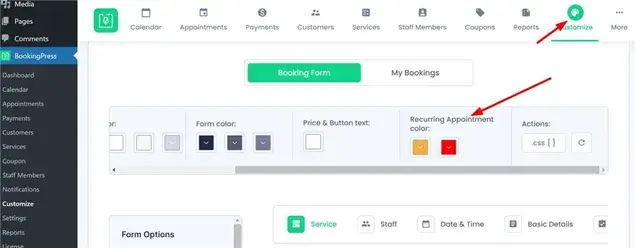
Let’s now see how you can customize the look of this option for the booking form on the front end of your website, that is, how your clients see it.
- Go to WordPress Dashboard > BookingPress > Customize.
- Set colors for time slots and labels like “Repeat Appointment Label”.
- Click Apply.
Customizing instruction texts:
To change text labels that explain to customers how to set up recurring appointment preferences, go to WordPress Dashboard > BookingPress > Settings > Messages. Simply type the needed text along with the settings.
Managing recurring appointments:
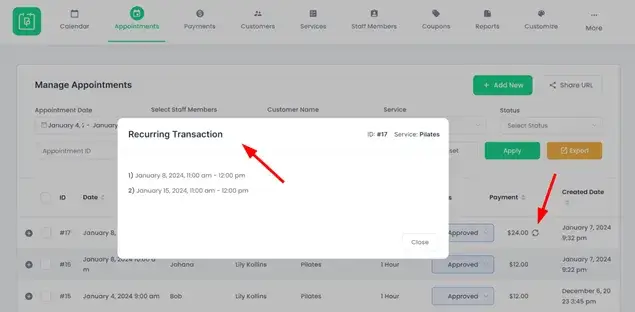
To see if an appointment on your BookingPress dashboard has recurring ones, do the following:
- Go to WordPress Dashboard > Appointments.
- View or manage existing appointments (edit, delete). In the Payment column, you will see the Payments column, the arrow icon will indicate a recurring appointment. Click on it to see details.
- Click “Add New” to create a new recurring appointment > configure settings in the ‘Repeat Appointment field’.
Displaying recurring appointment information in invoices and messages:
- Use the shortcode [bookingpress_recurring_items] within your invoice template to display recurring appointment details automatically.
- Select the %recurring_appointment_list% variable from the sidebar and add it to your email template. Clients will receive a single email with the list of recurring appointments after booking.
How It Works for Your Customers

How does the process look for your customer in the booking form?
- Users choose a service with recurring appointments enabled.
- They schedule multiple sessions, setting start dates, time slots, number of sessions, and frequency.
- They can edit previously selected dates and times.
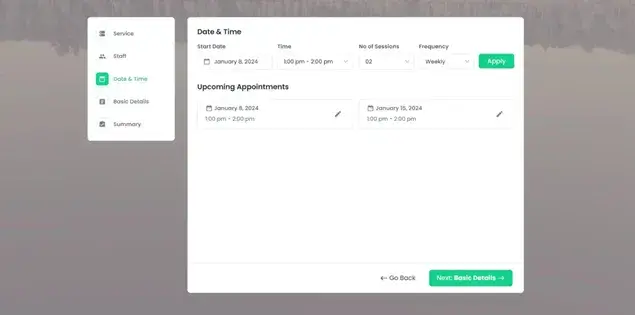
Note that the addon suggests alternative time slots if the chosen one is booked. It prevents booking on unavailable days and displays an error message. As the next steps, it work as usual, your customers review a summary with their details, appointment details, and total payment – before making a payment and being redirected to the booking confirmation page.
More BookingPress tutorials:
- How to Enable Clients to Book Appointments in Their Timezone
- How to Manage Appointment for Multiple Business Locations
- How to Create Dynamic Discounts (Happy Hours) for Services
Let’s Sum Up: How to Offer Recurring Appointments on WordPress?
As you see from our recurring appointment on WordPress tutorial, BookingPress has a simple extension that allows you to integrate the recurring appointment selection in the booking form by your customer. All you need to do is to be on either the Professional or Enterprise plan, download the add-on in your account, and configure a few simple settings to show this option in the booking form. Bingo! You are ready to help your clients schedule recurring appointments.


Brian is a WordPress expert with a decade of developing experience & technical-writing. He enjoys blogging, movies & hiking.

Get BookingPress Premium
60+ Premium Addons
21+ Payment Gateways
Plan starts at just $89
Get Premium NowLike our insights? Click the badge to add BookingPress as your preferred source on Google.

Add as a Preferred
Source on Google