List Appointments
The BookingPress Appointments page allows you view, create, edit and manage all appointments. Want to find a specific appointment, schedule a new one, or update booking details? Everything can be done from this page.
Here, we’ll show you how to view appointments list, add new bookings, use advanced features and manage existing appointments.
How to View and Manage Appointments (Dashboard Actions)
You can view and manage all your appointments from the WordPress → BookingPress → Appointments.

View All Appointments
The appointments list shows all scheduled bookings along with key details such as:
- ID.
- Date & time.
- Customer name.
- Staff member.
- Service.
- Status.
- Payment.
- Created Dated.
Note: To adjust the number of records shown, go to General Settings and select the desired number under “Default items per page.”
Search and Filter Appointments
As you can see, the BookingPress Appointments page has several ways to search for a specific appointment.
You can use the search bar to find appointments by customer or service name. Or, you can apply filters such as date range, staff member, customer name, service, status or appointment ID to quickly find the specific appointment details.
Update Appointment Status
You can update the status of any appointment directly from the list using the status dropdown, and simply change it to:
- Approved.
- Pending.
- Cancelled.
- Rejected.
- No-show.
- Completed.
View Appointment Details
Simply click on any appointment to see its complete booking details, including customer information, service, schedule and payment status.
You also get an option to cancel the particular appointment here.
How to Add a New Appointment in BookingPress?
To add a new appointment manually from the BookingPress, click the “Add New” button at the top-right corner.
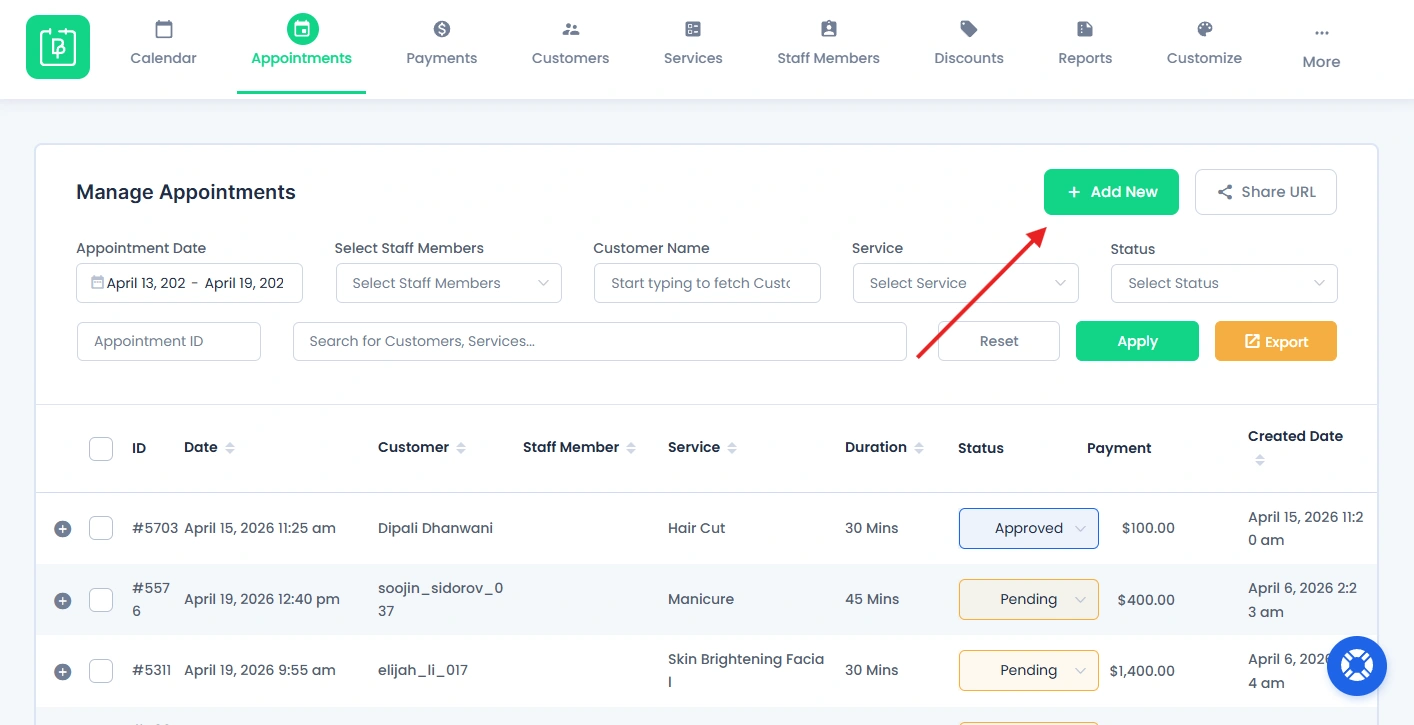
This will open a modal where you can fill in all the necessary details for the appointment.
Basic Details Section
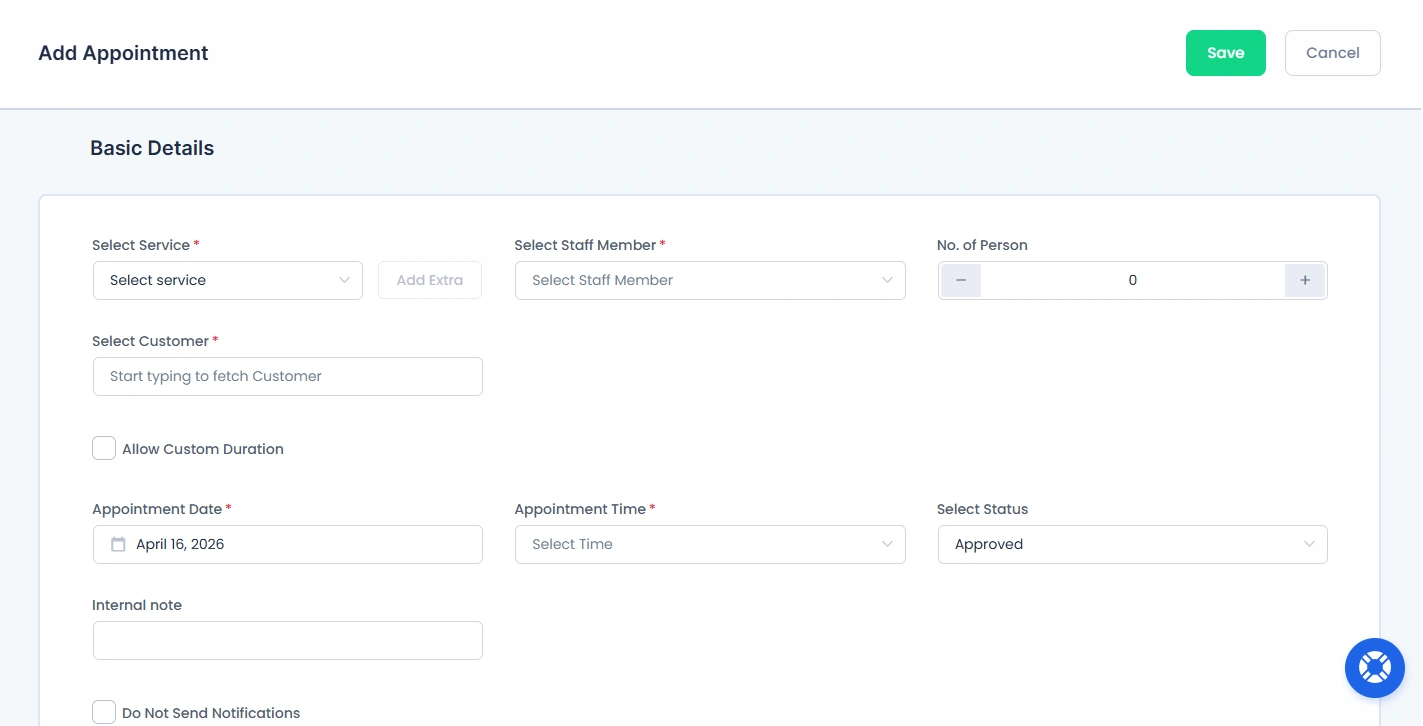
Here are the basic details you must enter to create a new appointment manually from the BookingPress admin side:
- Select Customer: Choose the customer for the appointment from the dropdown menu.
- Select Service: Pick the service from the dropdown, and you can also add extra services if needed.
- Choose Date and Time: Once the service is selected, the “Appointment Date” and “Appointment Time” dropdowns will be populated. Select an available date and time to schedule the appointment.
- Set Status: Choose the relevant status for the appointment.
- Add Notes: If needed, add notes for the appointment in the provided field.
- Notifications : When you add a new appointment,
- For notifying customers about their scheduled appointment, check the “Send Notifications” checkbox before saving.
- Make sure the “email notifications” are enabled in BookingPress → Notifications. If notifications are disabled, the system won’t send emails even if the checkbox is selected.
Payment Details Section

Next, scroll down inside the “Add Appointment” page, can review and manage payment options:
- Subtotal: Includes the total cost of the service and any extra services added.
- Additional Member Charges: Calculates charges for extra members accompanying the customer.
- Taxes: Shows applicable tax amounts.
- Discounts: Reflects any applied coupons.
Choose what to do regarding payment once the appointment is booked:
- Send Payment Link: Sends a payment link to the selected customer via email.
- Mark as Paid: Marks the appointment as fully paid.
- Do Nothing: Default option that takes no immediate payment action.
- Mark as Pending: Marks the appointments payment status as pending
Important: Payment link option will not be available while editing or updating an appointment.
Advanced Booking Features ( via Add-Ons)
BookingPress also offers advanced booking capabilities for appointments via its add-ons. It allows you to extend how appointments are scheduled and managed.
Multiple Quantity (Formerly known as “Bring Guest With You”)
The Multiple Quantity module allows customers to book appointments for multiple members for the same service in a single booking.
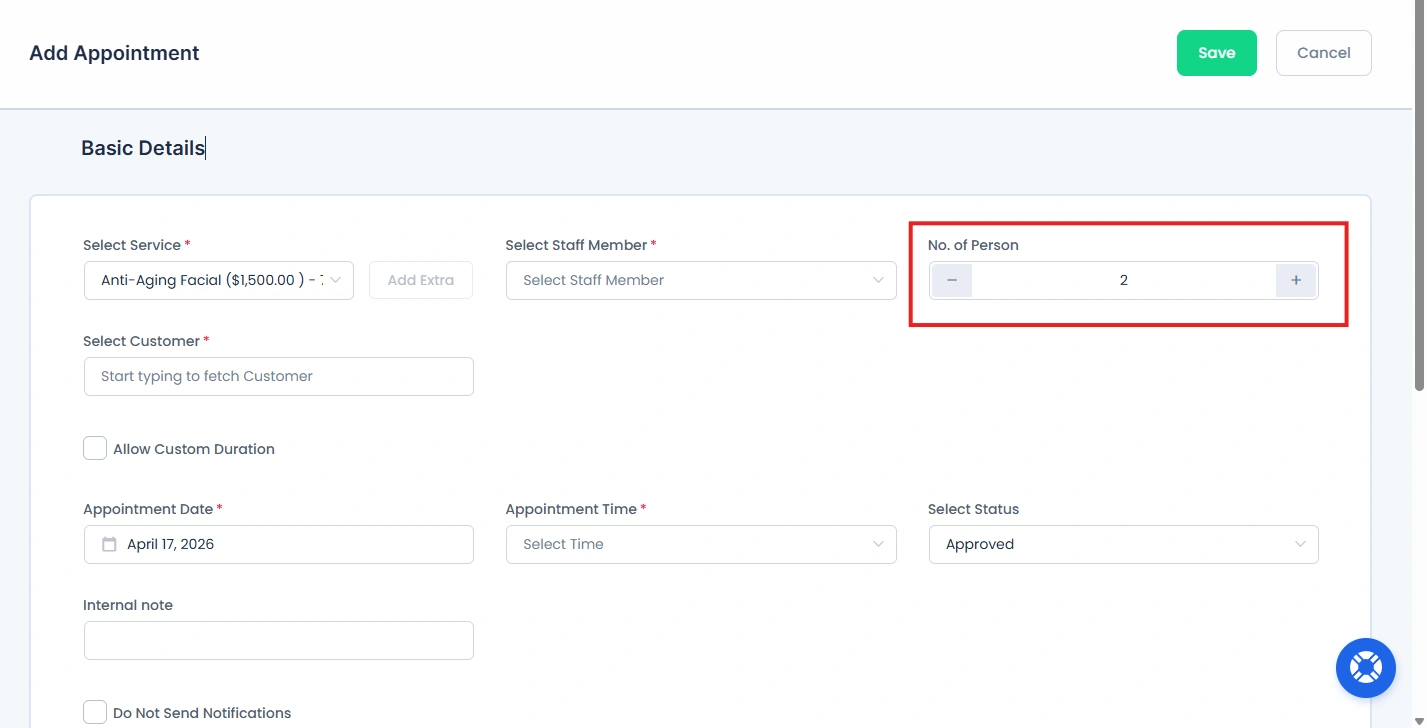
When this add-on is enabled, your customers can choose the number of additional members they will bring. And the system will automatically reserve slots for them along with the primary booking.
Apart from this, when this module is activated, you can set a Minimum Quantity for each service under BookingPress→Service. This makes sure that customers must select at least the specified minimum number of members to book that service.
Note: The ‘Multiple Quantity’ add-on must be active for this feature to work.
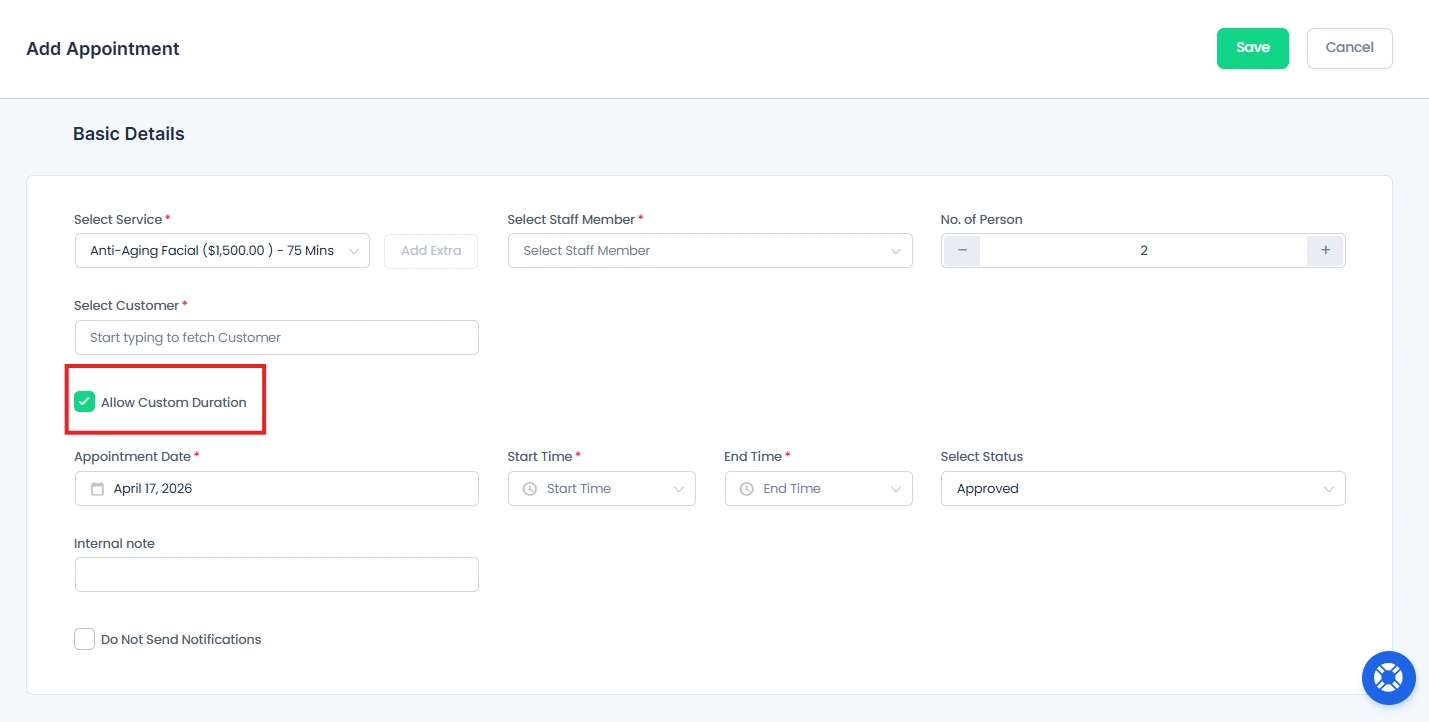
Custom Duration
If you want your customers to custom duration for any appointment, simply tick on the “Custom Duration” option. It’ll allow you to add appointments at any specified time, including past dates or outside the standard working hours.
Let’s say an appointment can be booked for a duration of 20 minutes, even if this duration does not match the standard length of the service.
Note: When this is enabled, you won’t be able to create recurring or custom service duration appointments for that particular appointment.
This feature also permits booking appointments during holidays, or when a day or slot is not available regularly.
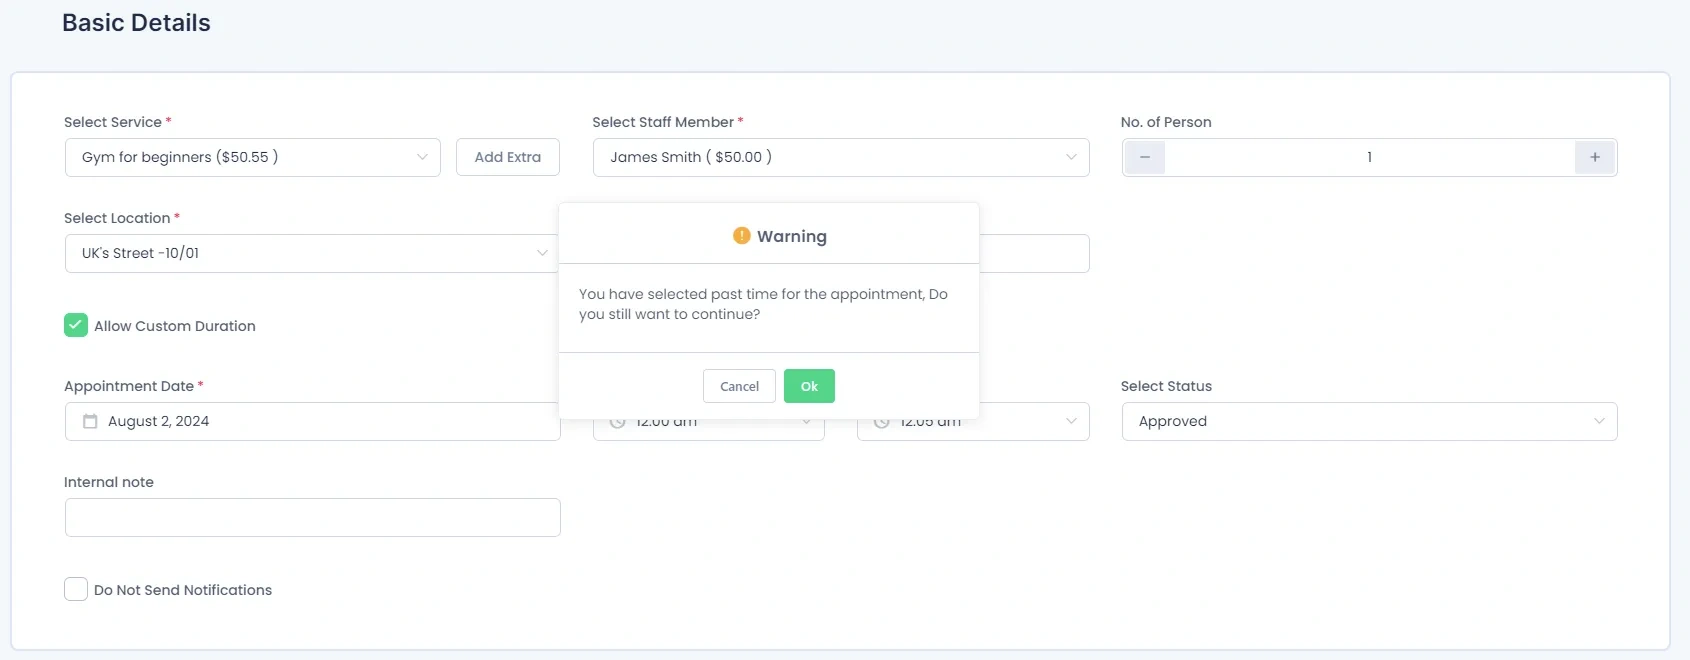
However, If an appointment is booked for a past date or a time slot during which services are not typically provided (e.g., break hours), a warning message will appear.
Important: You still cannot book for a time when the slot is already booked!
This alert message shows that the appointment is already booked, either for a past date or during a non-service period.
After clicking “Save”, the appointment will be added to the appointments list.
How to Manage Existing Appointments in BookingPress?
BookingPress allows you to easily update, organize and manage existing appointments directly from the appointments page.
Edit Appointment
To modify an appointment, simply hover over the appointment row and click the Edit icon.
Here, you can update details such as date, time, service, and status.
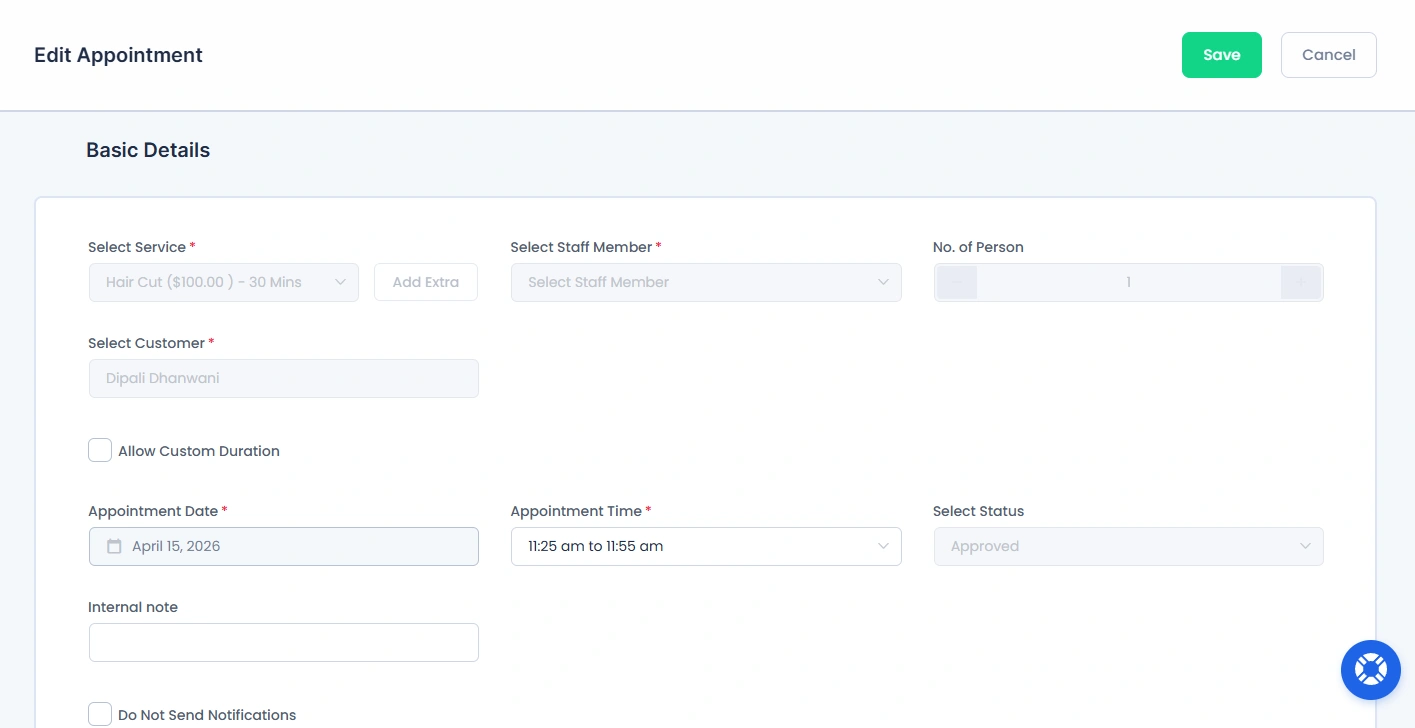
And after making changes, click Save to apply updates. You can also tick notifications to inform the customer about any changes.
One more thing, remember while editing the Recurring or Cart Appointments the pricing won’t be reflected. Plus, the deposit option will only work while adding an appointment; it won’t work when editing an appointment.
This is useful when a customer wants to reschedule or you need to make adjustments to fit your schedule.
Editing Past Appointments
Note: This is only possible if the coupons and the extra service module is activated!
You can edit past appointments with certain limitations.
While customer and service details cannot be changed, you can update fields such as extras, coupons, and custom fields (if enabled). Edited past appointments are marked to indicate changes.
Handling Payments & Discounts
Note: You can add coupons while editing the past appointment but you won’t be able to remove a coupon from an existing appointment.
When updating an appointment, you can manage additional charges, apply coupons or handle partial payments. If a coupon is applied to a paid appointment, the system will prompt you to process the corresponding refund.
Add Admin Note
Adding an internal note which is visible to both admins and staff members helps review important appointment-related information.
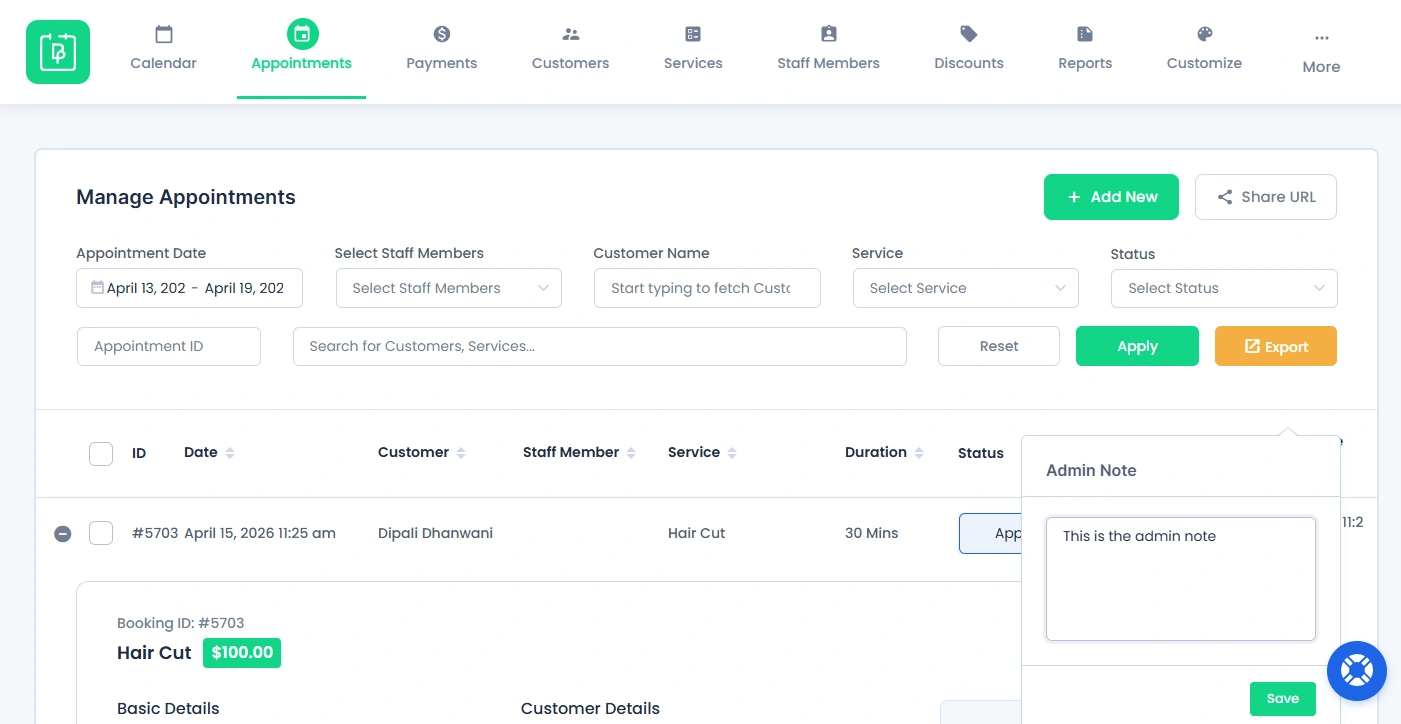
To add a specific note to an appointment, simply hover over the appointment to reveal the action bar.
Now click the “Note” icon to open a text area where you can enter an admin note.
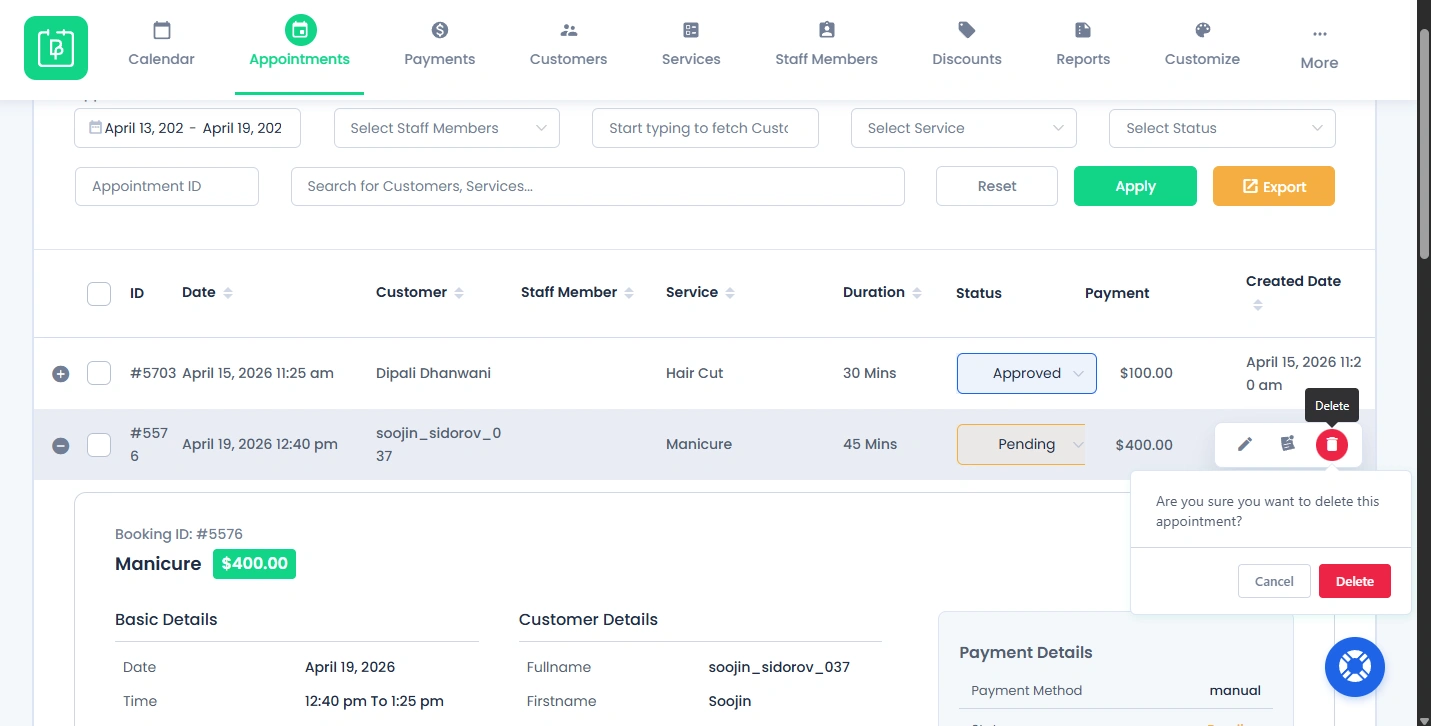
Delete Appointment
To delete a specific appointment, hover over that appointment and it will open an action bar that has a “Delete” icon.
Now click on that icon and it will ask for the confirmation to delete. Simply hit the “Delete” button from the confirmation box, and that’s it!
The appointment will delete that appointment right away.
You can delete multiple appointments by checking the appointments you want to delete. The dialog box with the options will display at the footer when you check at least one appointment which you want to delete.

Once you are sure you want to delete the appointments, hit the “Go” button and it will delete the selected appointments.
Share Booking Link (Share URL Feature)
BookingPress offers a Share URL feature that allows you to create a link to your booking form with certain fields pre-filled, such as the selected service, staff member, and more. This feature is useful when you want to share a pre-configured booking form with others.
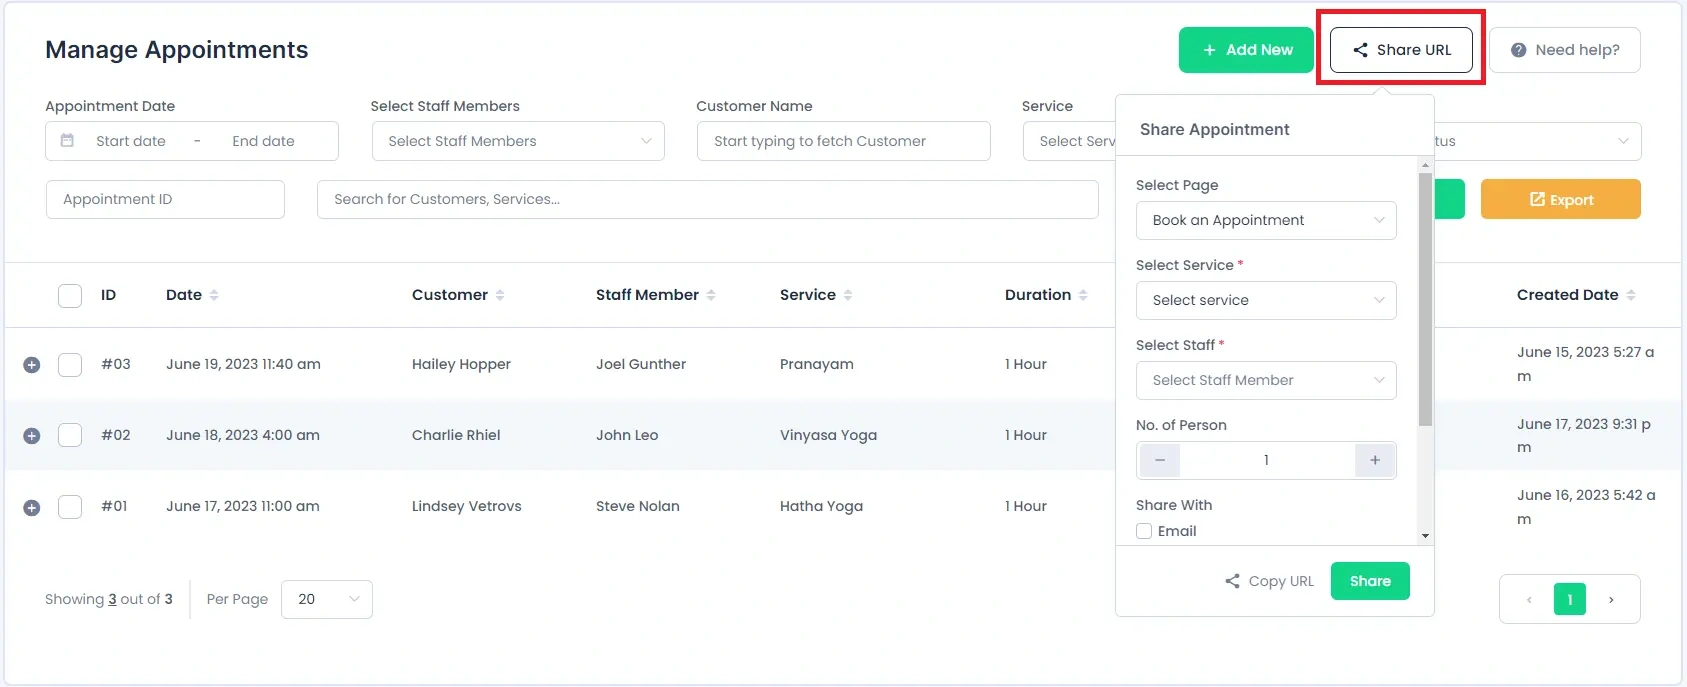
How to Use the Share URL Feature:
First of all, choose the page that contains the booking form shortcode from the “Select Page” option. Next, pick the service you want to pre-select for the booking, and select the staff members:
If the “Service Extra” and “Multiple Quantity” addons are active, you’ll also be able to:
- Select and add an extra service.
- Choose the number of guests accompanying the customer.
After that, if you want to give customers the option to change the service, check the “Customer can modify option” box. This allows customers to adjust the booking based on their preferences.
Sharing the URL:
Once you’ve set up the pre-filled booking link, you can share it via email:
- Under the “Share With” section, select Email as the sharing method.
- Enter the recipient’s email address. To send the link to multiple people, separate the email addresses with a comma (,).
- Click Share to send the link or copy the URL to share it privately with friends, family, or anyone else.
Export Appointments Data
You can export all appointment data by reaching the “Export” button at the top right corner of the appointments page.
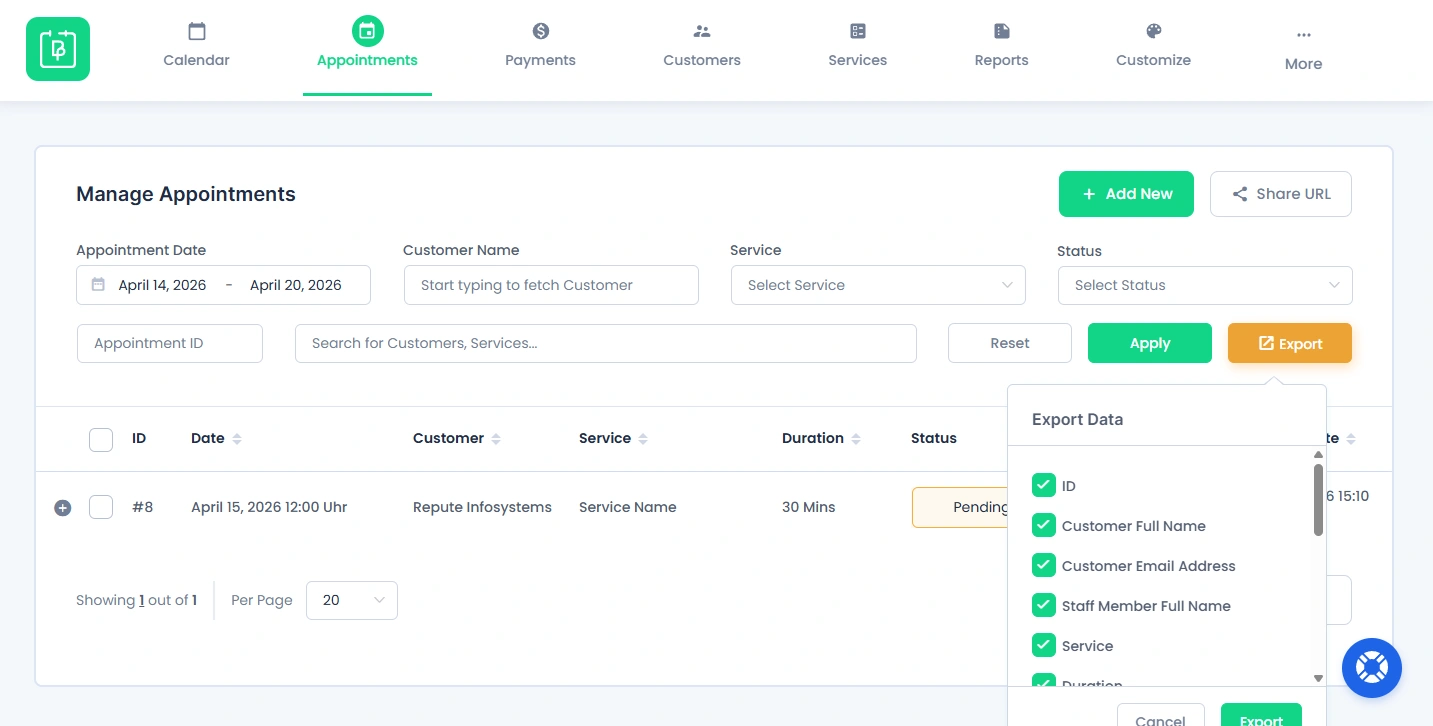
Here, you can select the specific fields you want to include in your file such as:
- ID
- Customer full name
- Customer email
- Customer phone number
- Staff full name
- Service
- Duration
- Amount
- Start & End time
- Note
- Appointment Status
- No. of Person
- And a lot more.
Once you select all the fields data you want, simply hit the “Export” button in the popup. Now, data will be downloaded in .csv file format.
After downloading, you can open the CSV file in Excel or any spreadsheet tool.
This makes it easy to use for reporting or external analysis.
Need a hand?
Our world-class support team is happy to help. Send us a message and we’ll take it from there.