Services and Categories Management
The BookingPress Services page allows you to view, create, edit, and manage all your services. These Services show your actual services that customers can book.
Here we’ll show you a quick overview of Manage Service and Manage Category.
How to Manage Services & Categories in BookingPress?
You can manage all your services and their categories from WordPress → BookingPress → Services.
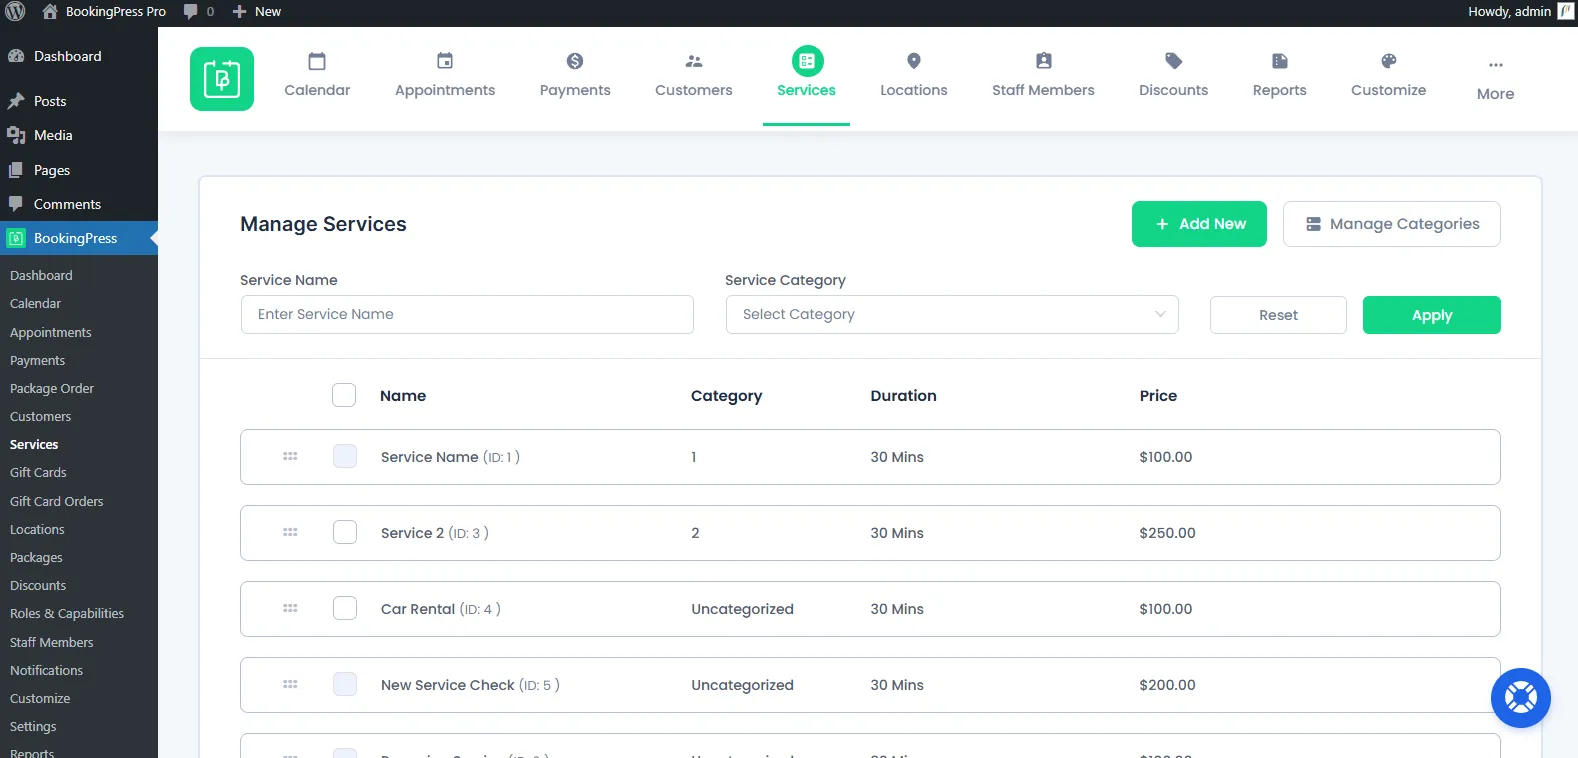
Manage Services
The Manage Services allows you to view and control all services created. From here, you can:
- See all your existing services in a structured list.
- Search services by name with the search bar.
- Filter services by selecting a category from the dropdown list.
- Perform quick actions such as edit, duplicate, delete, and more.
This section acts like your central control panel for all the services you want to manage.
Manage Categories
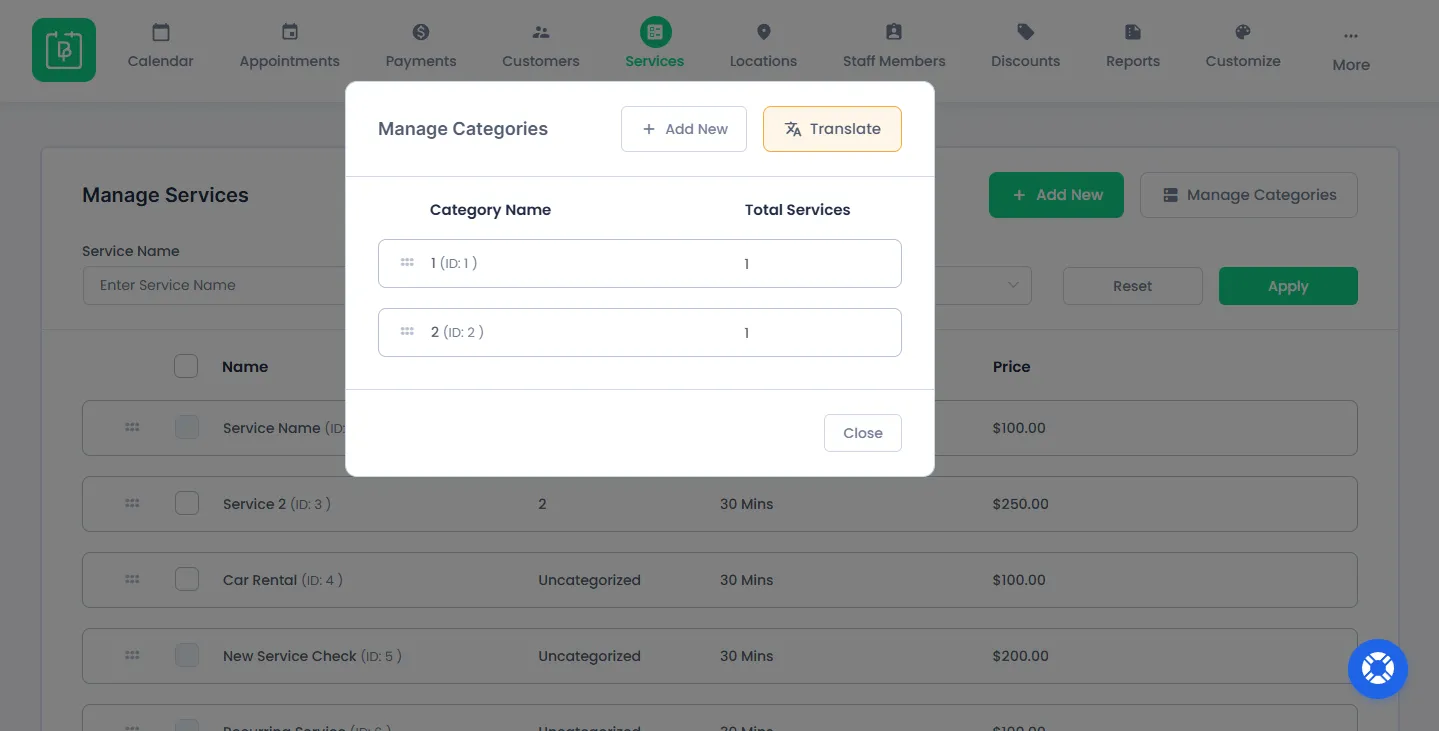
Inside the Manage Services page, you’ll have the option for Manage Categories on the top right corner. It will help you organize services into structured groups based on their type or purpose.
Click on it and a popup box will appear. It acts as your mini management section for categories. Here, you can:
- See all existing service categories.
- Create new categories using the “Add New” button.
- Edit or delete existing categories.
Categories for services improves service visibility and make booking management easier for both admins and customers. Your customers can easily search or shortlist services by category inside the booking form.
What Actions Can You Perform On a Service?
In BookingPress, each service comes with a set of quick actions that help you manage it directly from the service list without opening full settings every time. It’s more of a shortcut for managing services fast with ease.
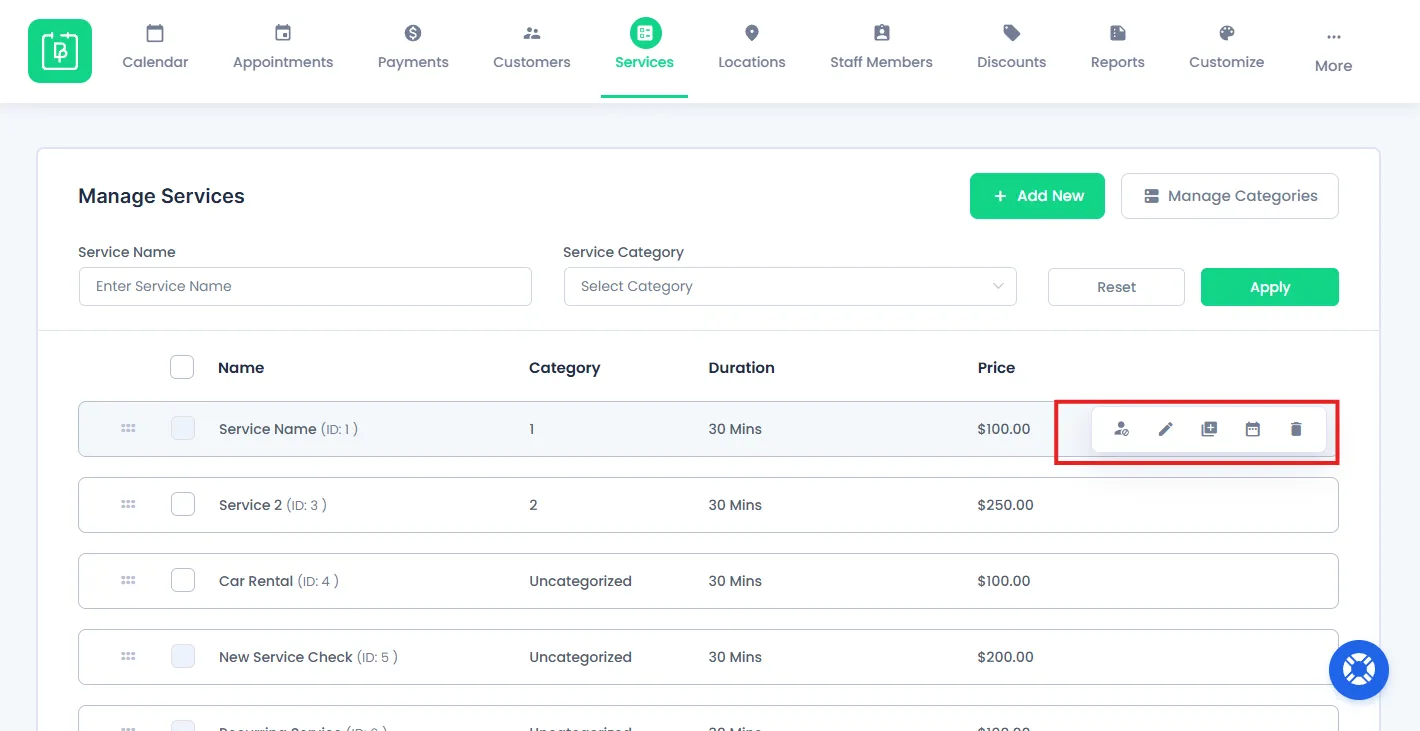
When you hover over a service, you will see action options such as:
Enable / Disable Service
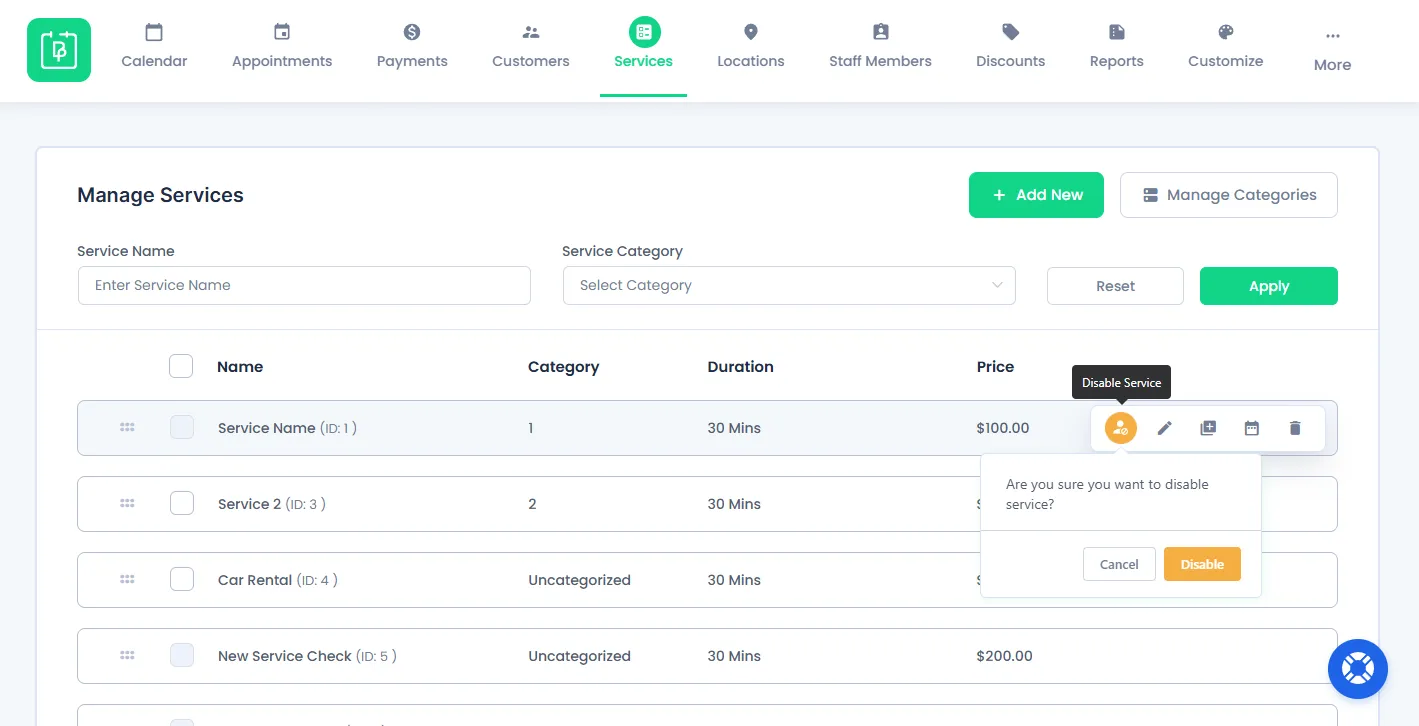
This option allows you to enable or disable any of the services from the list.
If you disabled any particular service, that service will not be shown at the front-end. Only the services which are enabled will be shown to customers at the front-end booking form.
Disable/Enable Service option is useful when a particular service is not available for a specific period of time. In that case, deleting a service makes no sense or else you’ll have to set everything up again.
Edit Service
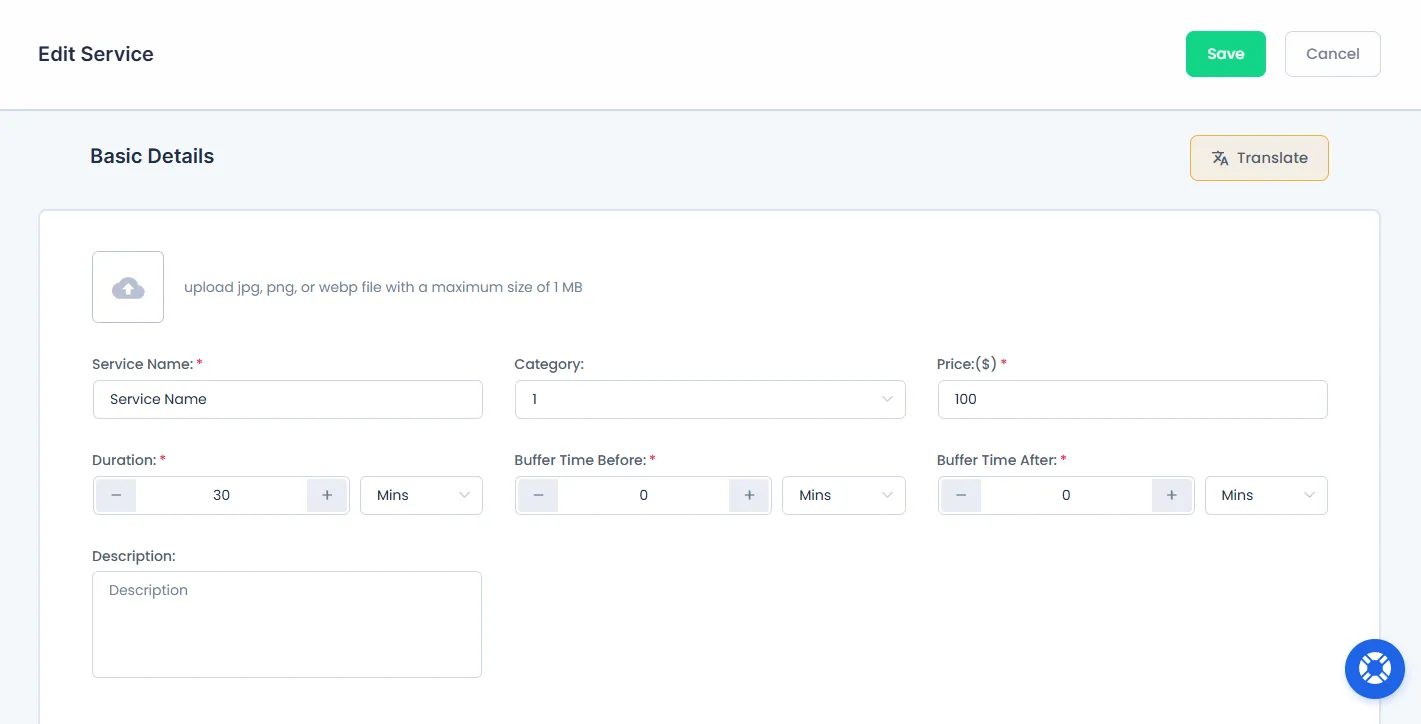
The Edit option will redirect you to the edit page of the service. Here, you can change any detail you want and click on “Save“.
All the existing data will be shown already inside the Edit Service form so you don’t have to fill the all service data again.
Duplicate Service
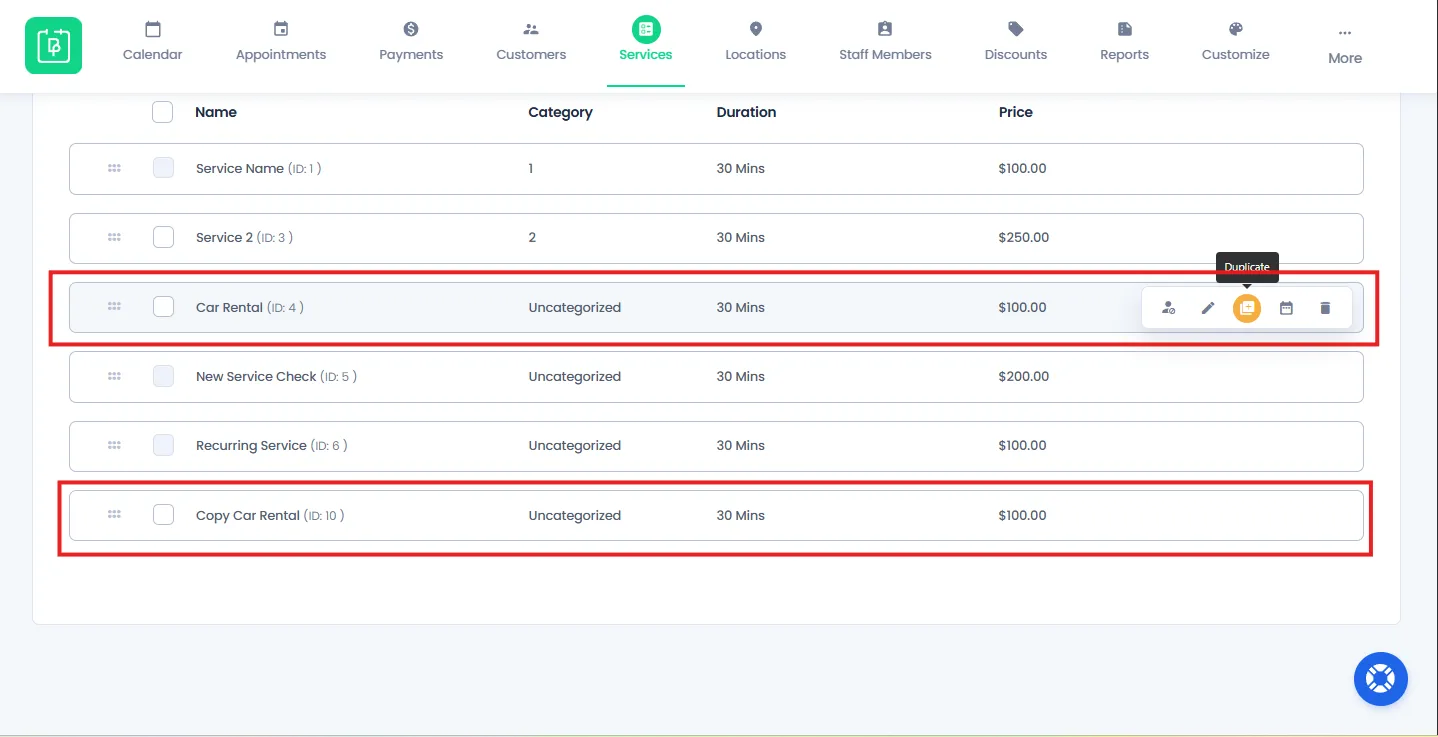
When you click the Duplicate option by hovering on any of the services, the system will copy all of its data, make a new service and open an Edit Service Page.
In simple words, it allows you to add a duplicate service of the existing service.
This Duplicate option is very useful when all your services have almost the same settings, only a few basic changes are needed. It saves you from the trouble of entering the same data again and again.
Service Shift Management (Working Hours & Availability)
Service Shift Management allows you to define when a service is available for booking. It makes the appointments scheduled only within the working hours and availability rules you set.
This option helps you avoid booking conflicts, maintain proper scheduling, and manage business hours availability per service.
Just click on the Shift Management icon, and you’ll automatically go to the Working Hours page for setting up custom working hours.

From here, you can control:
- Daily working hours of a service.
- Weekly availability. (which days are active or off)
- Break times between working hours.
- Special working days with custom timings.
- Holiday schedules for complete or partial service blocking.
Please Note: You can even set custom working hours as per location if the Location Addon is activated.
How do you configure hours of working?
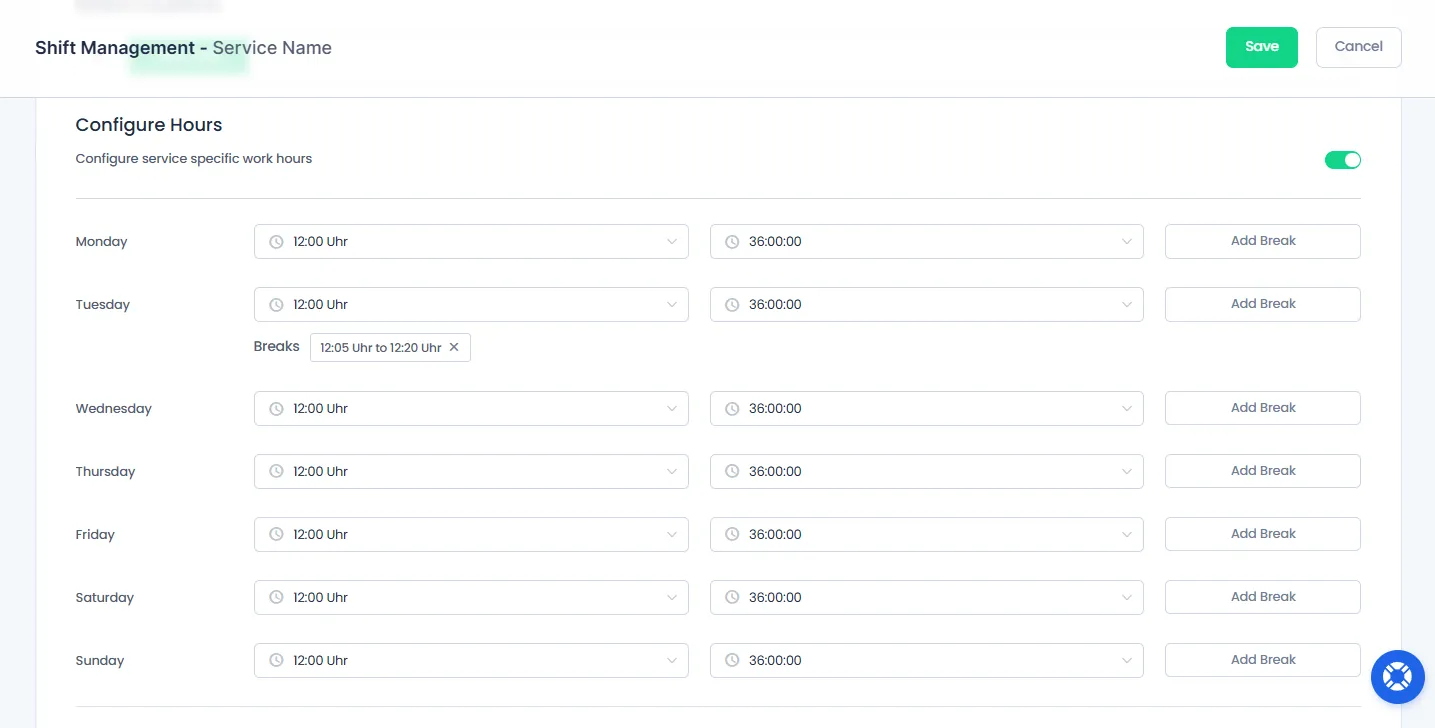
First of all, toggle on the “Configure Hours” section for configuring service specific work hours. You can set working hours for each day of the week like this:
- Monday to Friday: Fully working hours as set in the General Settings.
- Saturday & Sunday: Disabled by default, but can be enabled if needed.
Further, you can add break times to allow non-working intervals within a shift.
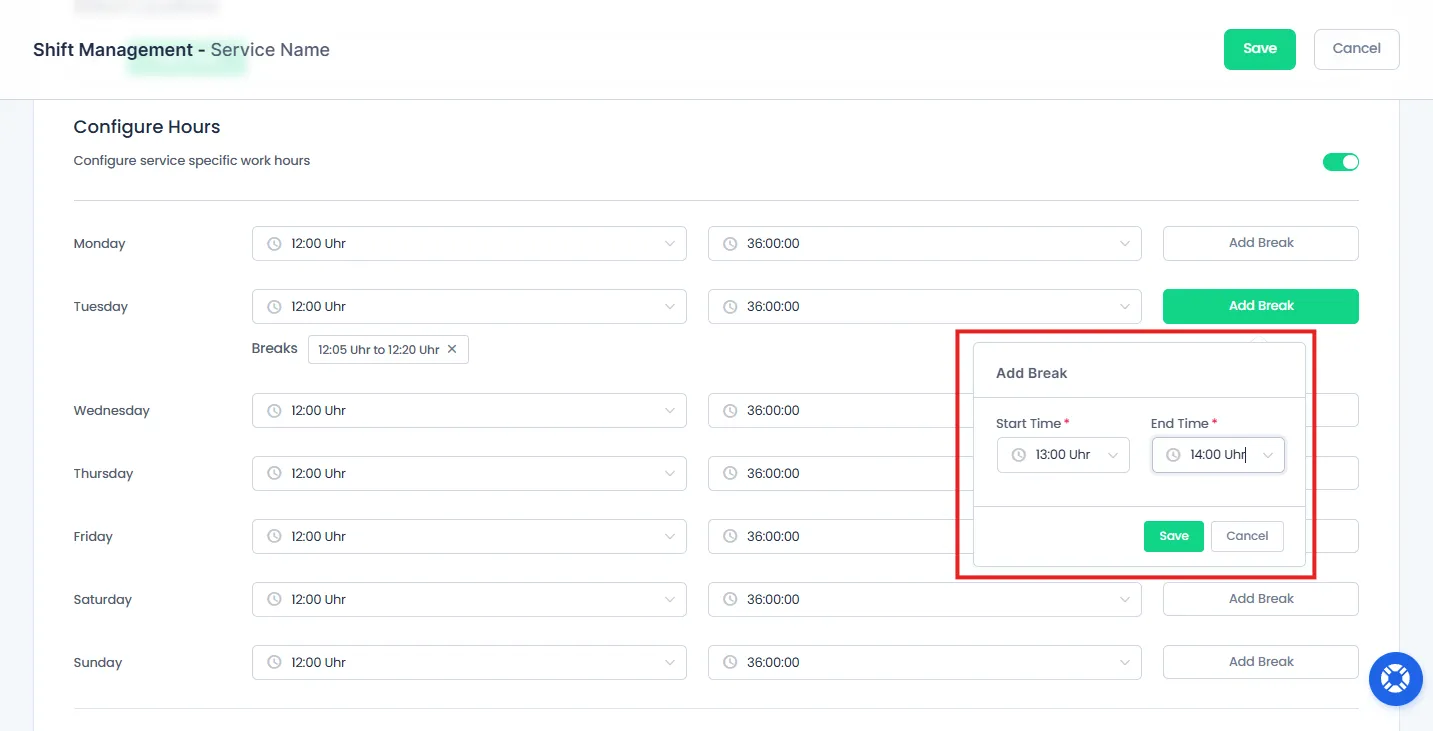
For example:
- Morning shift: 9:00 AM – 1:00 PM.
- Break: 1:00 PM – 2:00 PM.
- Evening shift: 2:00 PM – 6:00 PM.
This helps to make sure your staff gets proper rest periods between appointments.
What are special working days?
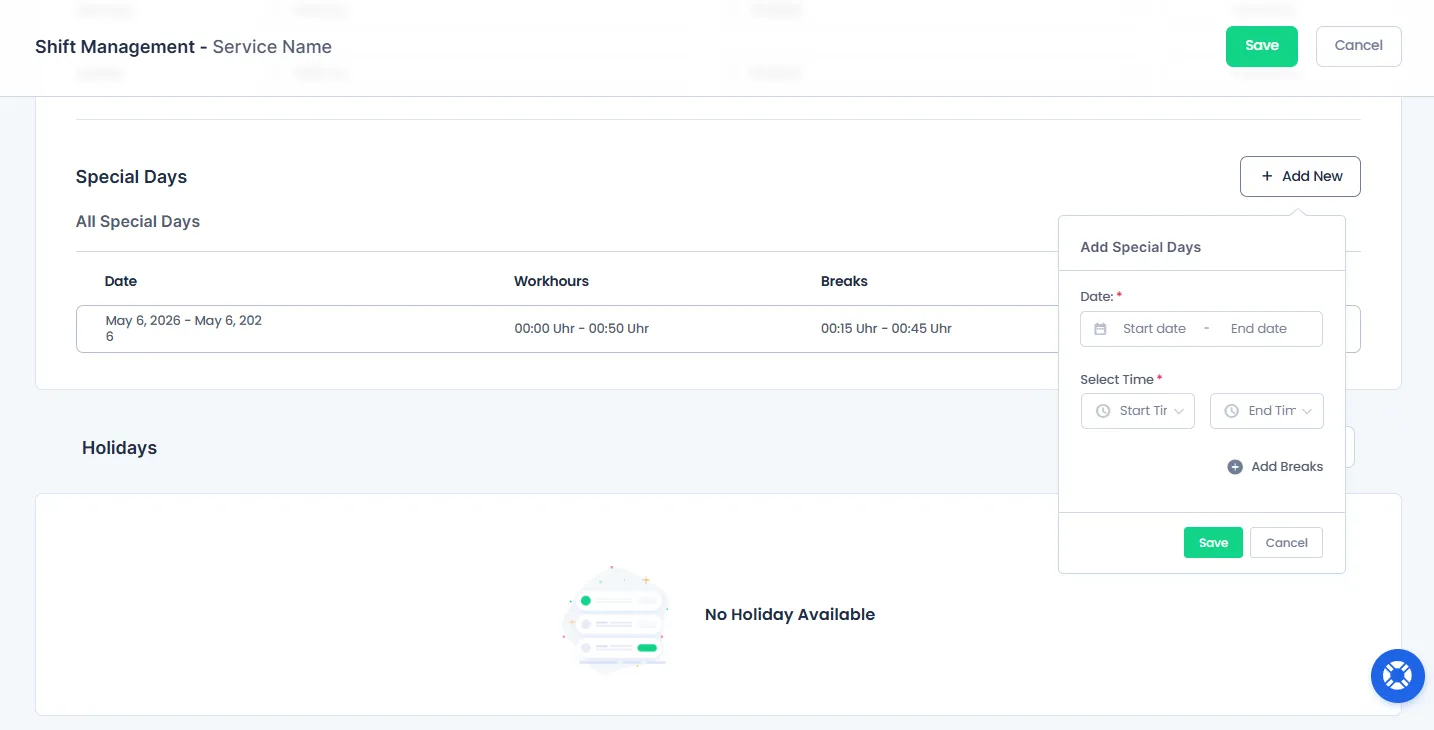
After “Configure Hours”, the next section below is “Special Days”. This section lets you override normal schedules for specific dates or ranges. You can:
- Set custom working hours for selected days.
- Apply different shift timings for specific dates.
- Add exceptions to normal weekly schedules.
This feature is best for seasonal changes, events or temporary schedule adjustments.
How do holidays work in Service Shift Management?

At last, you’ll see the “Holidays” section. Here you can set holidays to block availability for a service.
Holiday options include:
- Set start and end date of holiday.
- Holiday Name.
- Repeat holidays daily, weekly, monthly, or yearly.
- Choose the end Duration condition:
- Forever.
- Specific No. of Times.
- Until a particular date.
During holidays, the specific service will not be available for booking.
Delete Service
Wondering how to delete a service in BookingPress?
Go to the BookingPress → Services. Now hover over the service and click the Delete icon from the action bar.
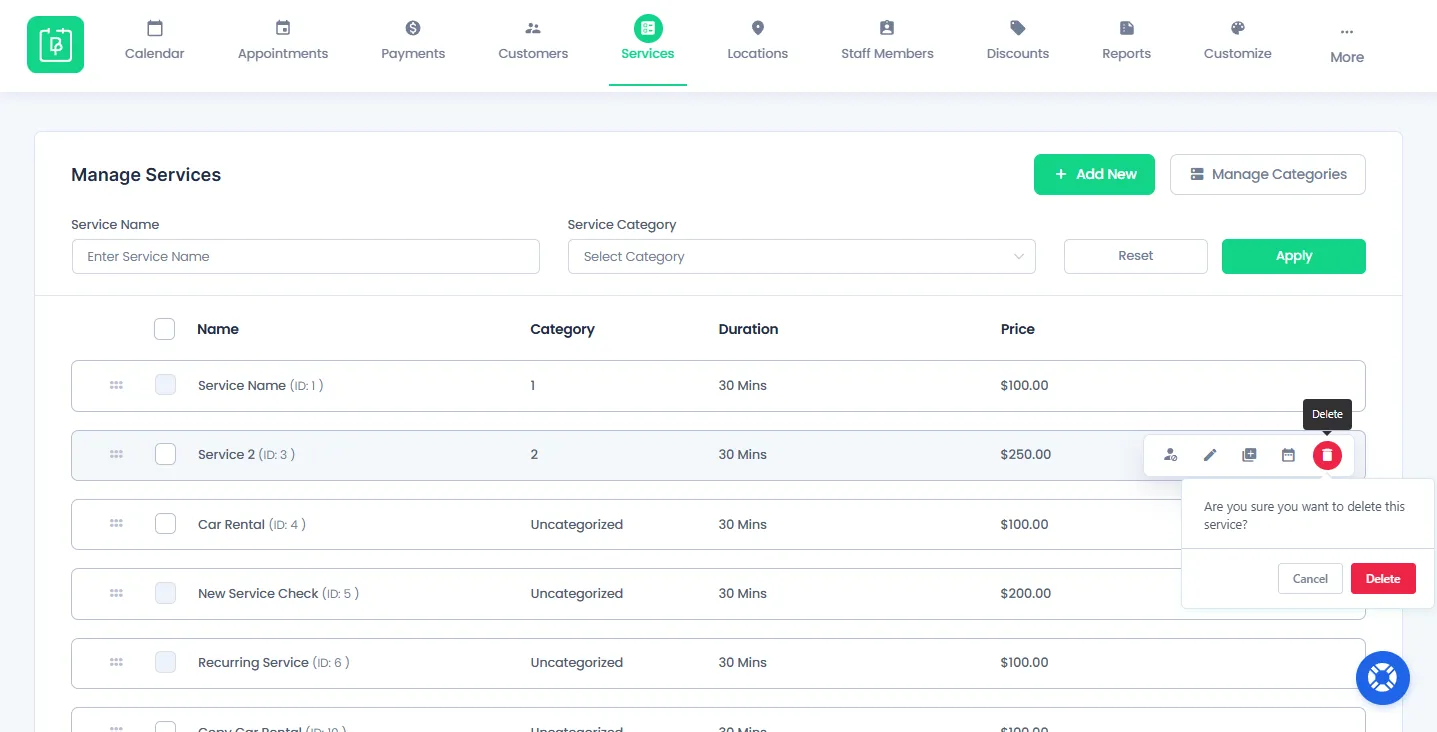
After clicking the Delete icon, a confirmation popup box will show up. Click on the Delete button inside the popup to finalize the delete operation.
Remember once you delete a service, you can’t recover it.
How Do You Add a Service In BookingPress?
You can create a new service in BookingPress from the Services page. Inside the Services page, click on the “Add New” button from the top right corner of the page.
It’ll open a new Add Service page where you can enter all the details of your service.
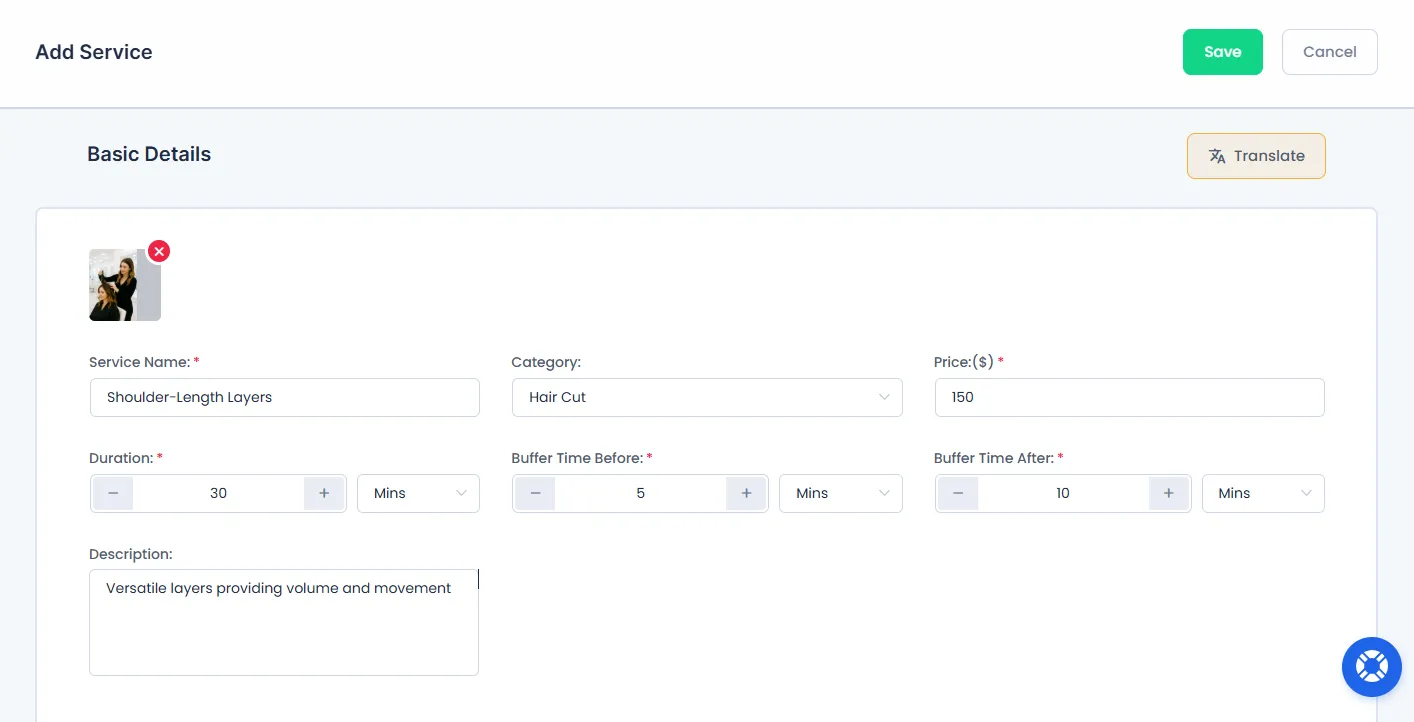
First, let’s start with the Basic Details section:
Service Image:
You can add an astonishing photo related to the service which helps clients to recognize the particular service at a look. Remember you can only upload jpg, png, or webp file with a maximum size of 1 MB.
Service Name:
Add the name of the service you are going to offer to the clients.
Category:
Next to the service name, you’ll see the option of category. Simply pick the related category of that service from the dropdown menu. You can also create a new category from here by selecting the “Add New” option from the dropdown.
Price:
If you are offering a paid service, just enter the price you want to set for your service. If you want to offer free services, then simply add 0 in the price field. This will make the payment method disappear on the front end booking form.
Please Note: You will see the currency symbol along with the price label. You can change it from the BookingPress → Settings → Payments Settings → Currency.
Duration:
You can set the time duration for any of the services in three different aspects :
- Minutes.
- Hours.
- Days.
You will see the time slots in the duration options which are defined in the “Default Time Slot Step” from “General Settings”.
Please Note: If you change the “Default Time Slot Step” and if an appointment is already booked for that service, it will not affect existing appointments. But it will create some issues in the booking process for new appointment bookings, as your newly set time slot will not match durations.
Buffer Times in-between Services
These options help you to set the time around the appointment of any service.
- “Buffer Before Time” is the time which will be required by the Service Provider before the service starts according to your schedule.
- “Buffer After Time” is the time which will be required of the Service Provider after the service ends. It’s mostly either for resting or to wind up the things of the service.
You can set the “Buffer Time Before” and “Buffer Time After” duration in minutes or hours, as per your requirement, individually for every service.
Description:
You can write a few sentences about your service so clients can understand what they’re getting exactly.
This is it. These are all the basic details you need to create a service in BookingPress. Once done, simply reach the “Save” button, and your service now will show in the booking form.
How to Configure Advanced Settings For a New Service?
While adding or editing a service, BookingPress offers several advanced settings that help you control availability, pricing flexibility, booking rules and overall service behavior.
These options inside the Add Service page allow you to fine-tune how your service works in real booking scenarios.
Multiple Quantity For Services

Multiple Quality Addon allows customers to book an appointment for more than one person. For example, a yoga class can accept 10 participants per session. If a customer selects quantity = 3, it will reserve 3 spots from the total capacity.
In simple words, it is useful for creating group bookings or services that can be delivered to more than one person at the same time.
After activation, you can configure it from the BookingPress → Services → Add Service page.
Scroll down on the same Add Service page, and you’ll see the multiple quantity settings.
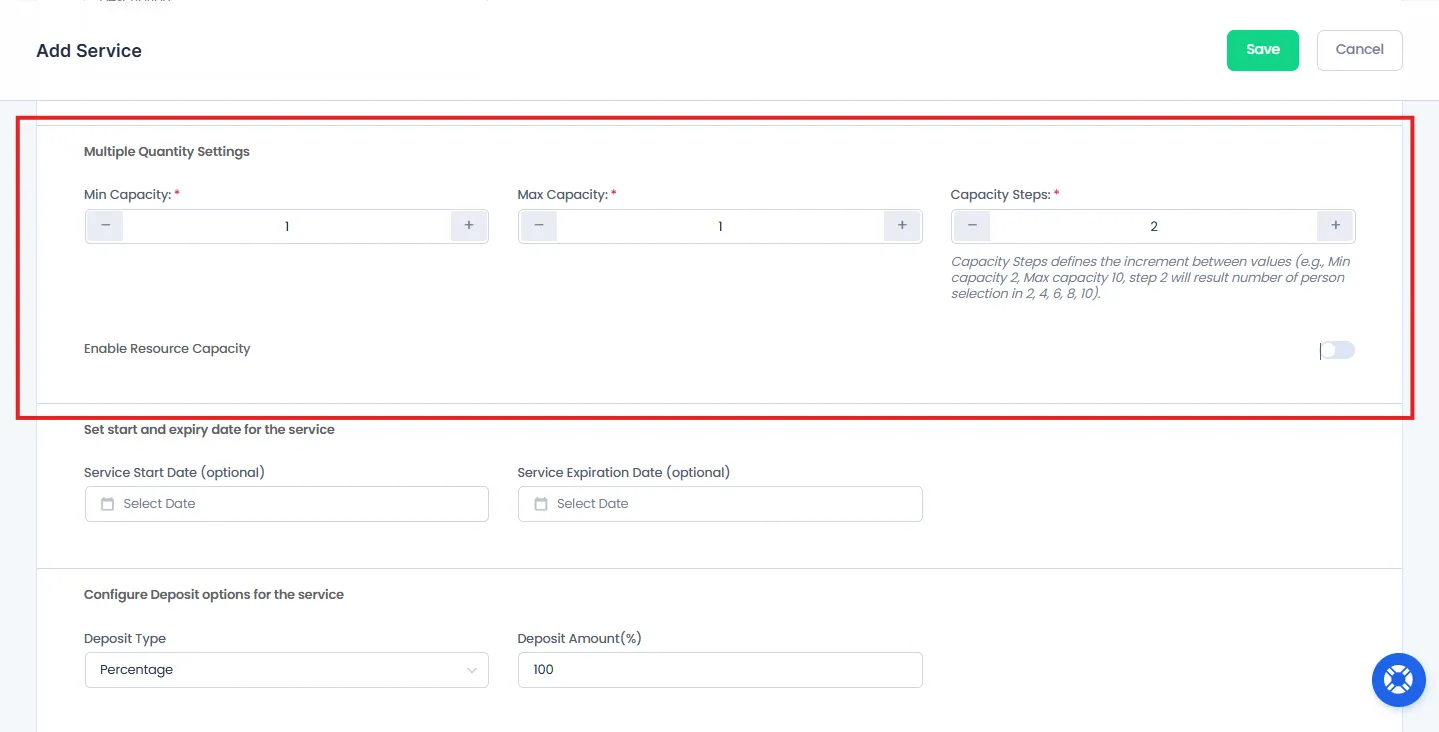
Remember: You’ll only see the Multiple Quantity Settings section if the Multiple Quantity Addon is activated.
Inside the Multiple Quantity Settings section, you can set:
- Min Capacity.
- Max Capacity.
- Capacity Steps.
- Enable Resource Capacity.
Minimum Capacity
This option allows you to set the minimum capacity needed for a service provider to offer a particular service. It makes sure that you must have at least the specified minimum capacity available before appointments are scheduled for that service.
You can set the minimum capacity individually for every service and service provider.
Maximum Capacity
This option allows you to set the maximum capacity of the service, like how many times a service provider can be able to provide the particular service. And as per the max capacity of the service provider, the appointments will be scheduled.
You can set the maximum capacity individually for every service and service provider.
Capacity Steps:
This option lets you set the increment between selectable capacity values during the booking process. It works in combination with the “Min Capacity” and “Max Capacity” to control the steps in which persons can be selected.
For example, if you set Min Capacity to 2, Max Capacity to 10, and Capacity Steps to 2, then customers will be able to select from the following person counts: 2, 4, 6, 8, 10.
You can set the Capacity Steps individually for every service, giving you full control over how your group bookings should be structured.
Enable Resource Capacity:
The Resource Capacity setting lets you control how many people can book a service at once without changing the service price. All you gotta do is simply Toggle it on. Now you’ll see a new “Resource Capacity” option appear below.
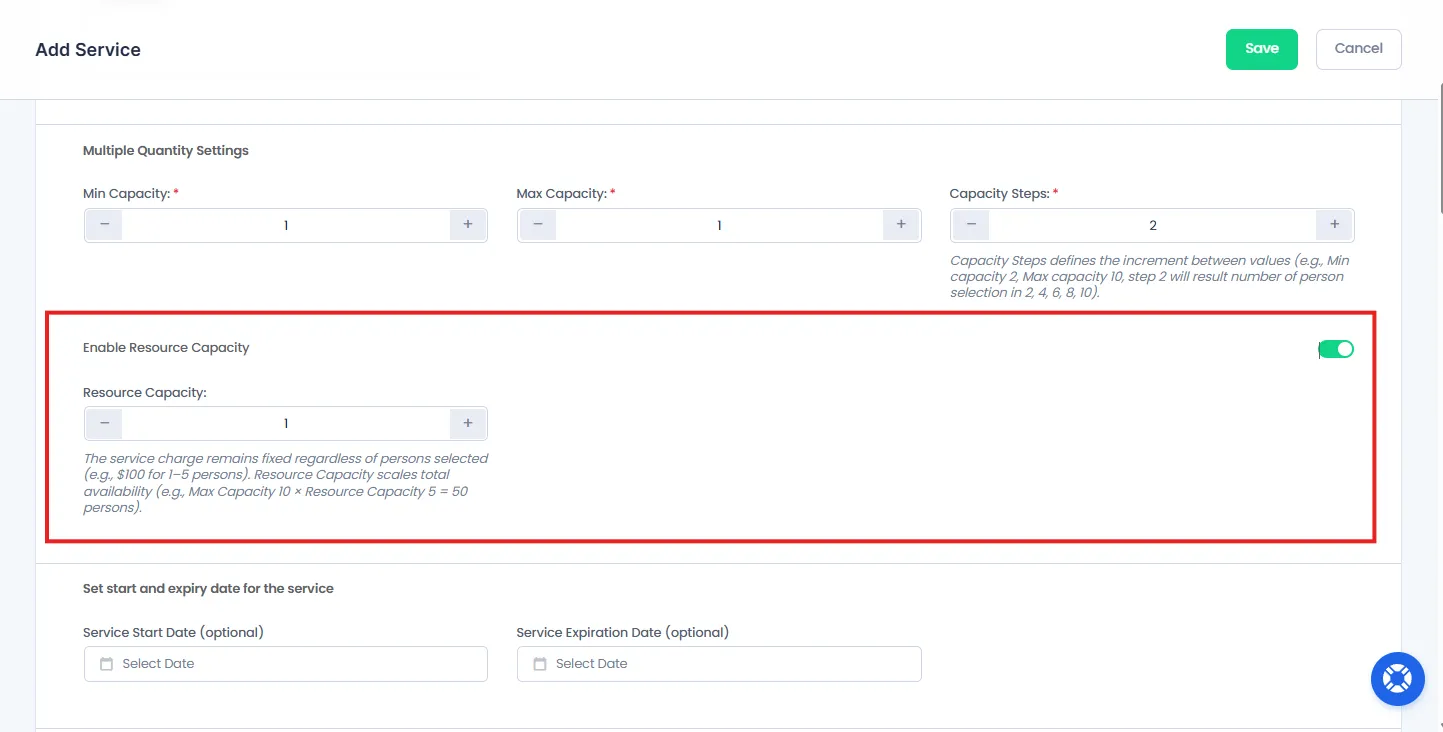
With this enabled, if a service costs $100, it remains $100 whether 1 or 5 people book it together.
How does it affect person selection?
Resource Capacity acts as the visible limit for how many persons a customer can select.
For example:
- Min Capacity = 1.
- Max Capacity = 10.
- Resource Capacity = 5.
Now customers can select up to 5 persons in the booking form, even though backend capacity allows more. (via Max Capacity)
How does Resource Capacity affect total availability?
Resource Capacity works together with Max Capacity to calculate total service capacity:
Total Capacity = Max Capacity × Resource Capacity.
For example:
- Max Capacity = 10.
- Resource Capacity = 5.
It means a total of 50 persons are allowed for that service at a time.
This feature is very useful when you charge per session, not per person, or you want fixed pricing with flexible group size. Also, it allows multiple people to attend the same booking session.
Set Start and Expiry Date for The Service (Optional)
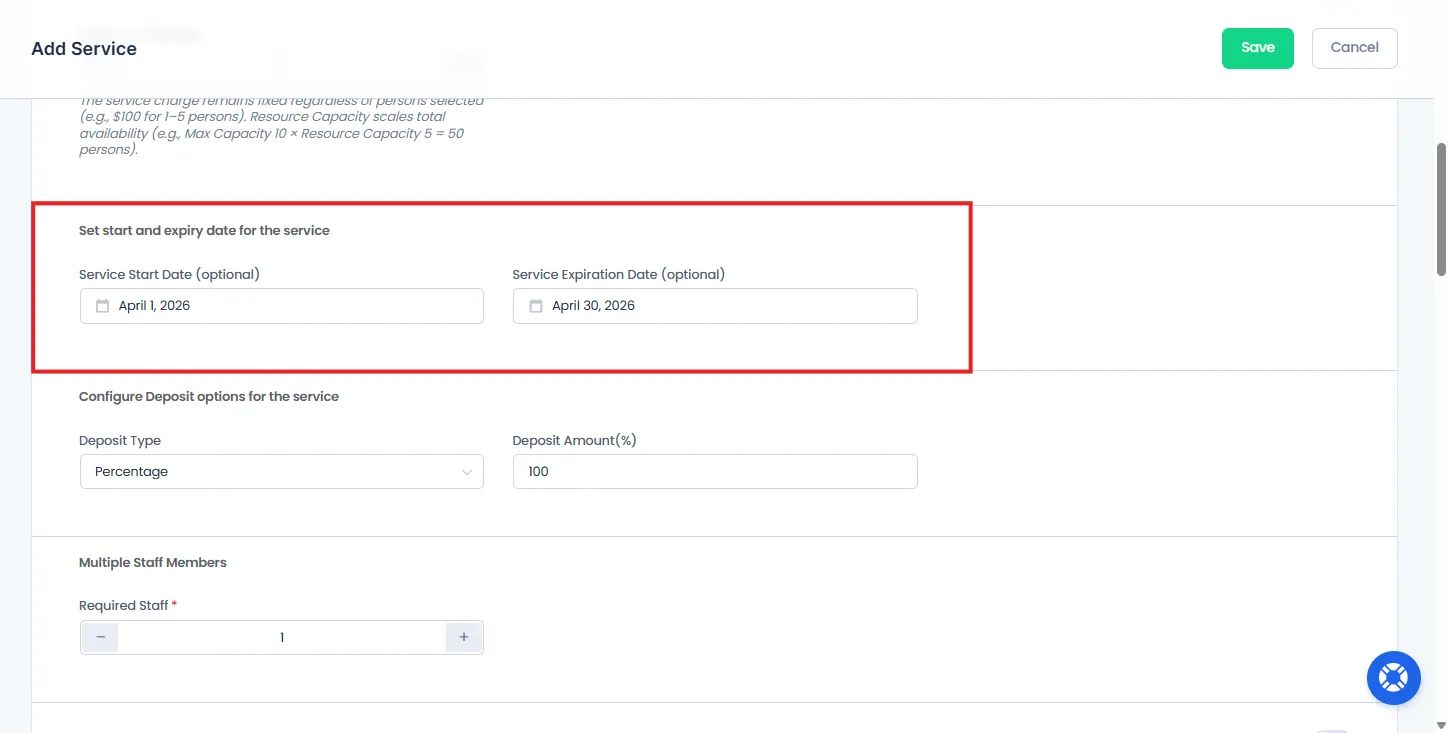
Next, we’ve a section to set the start and expiry date of a specific service:
Service Start Date:
This option allows you to set the start date of a service.
For example, if you have set the “Service Start Date” as 1st March 2026, the bookings for the service will only be accepted starting from 1st March 2026.
Before this date, the service will not be displayed in the front end booking form.
This feature helps you control when a particular service becomes available for booking. It’s actually great when you are above to launch a new service in your business.
Service Expiration Date:
This option will let you set the Expiration date of the service.
So far if you have set the “Service Expiration Date” as 27th February 2027, then the bookings for the service will only be accepted till 27th February 2027. After that, the service will not be shown in the front-end booking form.
This feature is very useful when you have a limited-time service available.
Deposit Type & Deposit Amount
Deposit Payment Addon allows you to accept partial payments. Means a little portion of full payment during the time of online booking, and the remaining later at the time of actual appointment at location.
Remember: You’ll only see the Configure Deposit options for the service section if the Deposit Payment Addon is activated.
After activation, you can set deposit payment from the BookingPress → Services → Add Service Page.
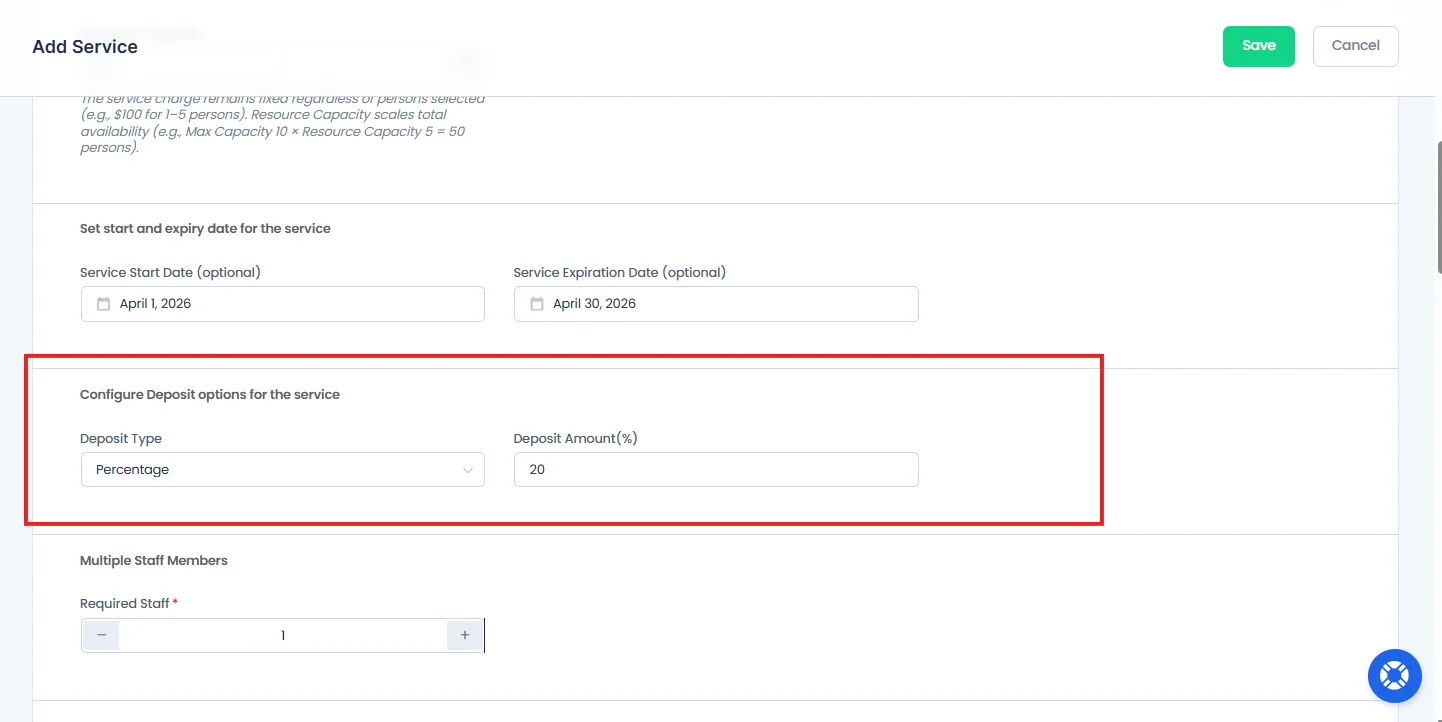
This payment option lets you set a custom deposit amount for each and every service. This is a great feature because not all services are the same. Some need advanced preparation so you can set more deposit amounts for it.
You can set the Deposit Type either as “Percentage” or “Fixed Amount“. Next to it, add the Deposit Amount you want clients to pay online during the time of online appointment booking.
Please Note: “Deposit Amount” will be calculated according to the “Deposit Type” set (Whether in Percentage or In actual Amount).
If you do not want to charge a single amount for booking any of the slots, simply set the Deposit Amount to 0.
Staff Member Management in Services
You can manage staff members as per the service in BookingPress:
Multi-Staff
Multi-Staff Addon allows you to assign more than one staff member per service for high-tier or costly services.
After activation, you can add multiple staff members for a particular service by going to BookingPress → Services → Add Service Page.
Remember: You’ll only see the Multiple Staff Members section only if the Multi Staff Addon is activated.
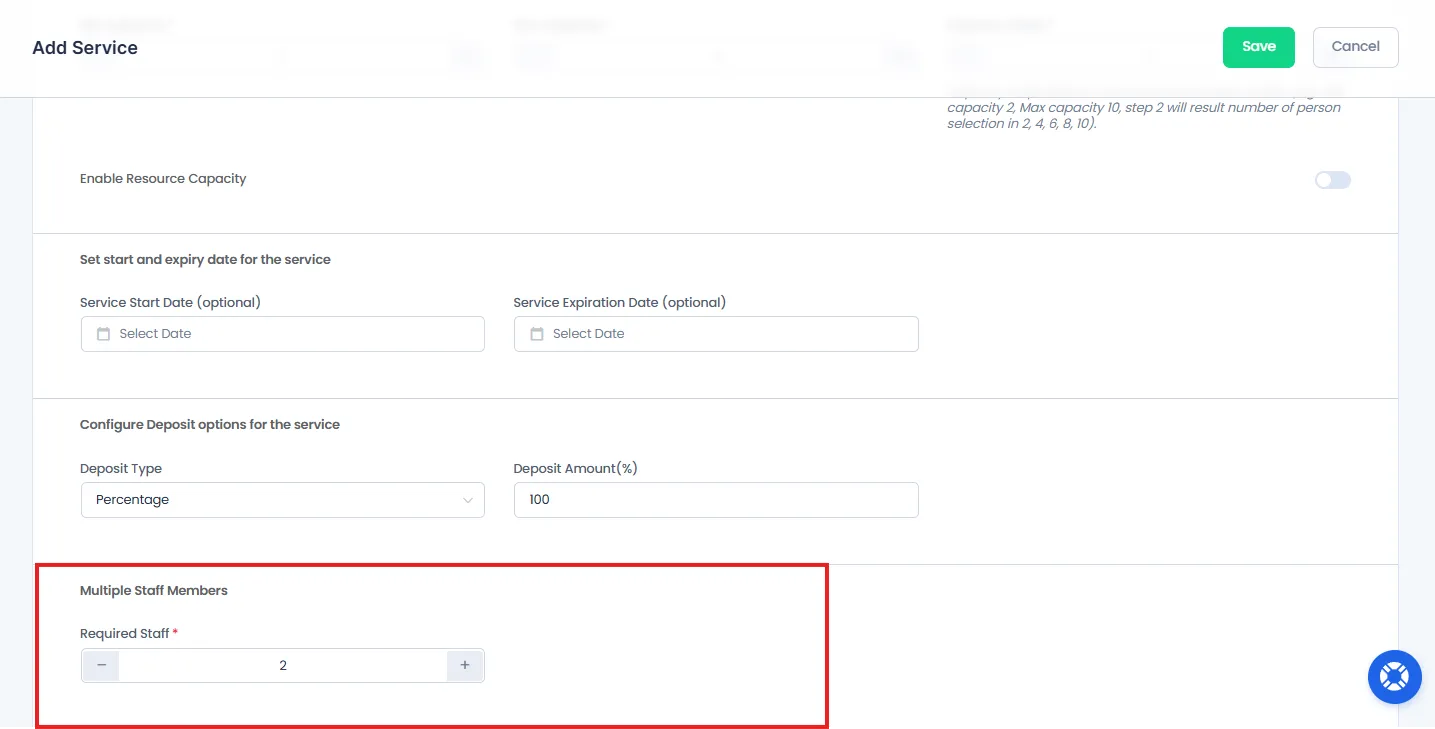
Here, simply enter the number of staff members needed for this particular service, and that’s it.
Staff Member
Staff Member Addon allows you to set and manage the Staff Members for each and every service.
After activation, you can assign multiple staff members to each service. This feature is useful because not every staff member is an expert in every service.
Remember: You’ll only see the Staff Members section only if the Staff Member Addon is activated.
Inside the BookingPress → Services → Add Service page, scroll down to the Staff Members section.
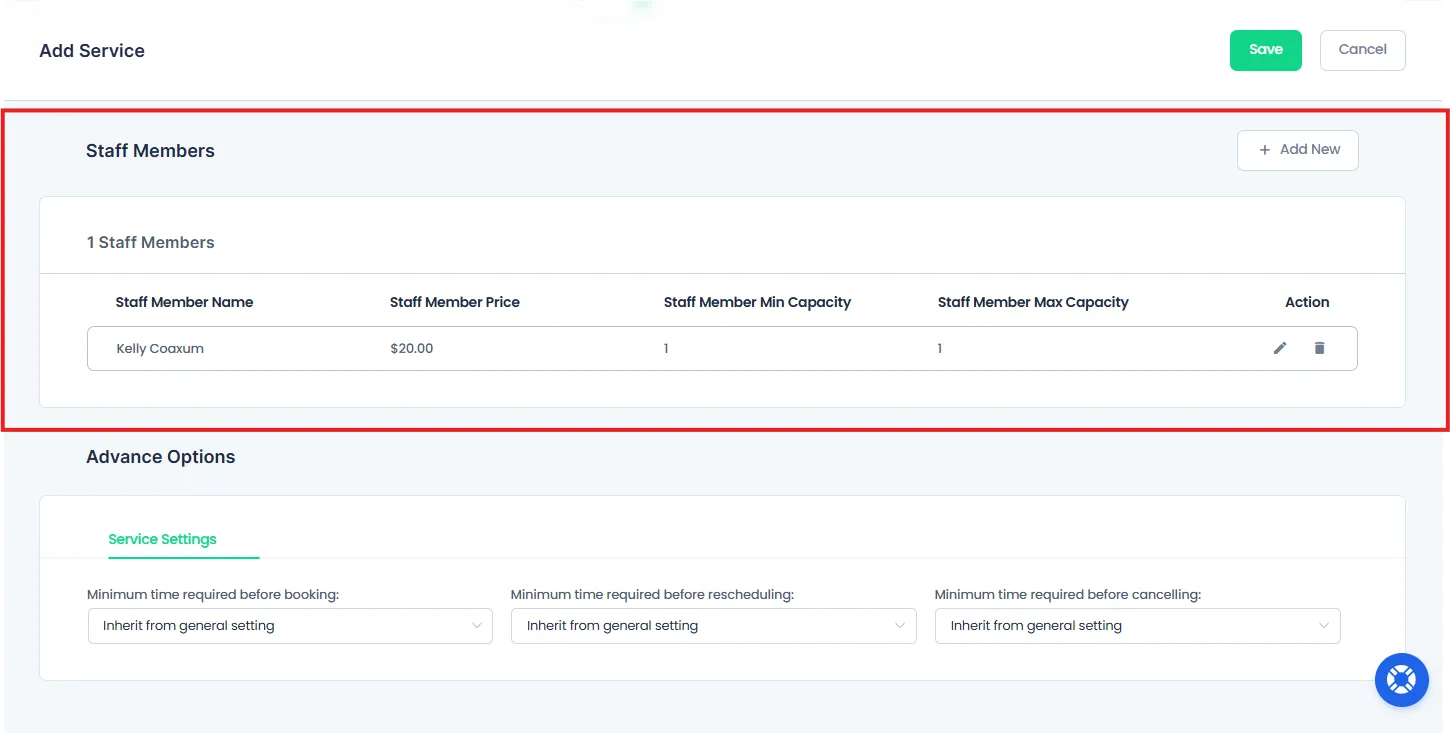
Now click on the “Add New” button. This will open a popup box with options for:
- Selecting Staff Member
- Selecting Location (If the Location Addon is activated)
- Min Capacity (If the Multiple Quality Addon is activate)
- Max Capacity (If the Multiple Quality Addon is activate)
- Price (Extra charge for the service)
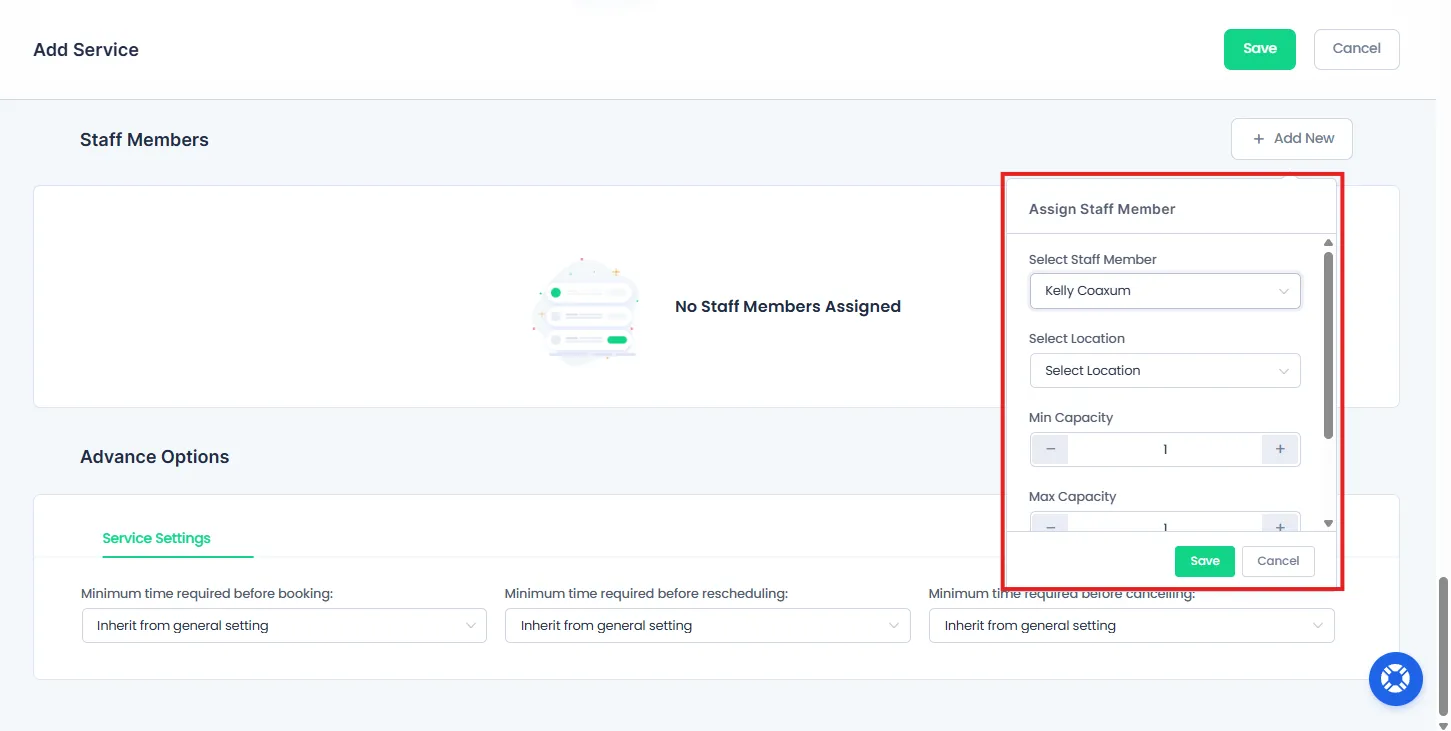
At last, click on the “Save” button, and the staff member record will be added.
Advanced Options (Service Settings)
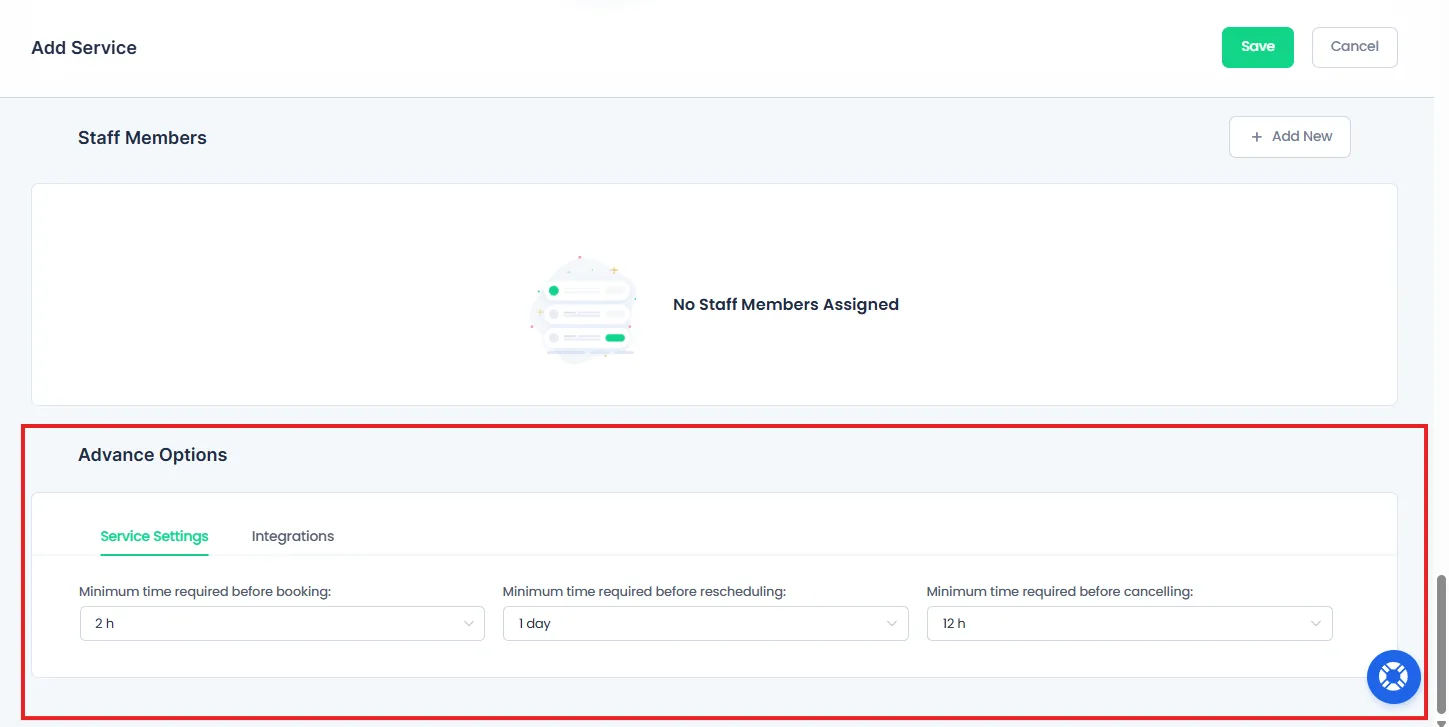
Service Settings allow you to control how early or late customers can book, reschedule or cancel appointments. These rules help you avoid any last minute changes and keep your schedule organized.
This section includes three key settings:
Minimum Time Required Before Booking
This setting decides how far in advance a booking must be made.
If a customer tries to book within the restricted time window, the booking will not be allowed
Ensures you have enough preparation time before each appointment
For example, if you set it to 2 hours, customers cannot book a service less than 2 hours before the time slot.
Minimum Time Required Before Rescheduling
This setting controls how late a customer can reschedule an appointment.
- Avoids last minute changes.
- Make sure the schedule stays organized.
Let’s say if you set it to 12 hours. customers must reschedule at least 12 hours before their appointment time.
Minimum Time Required Before Canceling
This setting decides how late a customer can cancel a booking. Enable it if you want to avoid last-minute sudden appointment cancellations.
Here’s how it works:
If set to 24 hours, cancellations are only allowed if made at least 24 hours before the appointment.
Time Format Options
For all three settings, you can define time in:
- Hours.
- Days.
- Weeks.
- Months.
Furthermore, you can also choose to inherit default values from General Settings if needed.
What Integrations are Available For Services?
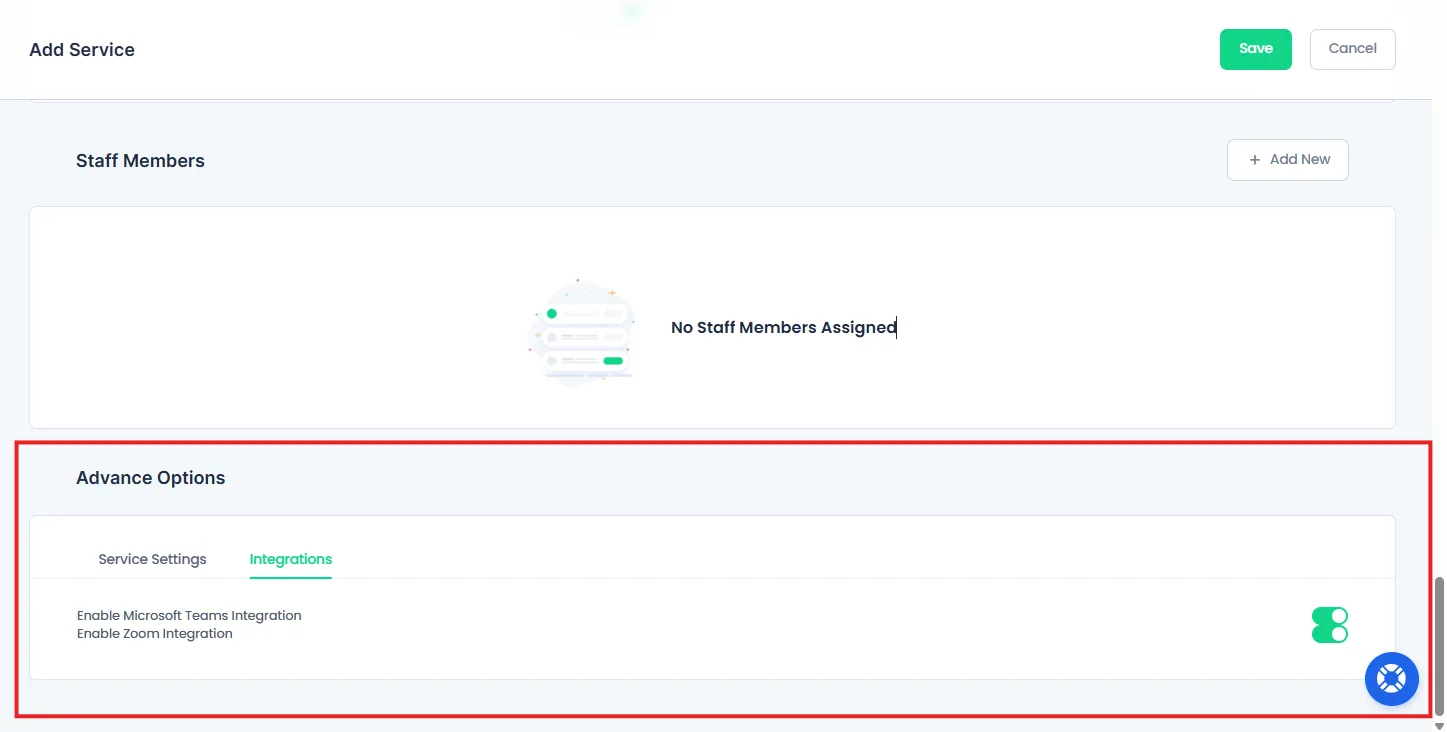
Inside the Advance Options, switch to “Integrations” to see all the integrations available to set inside the Services page when you are adding or editing a service:
These integrations allow you to take online sessions.
Additional Advanced Features (Add-ons)
Inside the Add Service page, some advanced service sections are available only when specific addons are activated. These sections will appear inside the Add/Edit Service page, including:
- Enable Recurring Appointments: Allows customers to book repeating appointments with frequency controls and occurrence limits.
- Configure Waiting list option for the service: Allows customers to join a waiting list when slots are fully booked (plus set max limit) for this particular service only.
- Happy Hours Pricing: Lets you offer discounted pricing for specific time slots or hours for this particular service.
- Location: Add services availability based on different locations.
For detailed setup instructions, feel free to take a look at the dedicated user-friendly guide for each addon.
Need a hand?
Our world-class support team is happy to help. Send us a message and we’ll take it from there.