Microsoft Teams Integration
Microsoft Teams Integration:
Note: Microsoft Teams required below licenses to use Team addon.
- Microsoft 365 Business (Basic / Standard / Premium)
- Microsoft 365 (E1 / E3 / E5)
First of all, you will need to get the “Client ID” and “Client Secret” for the Microsoft teams. You will be able to get the “Application (Client) Id” and “Client Secret” from Azure.
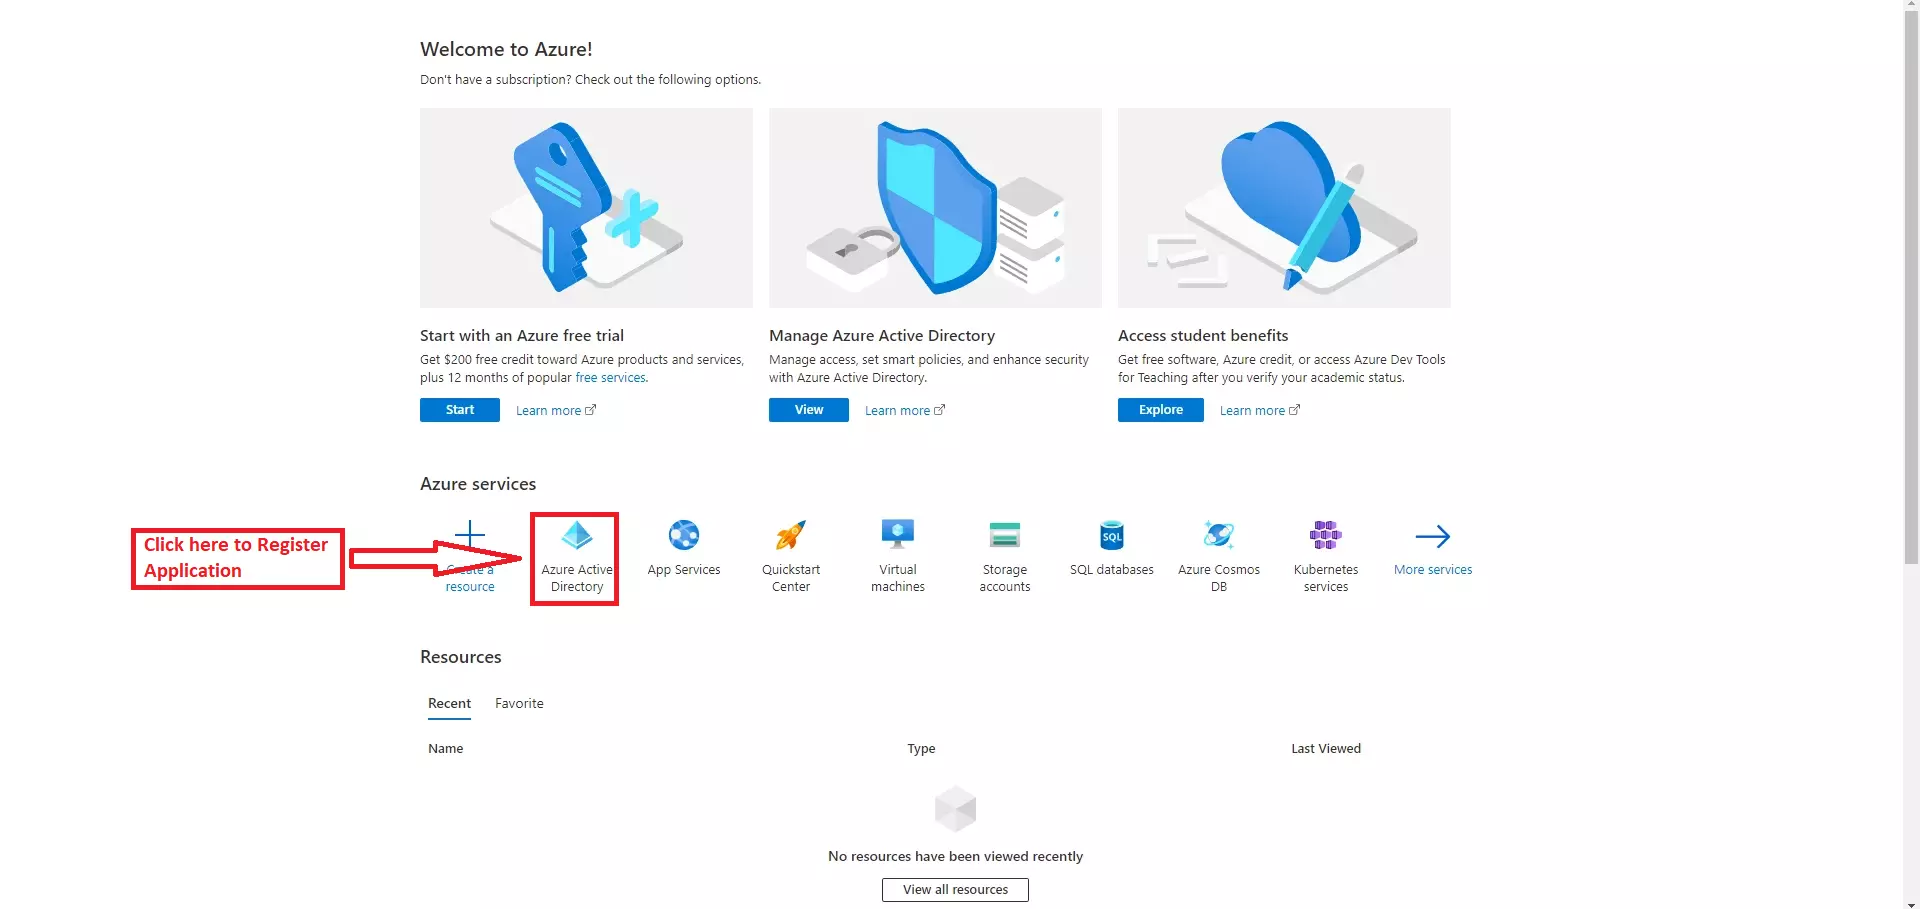
Register Application:
Go to the Register page and Register the application shown as below image :
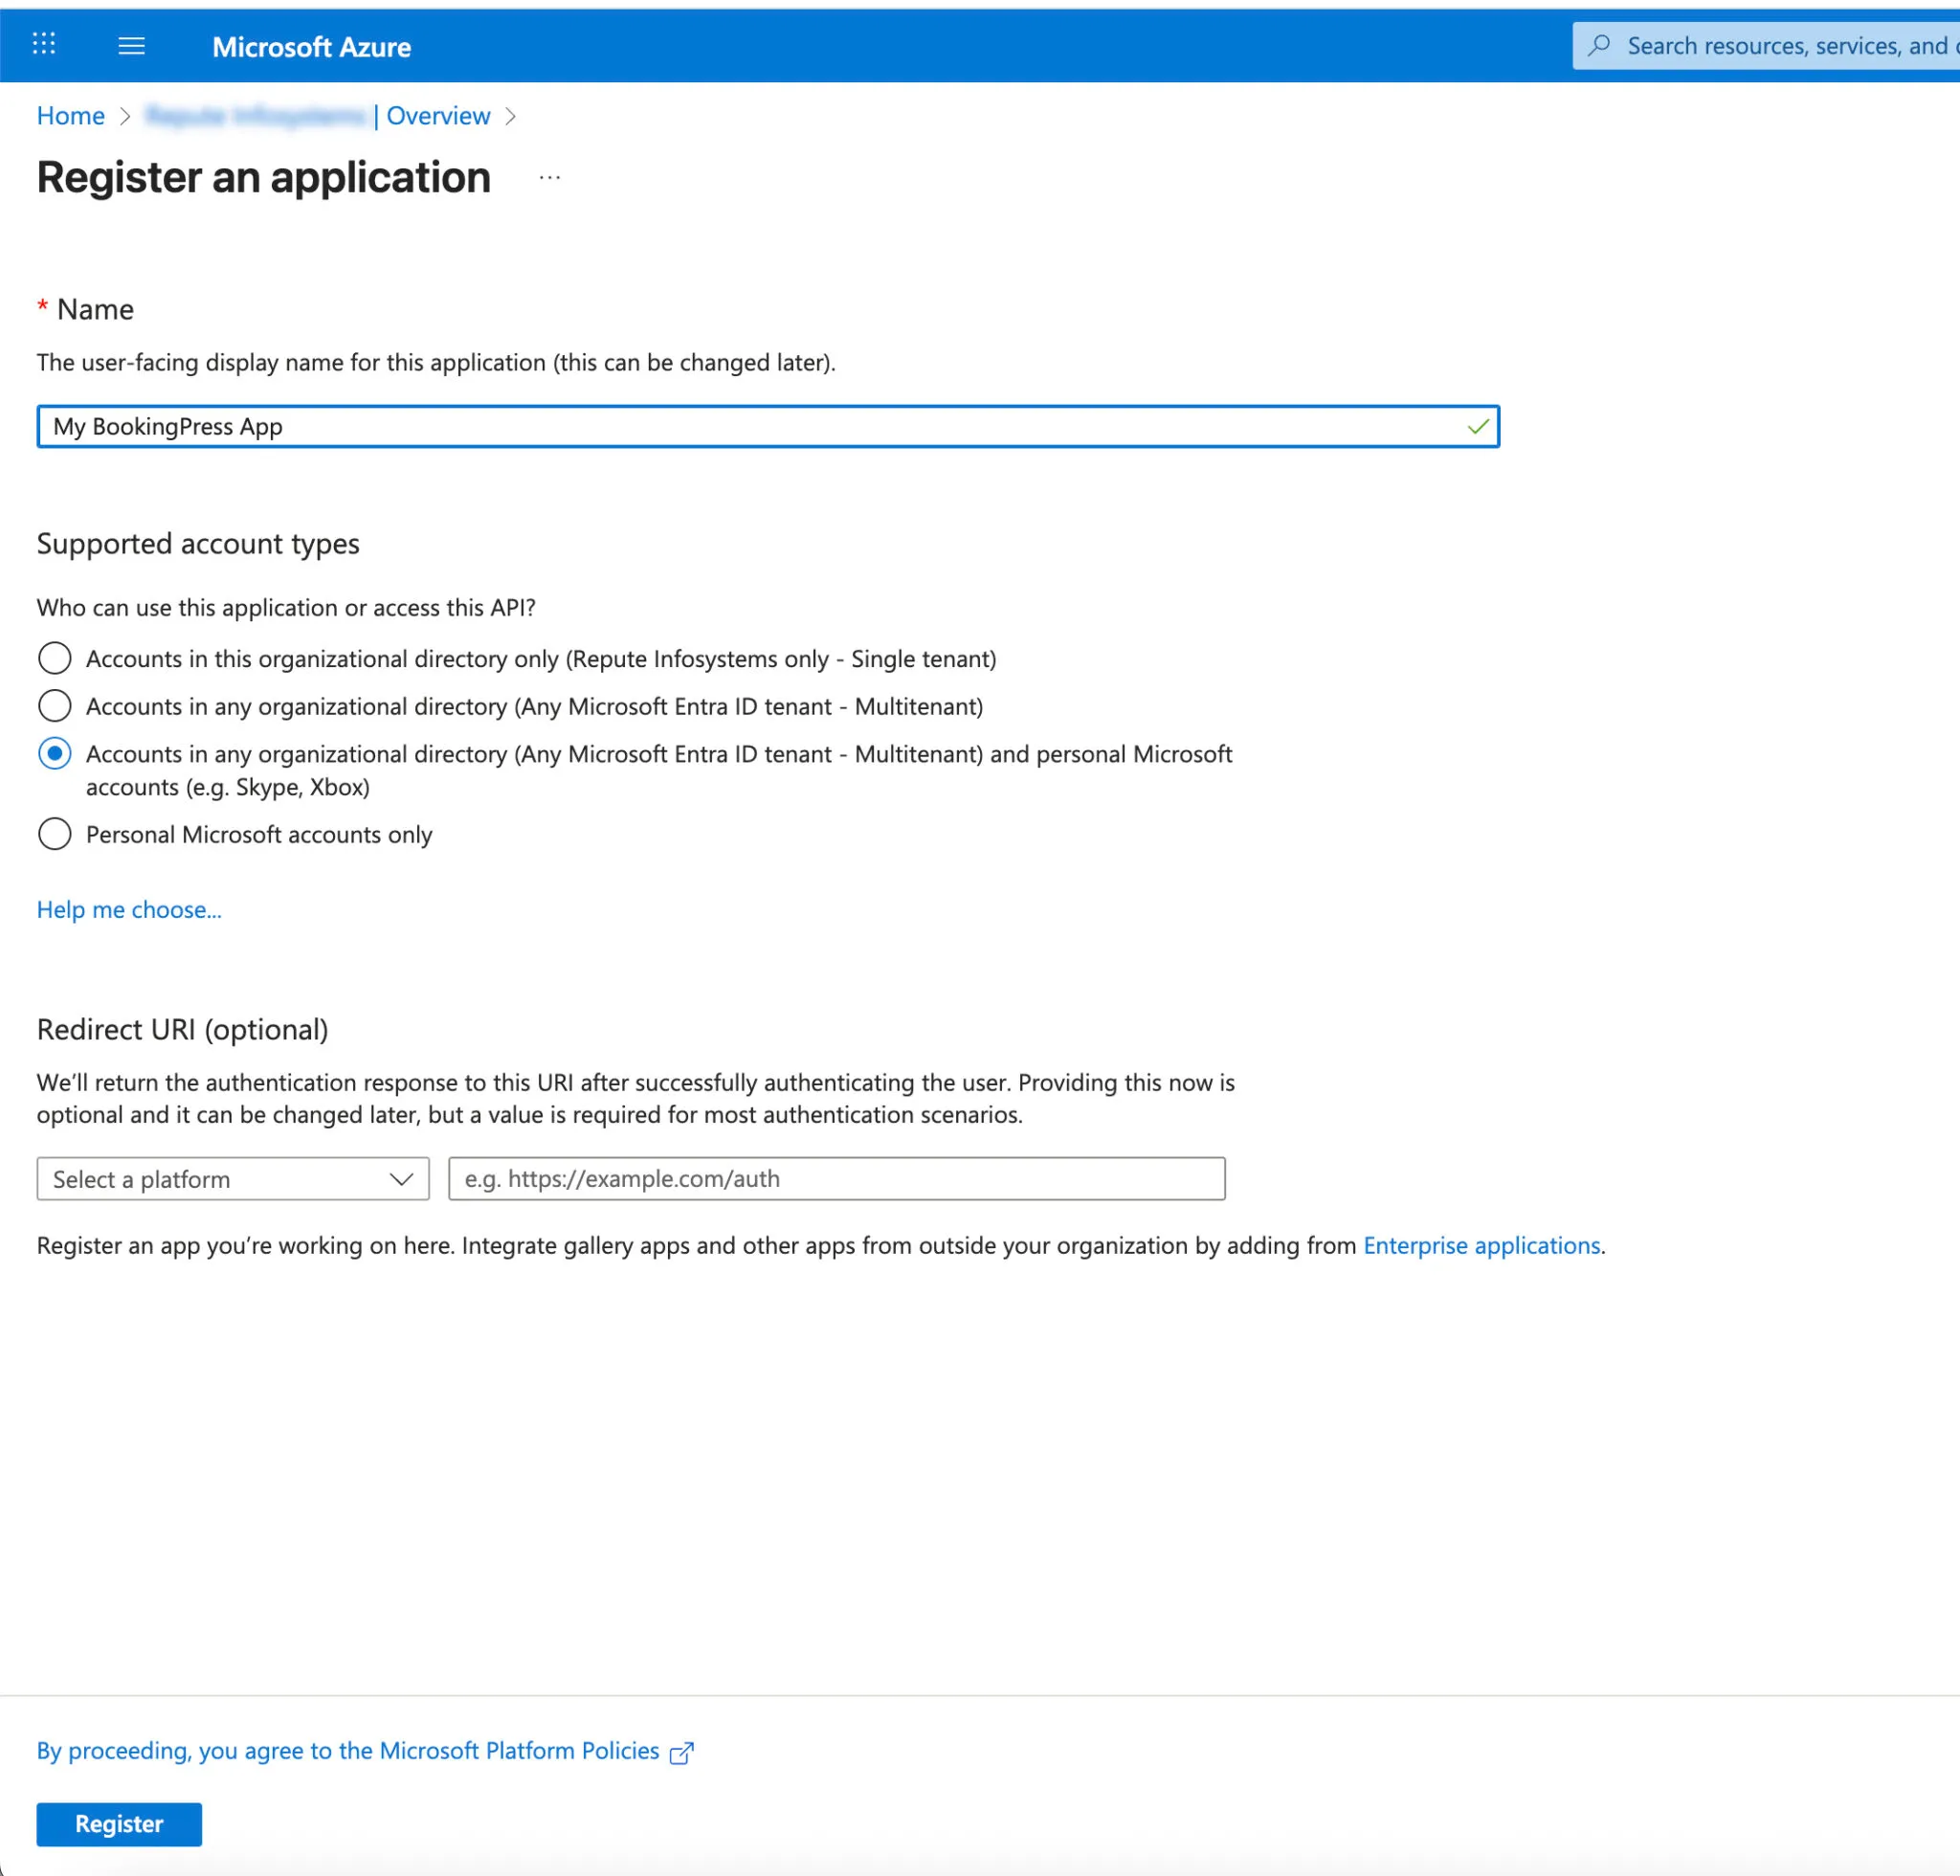
Add the Name field (required) and Redirect URL (optional) after then click on the register button shown as below image.
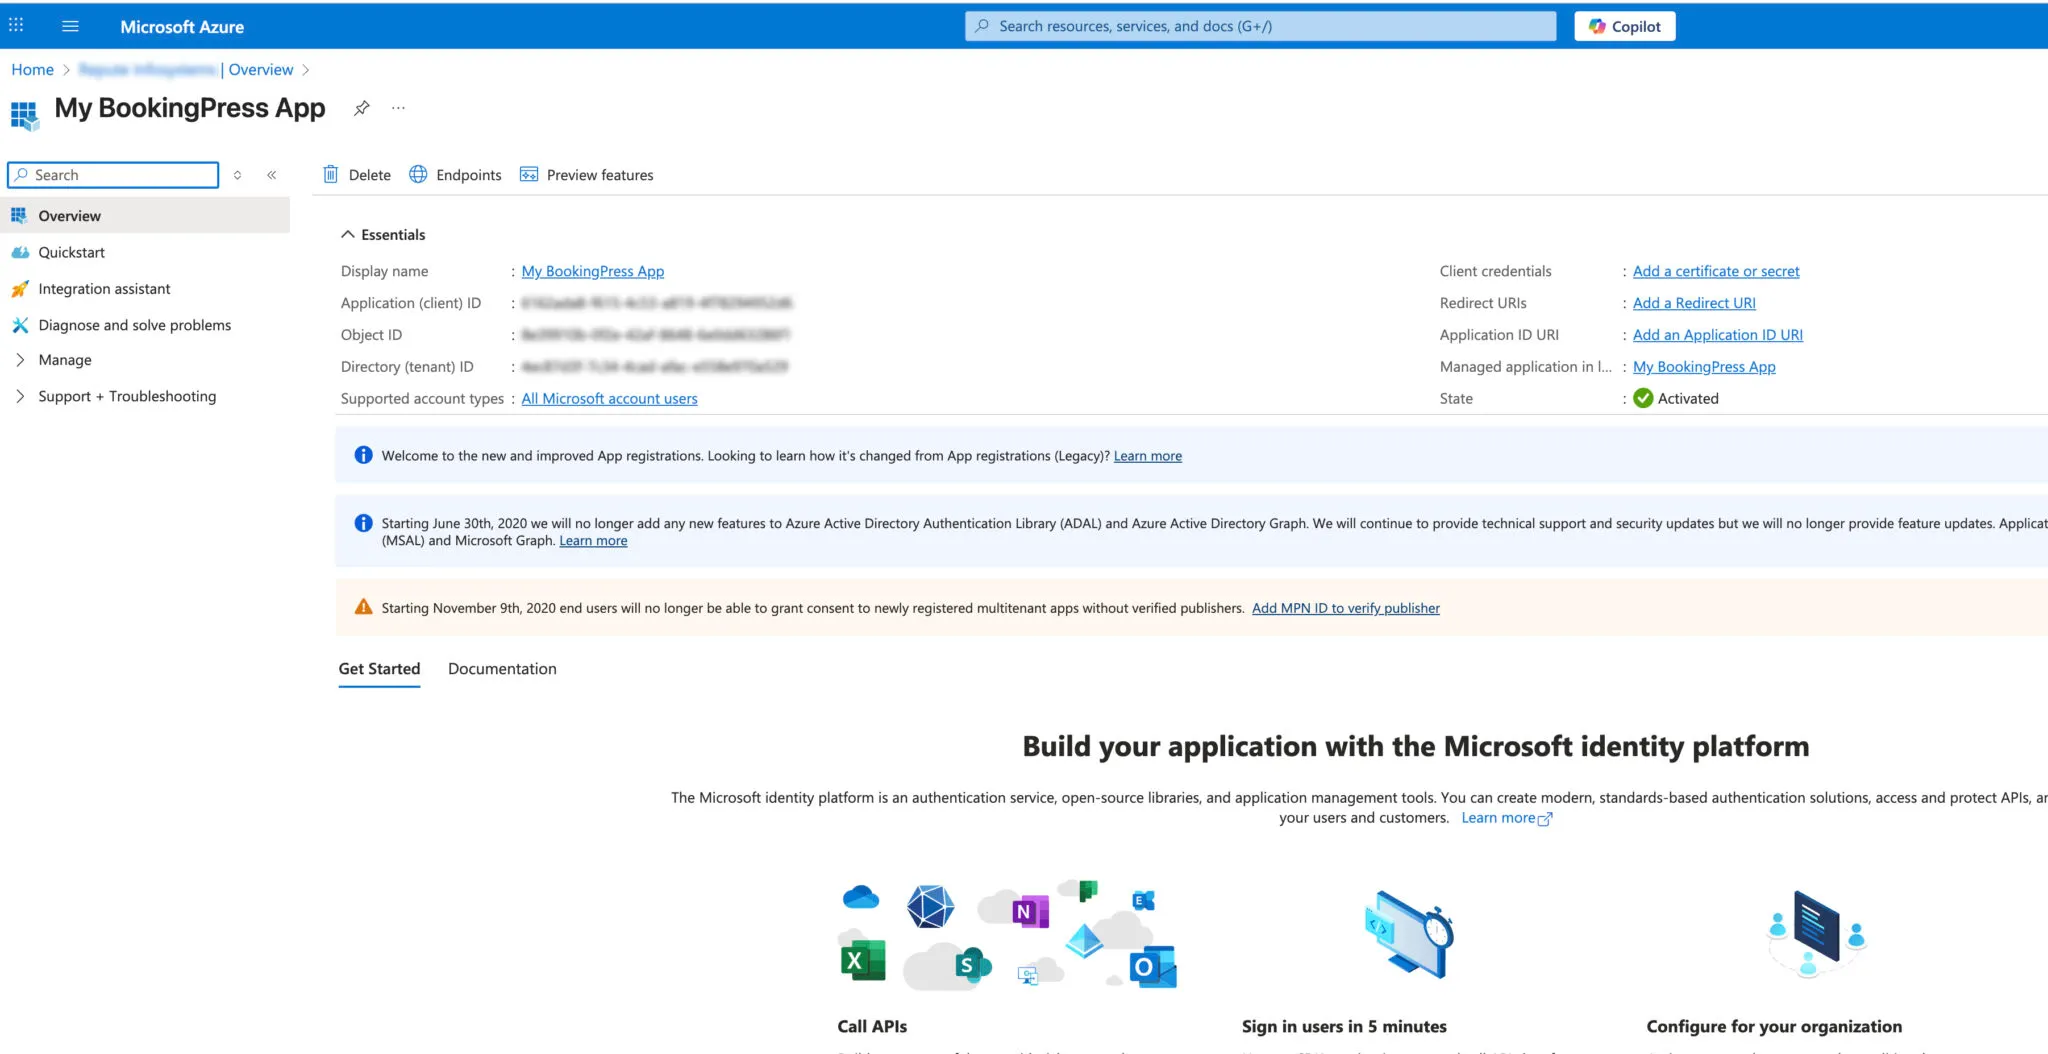
Application id (Client id):
After then go to the application overview menu and then get the Client id (application id) and other details of the application shown below image:
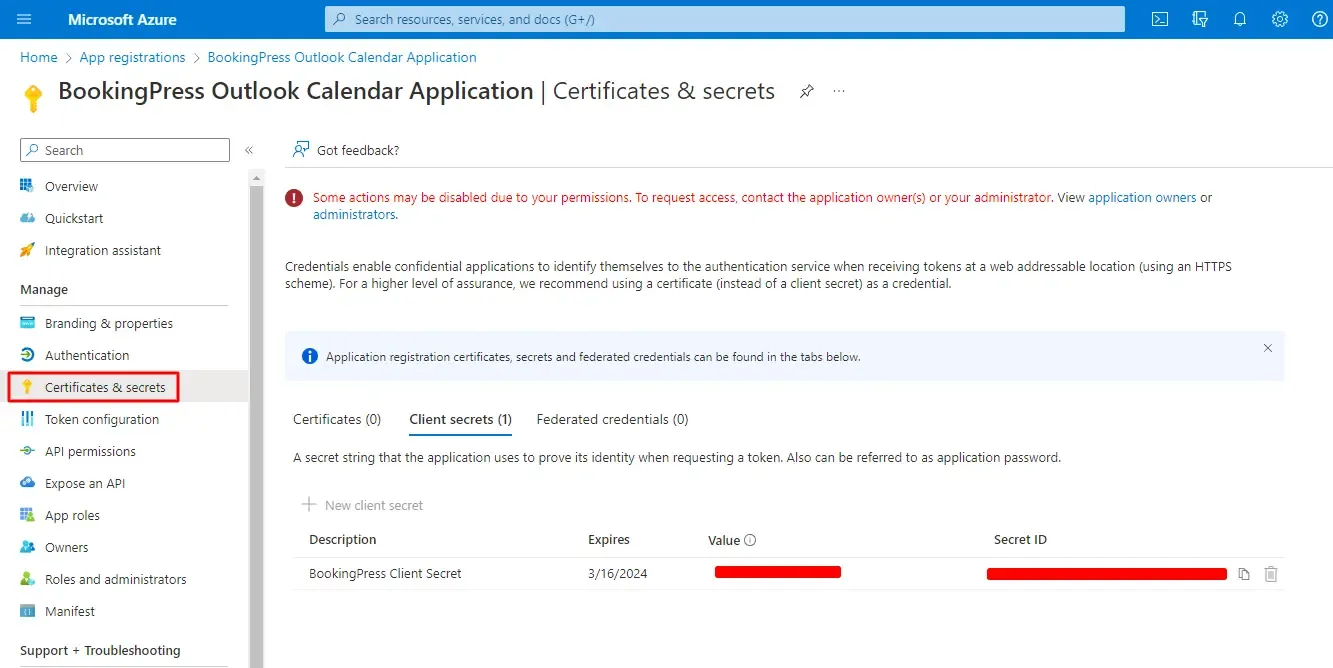
Client Secret Value:
After then go to Application Dashboard -> Certificates & secrets and Get Secret Value shown as below image :
Note : Secret Value will be displayed only one time.
After that add application redirect URI
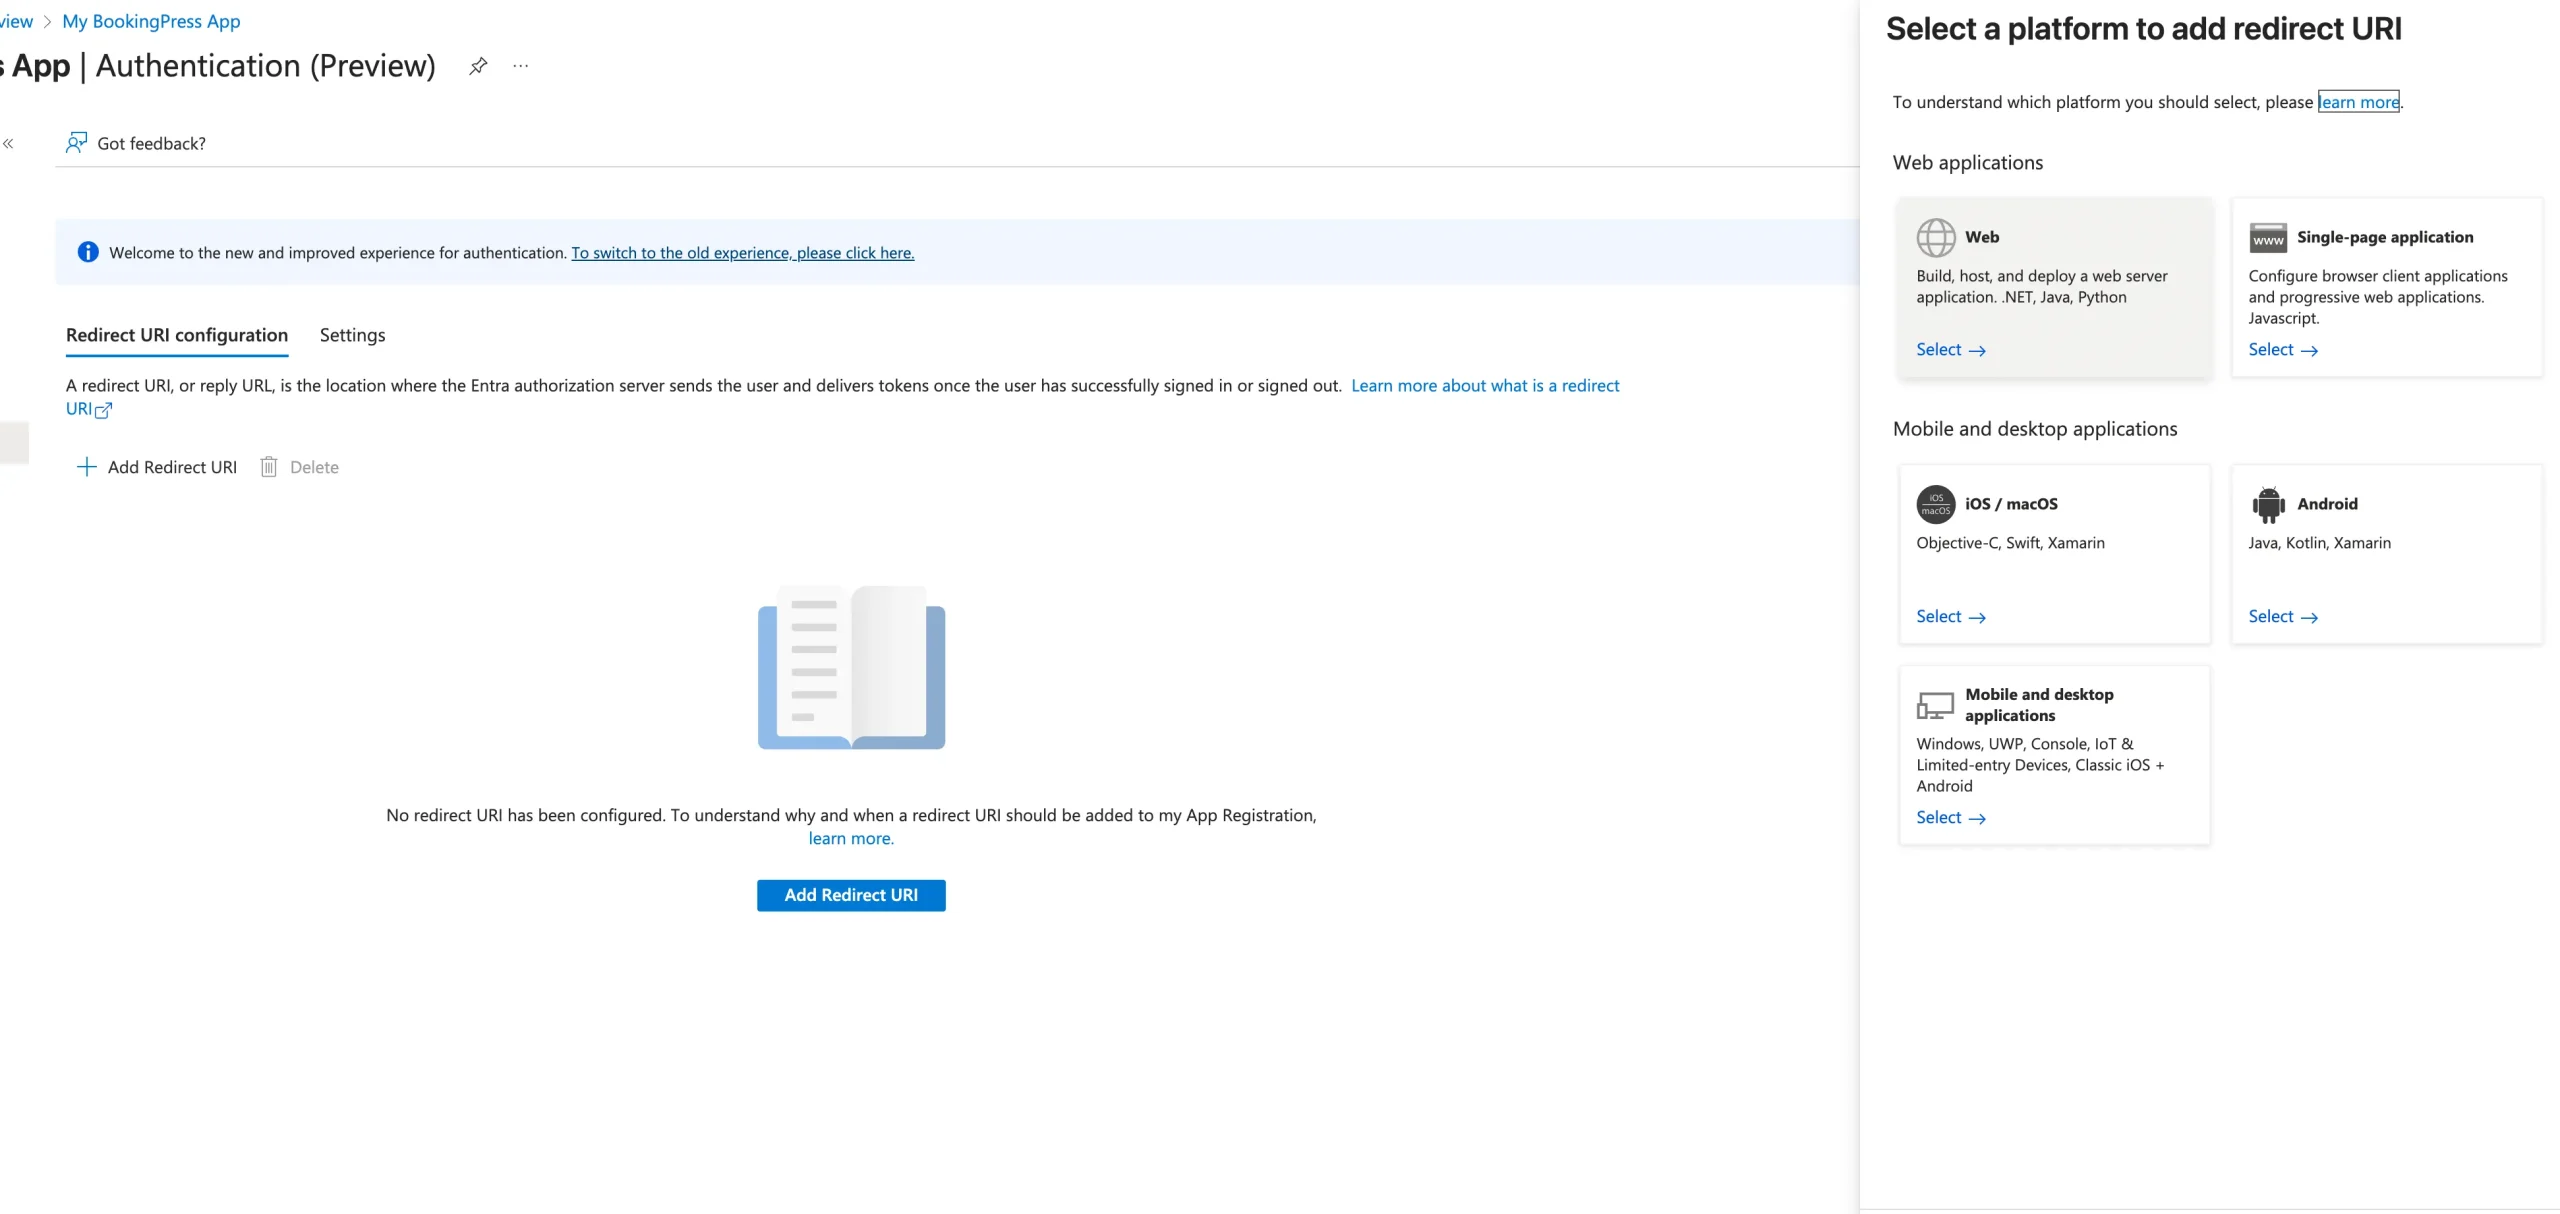
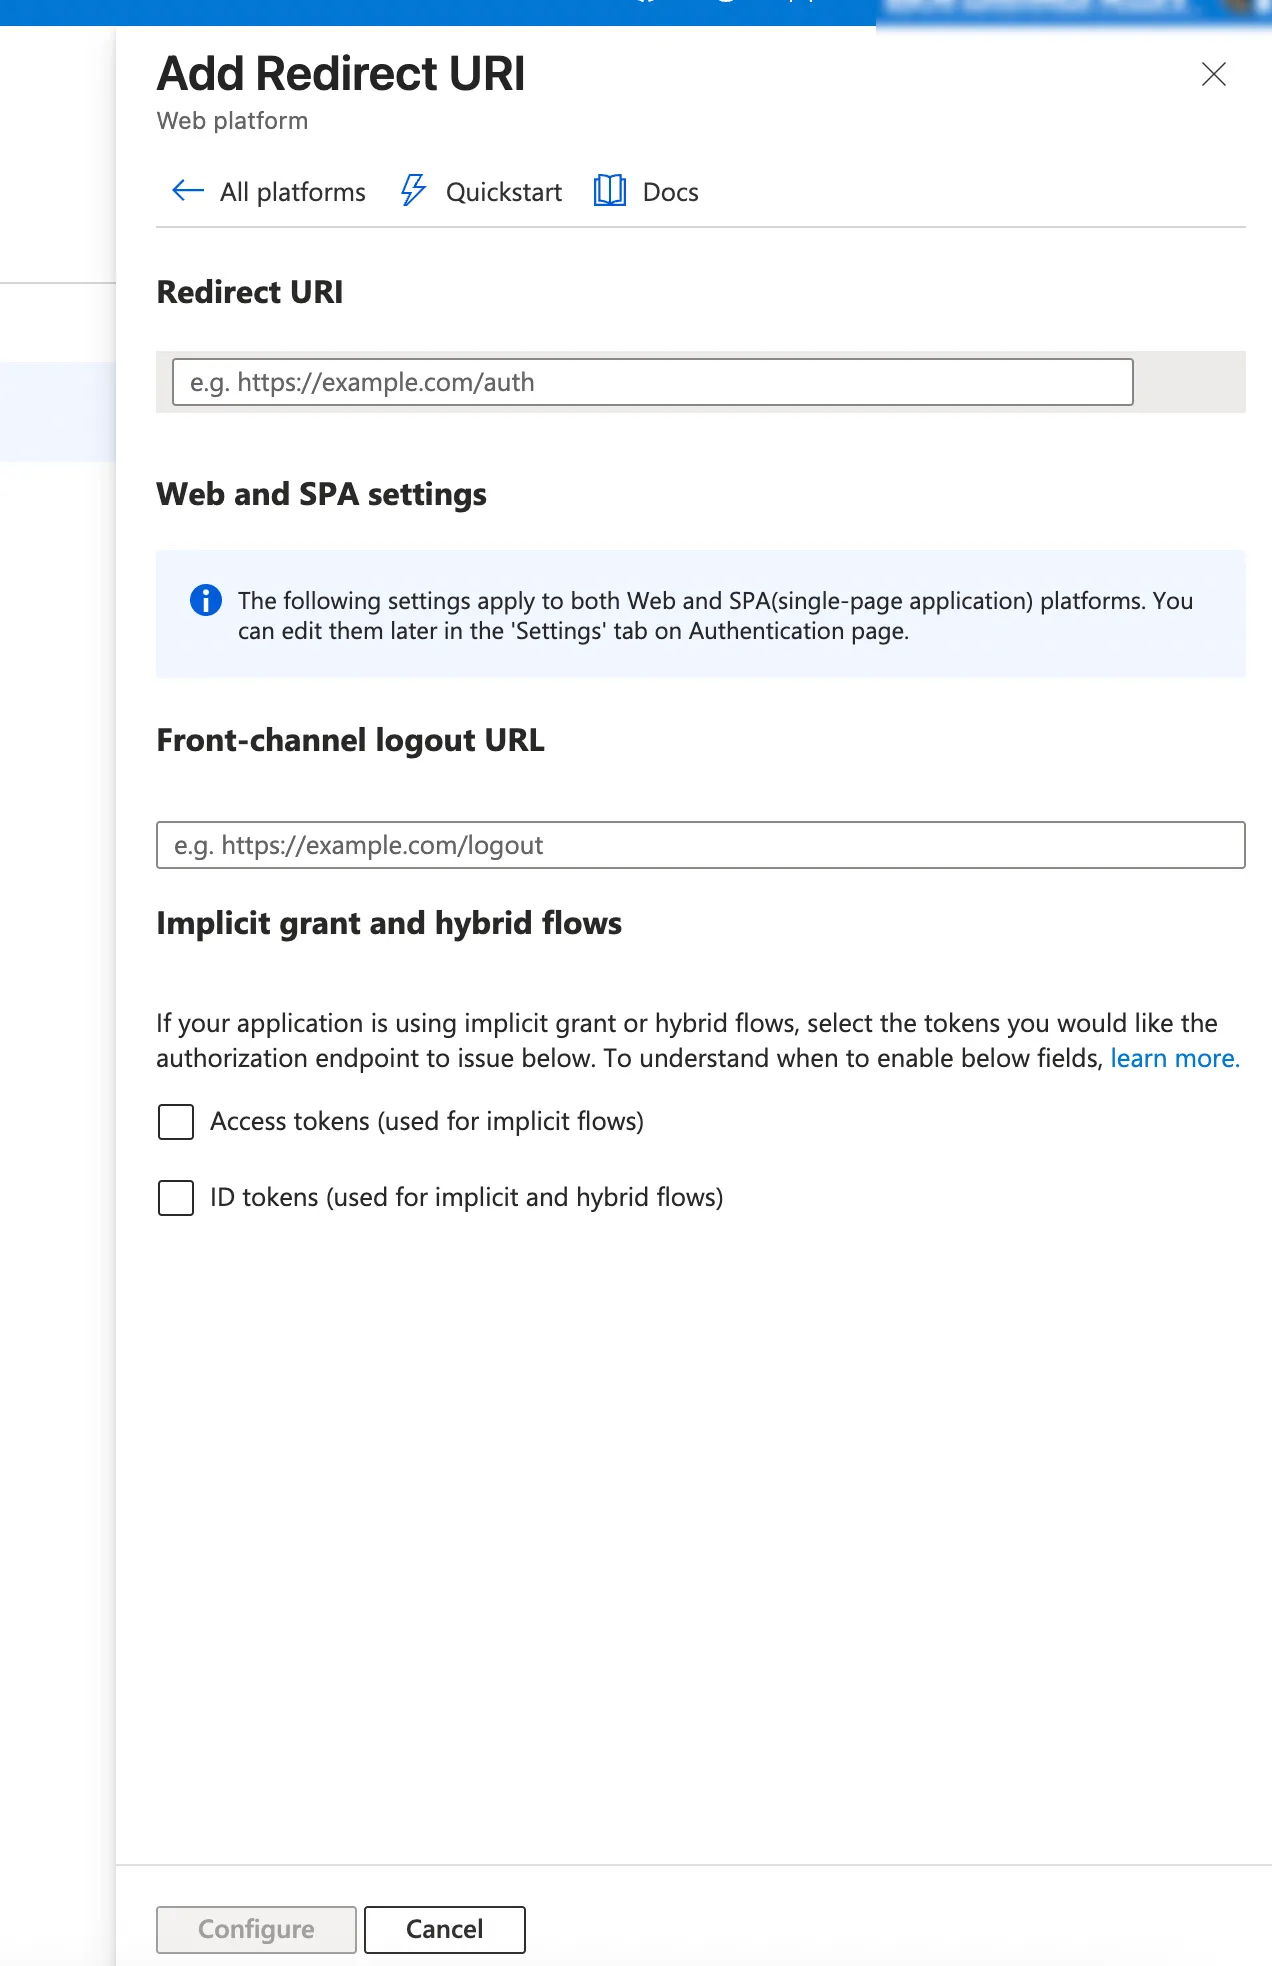
After that you need to grant some permissions to access the required APIs.
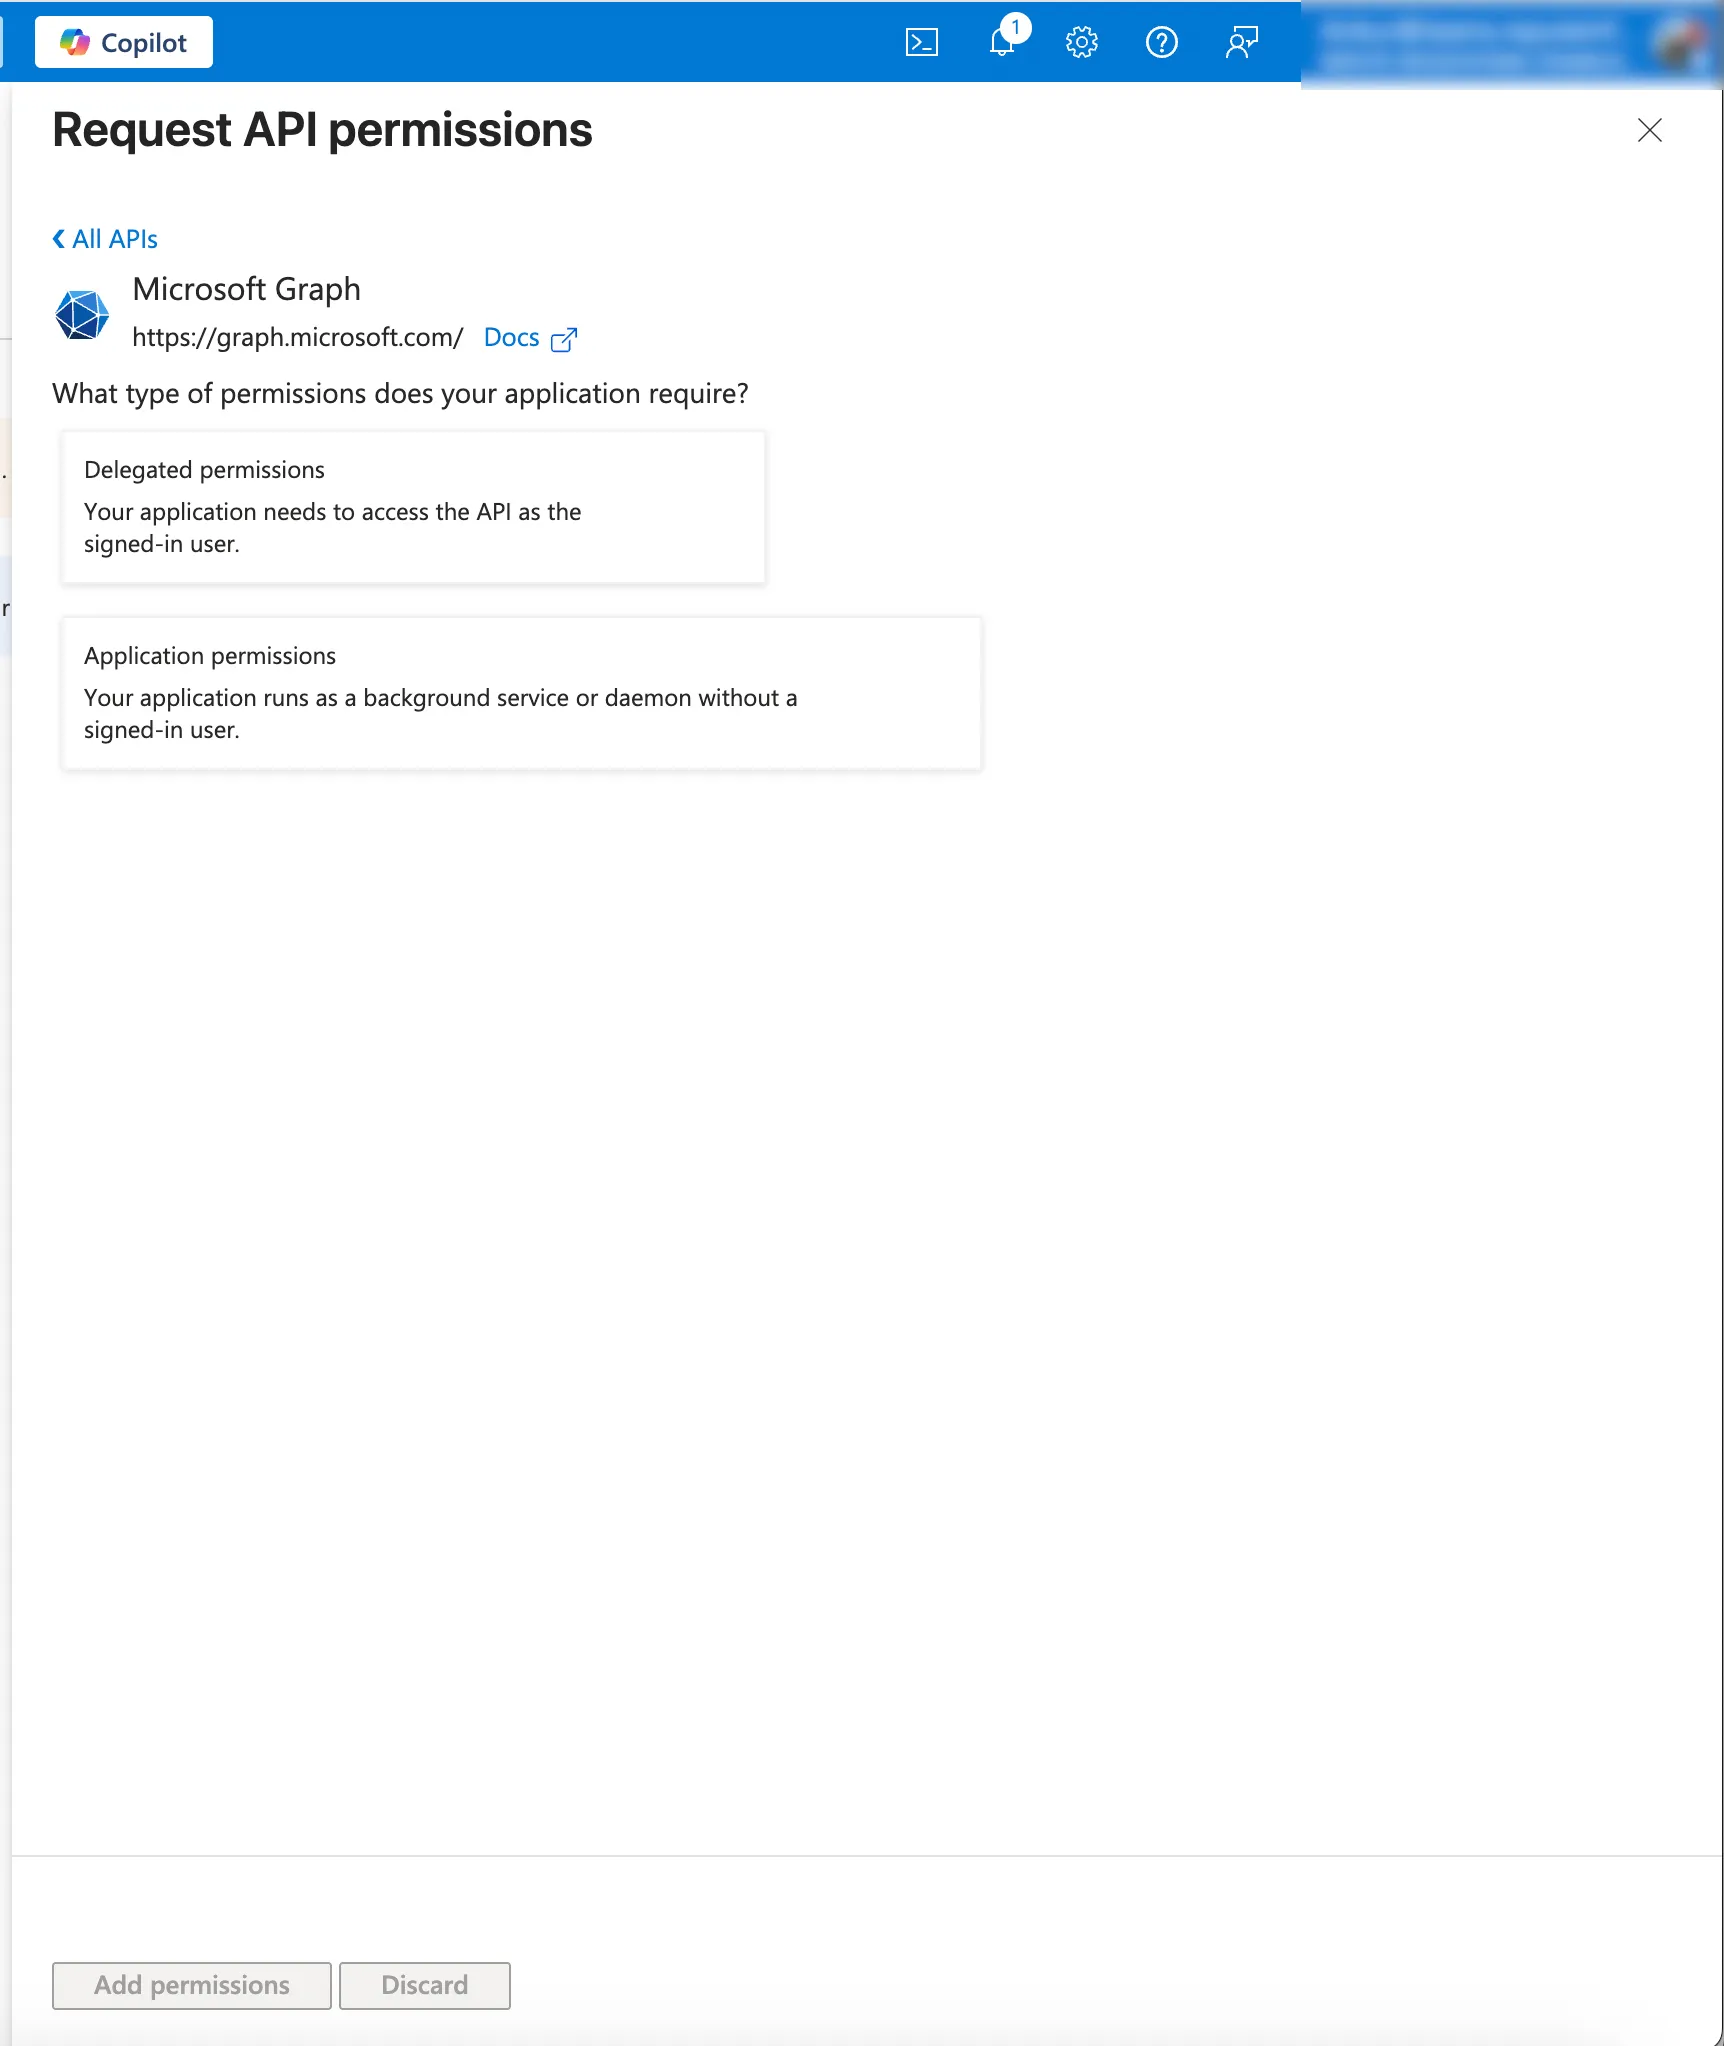
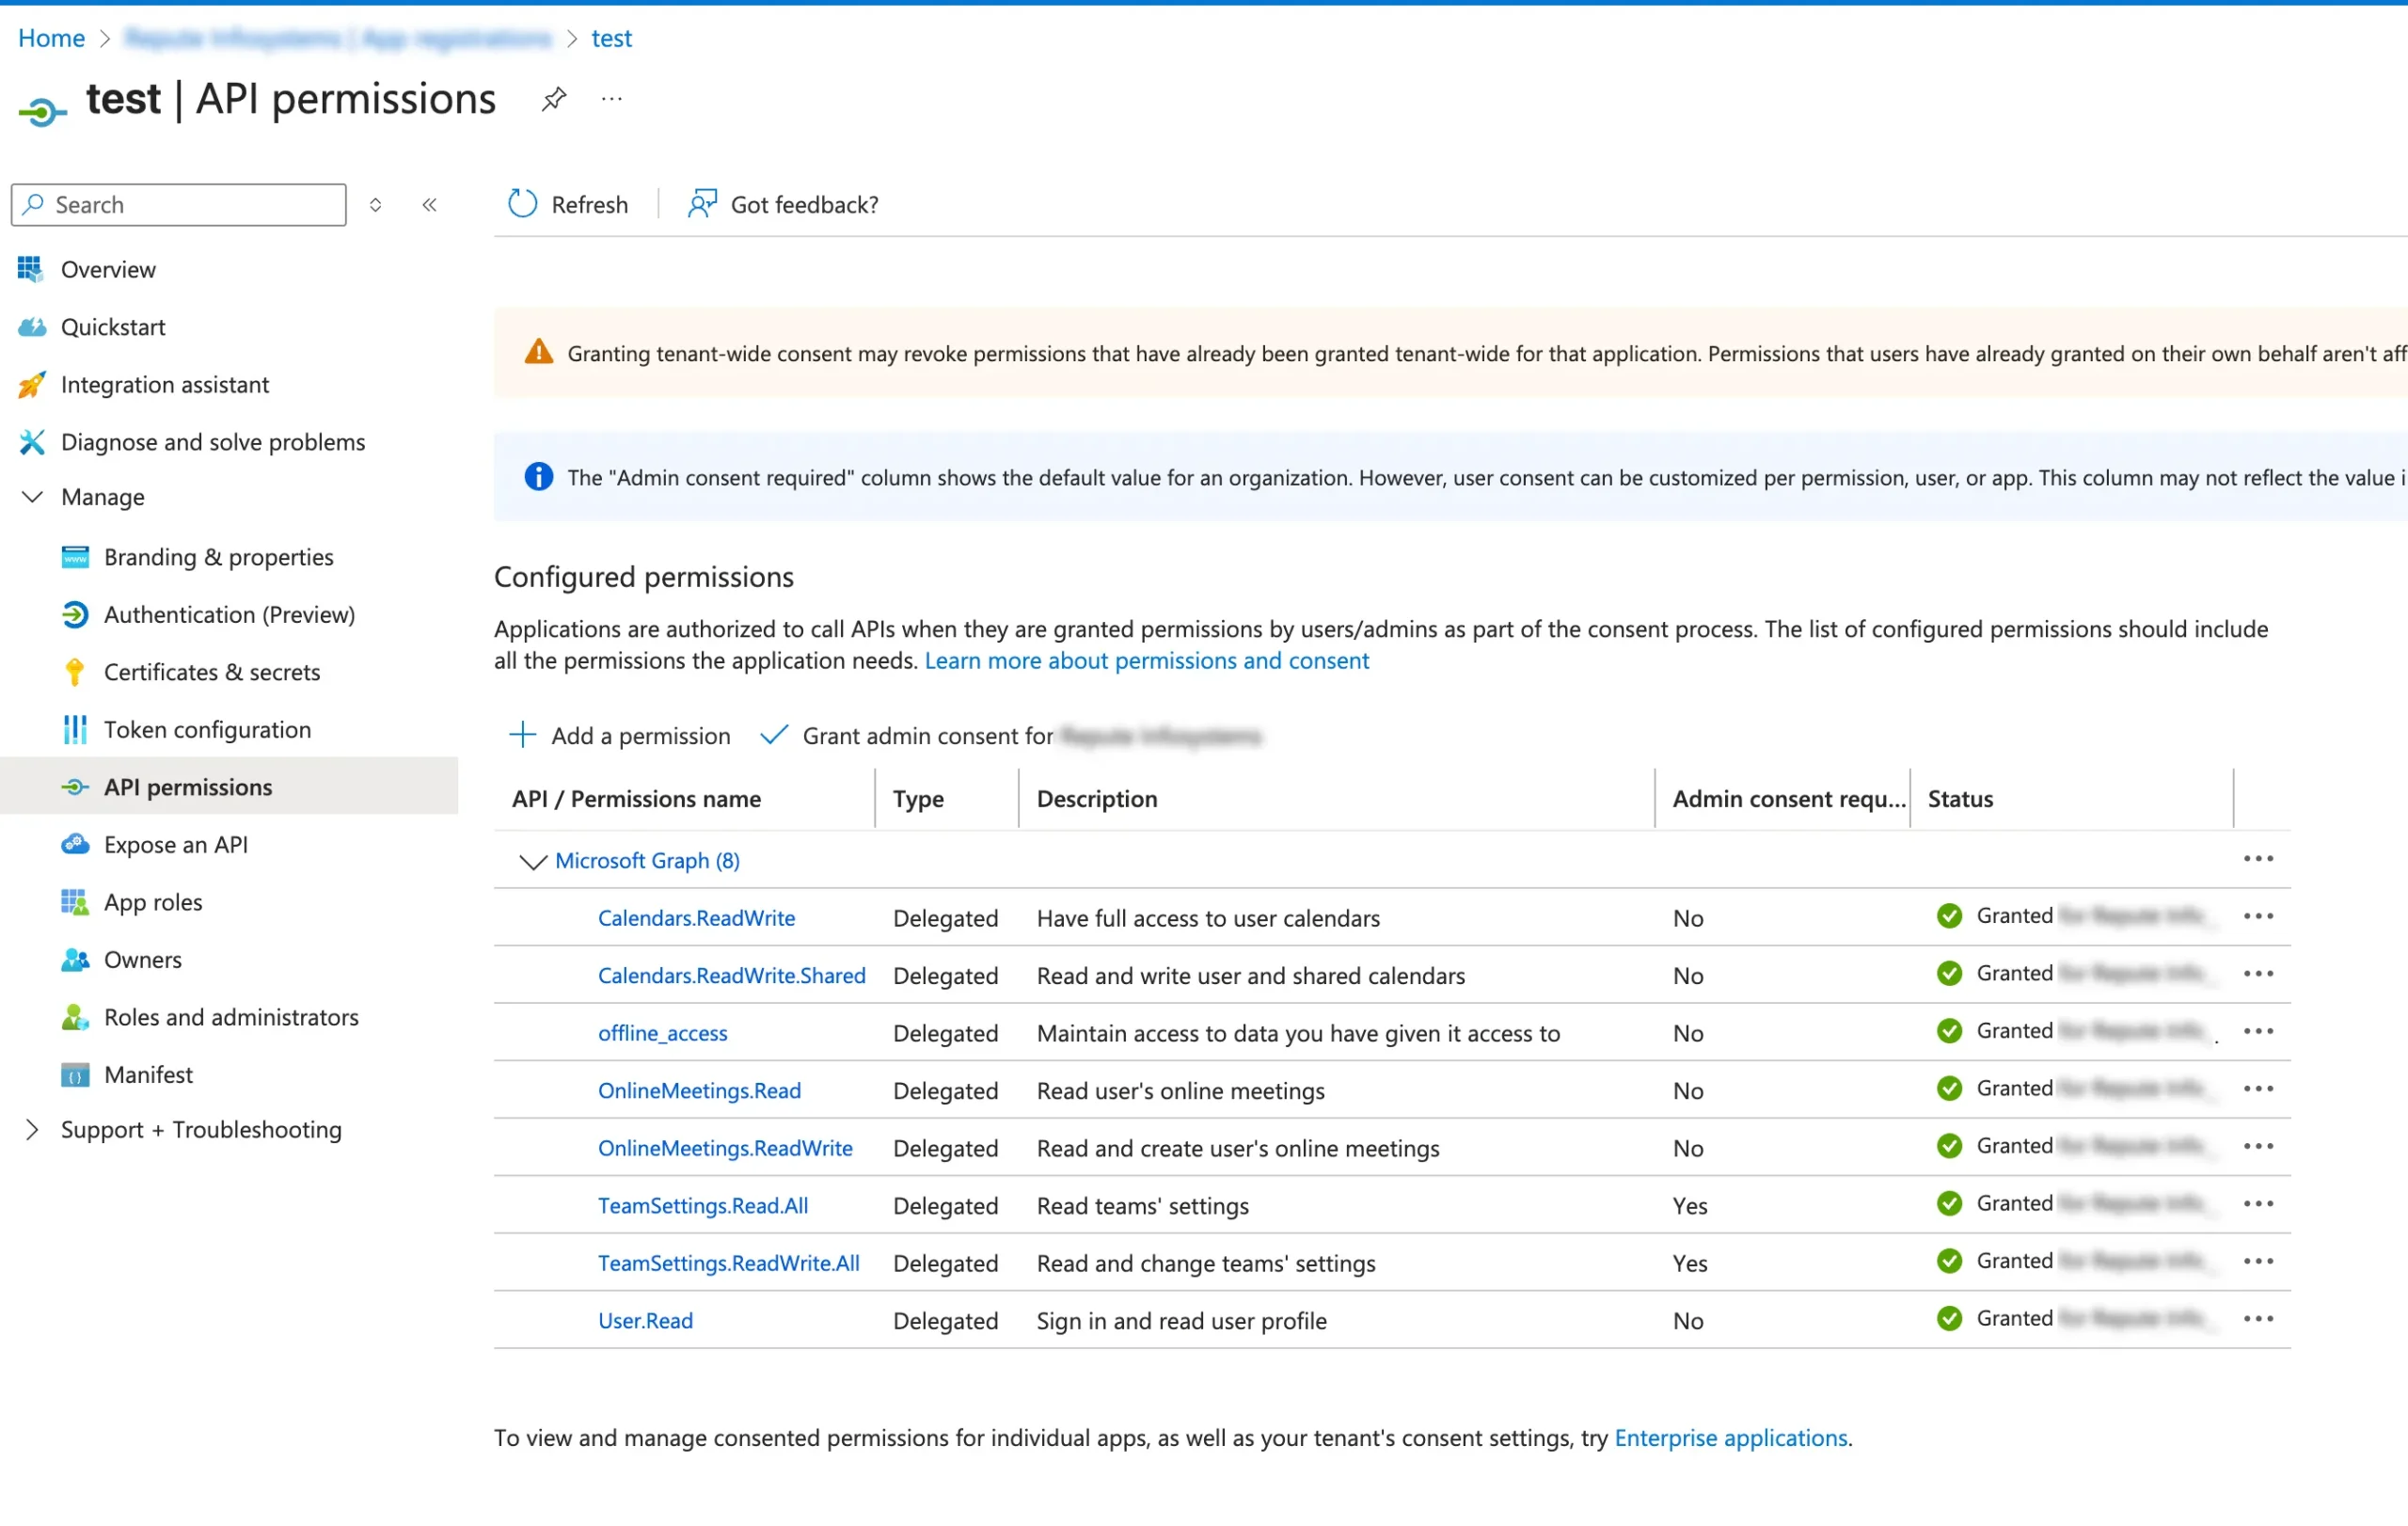
User.Read
OnlineMeetings.ReadWrite
offline_access
Calendars.ReadWrite
Calendars.ReadWrite.Shared
TeamSettings.Read.All
TeamSettings.ReadWrite.All
Make sure you updated the Teams policy from teams policy center. If not below are the steps to update the policy.
Using Microsoft Teams Admin Center
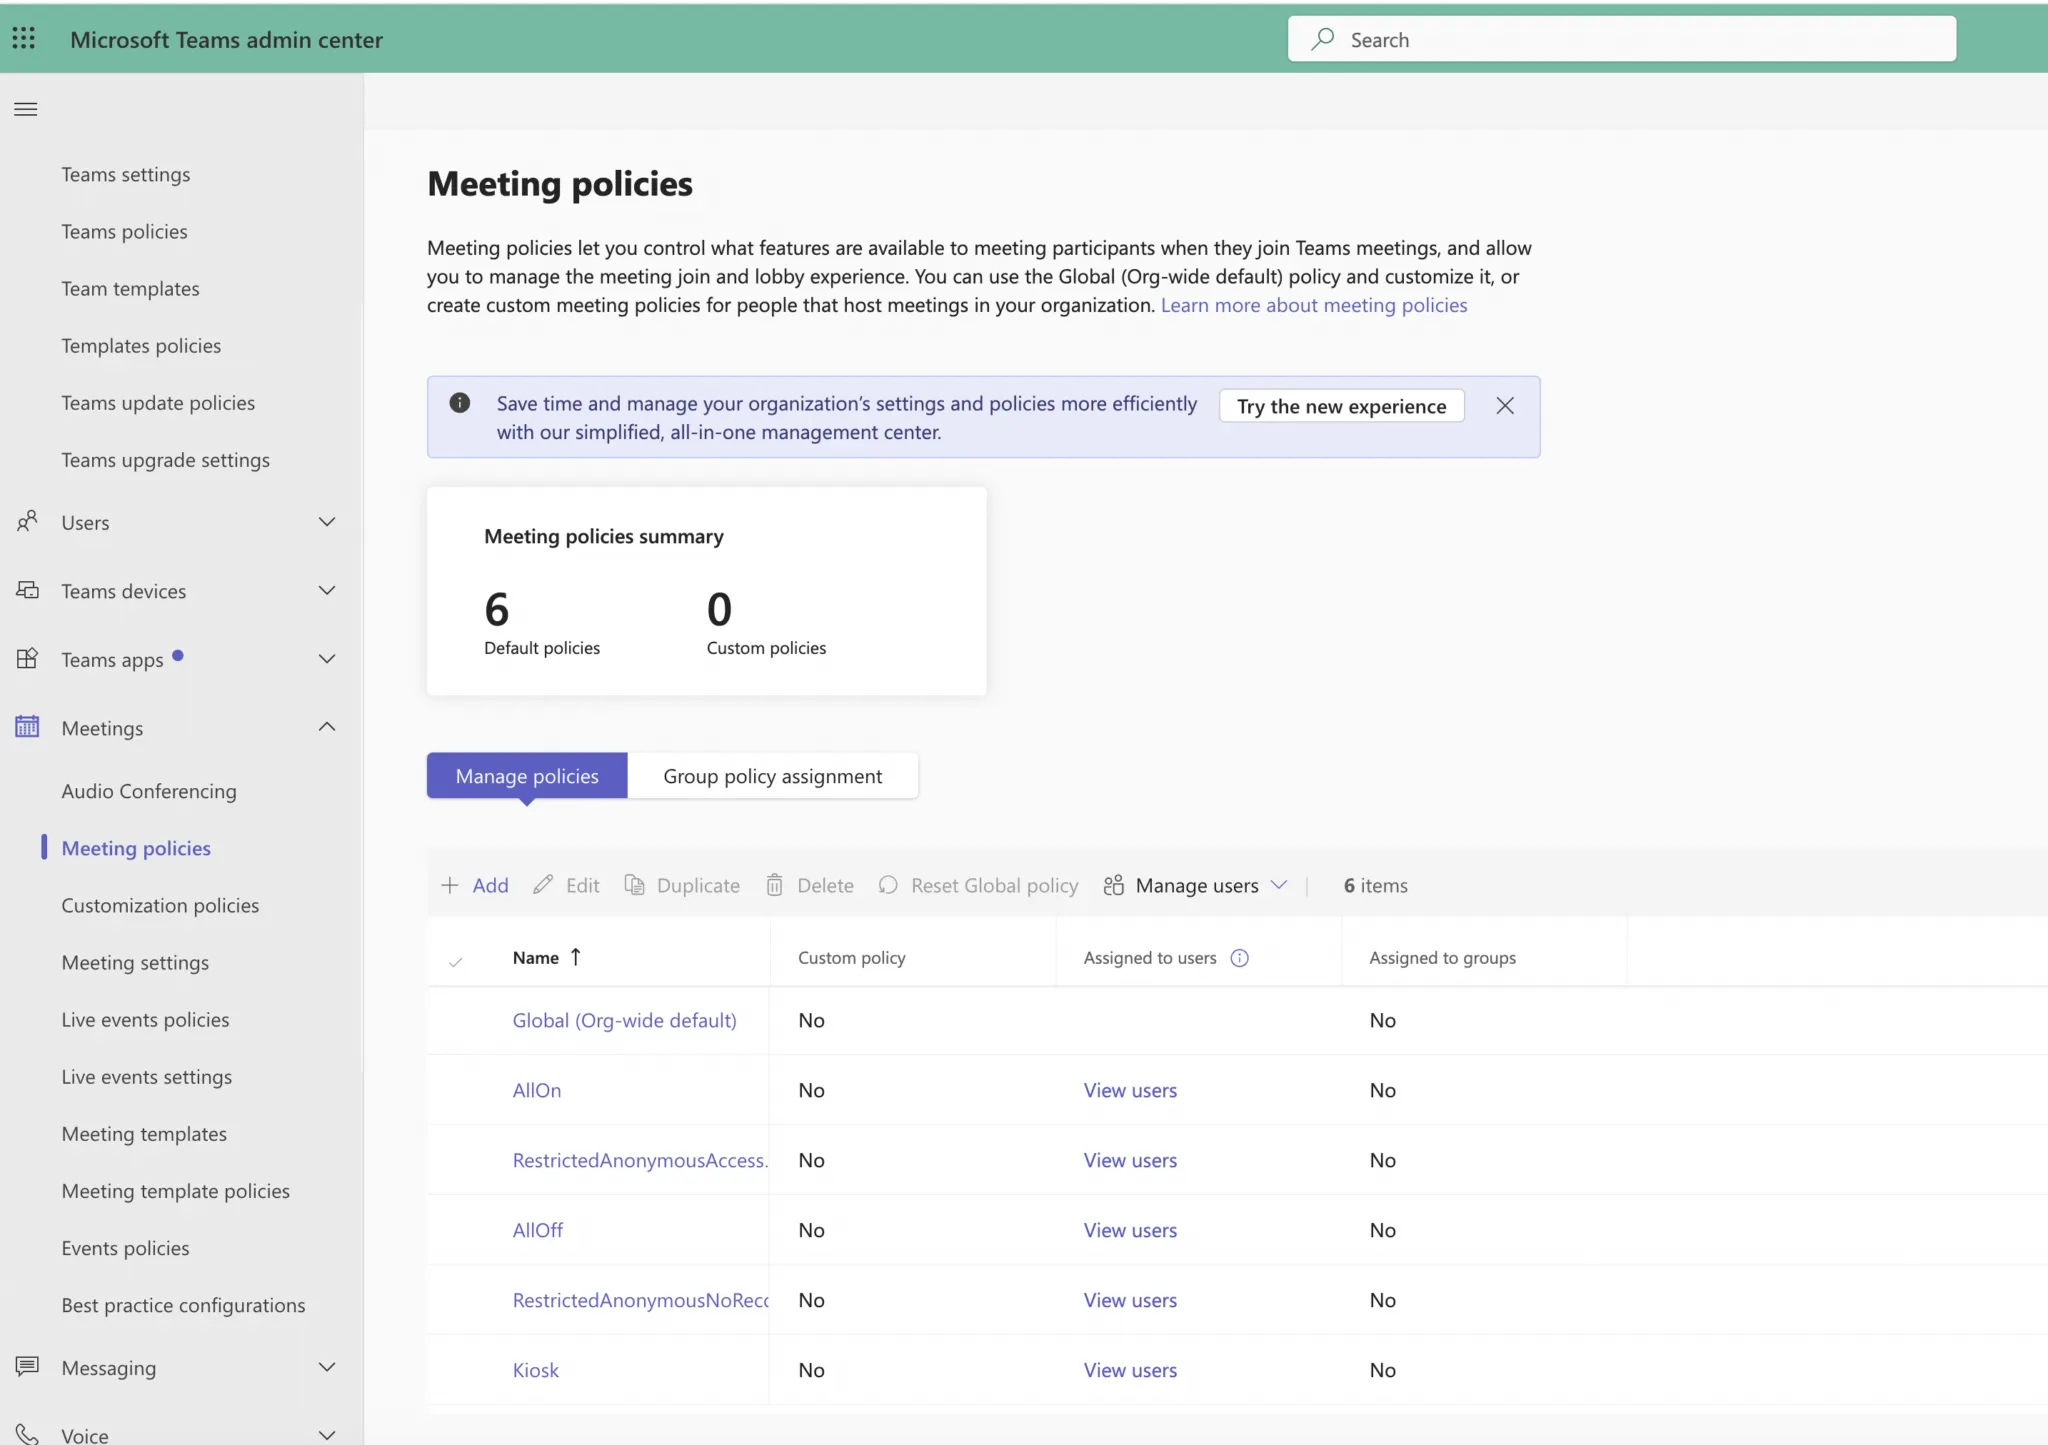
URL: https://admin.teams.microsoft.com
Check Meeting Policies
Go to Meetings > Meeting policies.
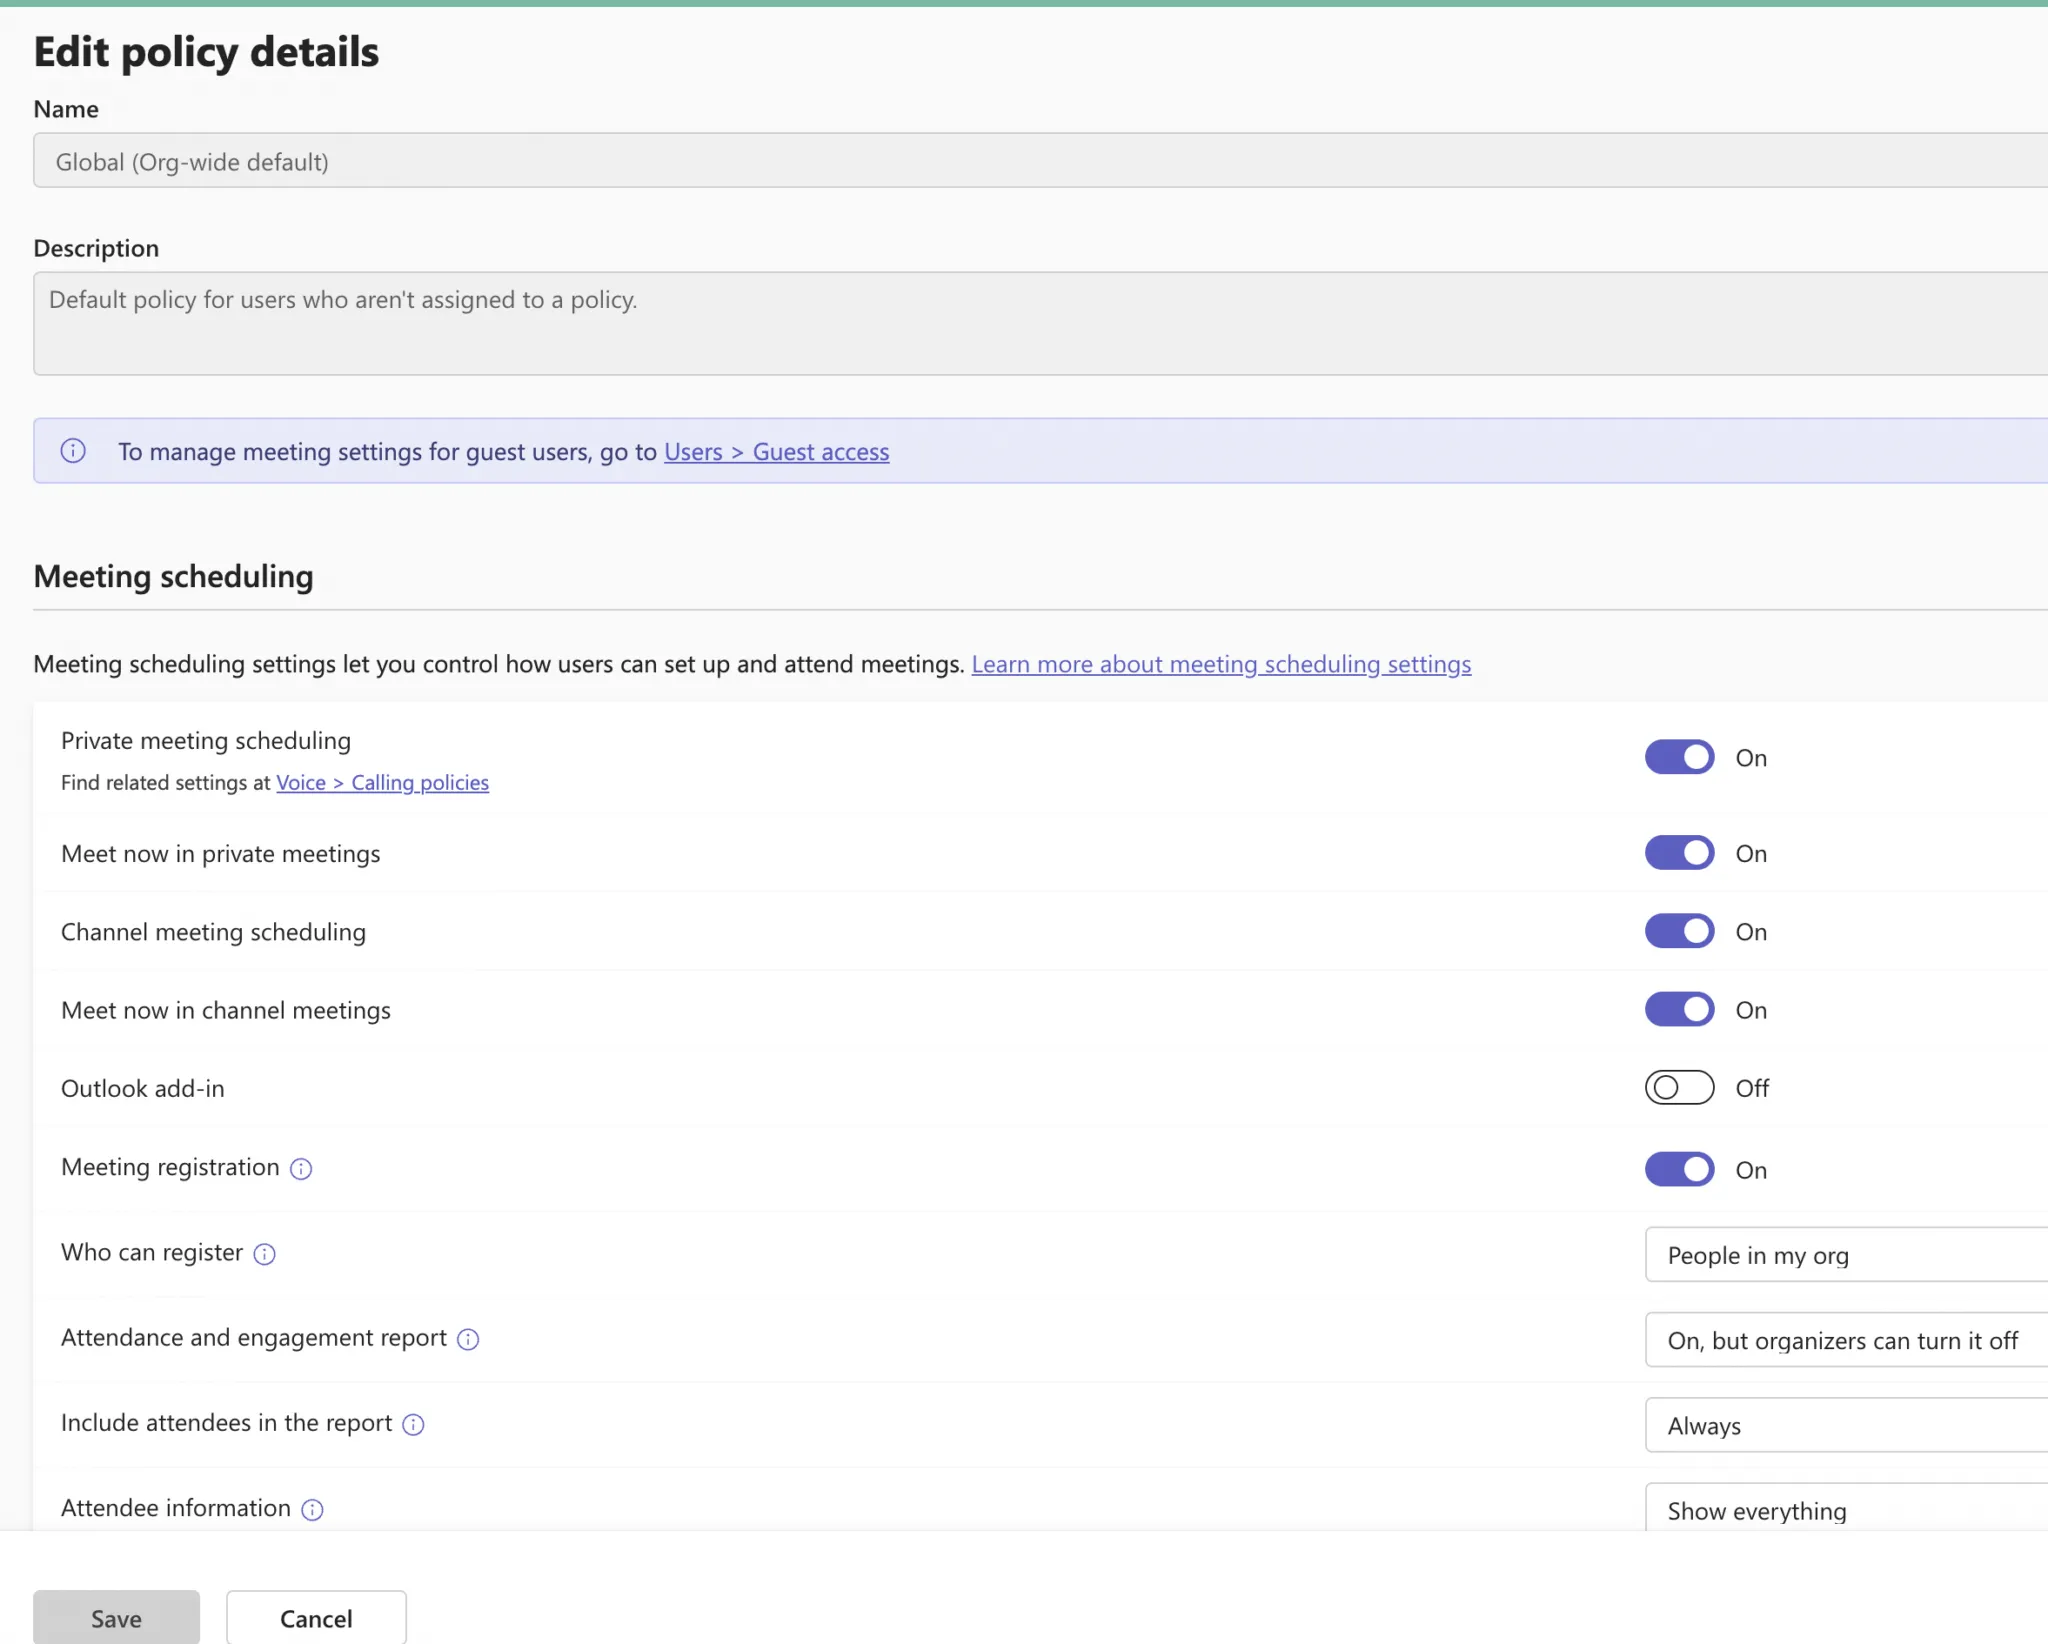
Click on the policy assigned to the user (often “Global (Org-wide default)”)
Ensure the following settings are enabled:
- Allow scheduling private meetings
- Allow Meet Now
- Allow channel meeting scheduling
- Allow transcription, cloud recording (if needed)
💡 If this is disabled, users will get the “Organizer is not allowed to create private meeting” error.
Now, activate the Microsoft Teams Addon from BookingPress -> Addons.
After the addon is activated, you can configure the plugin by going to BookingPress -> Settings -> Integrations -> Microsoft Teams.
Enter the “Client ID” and “Client Secret”. You will be able to get the “Application (Client) Id” and “Client Secret” from Azure.
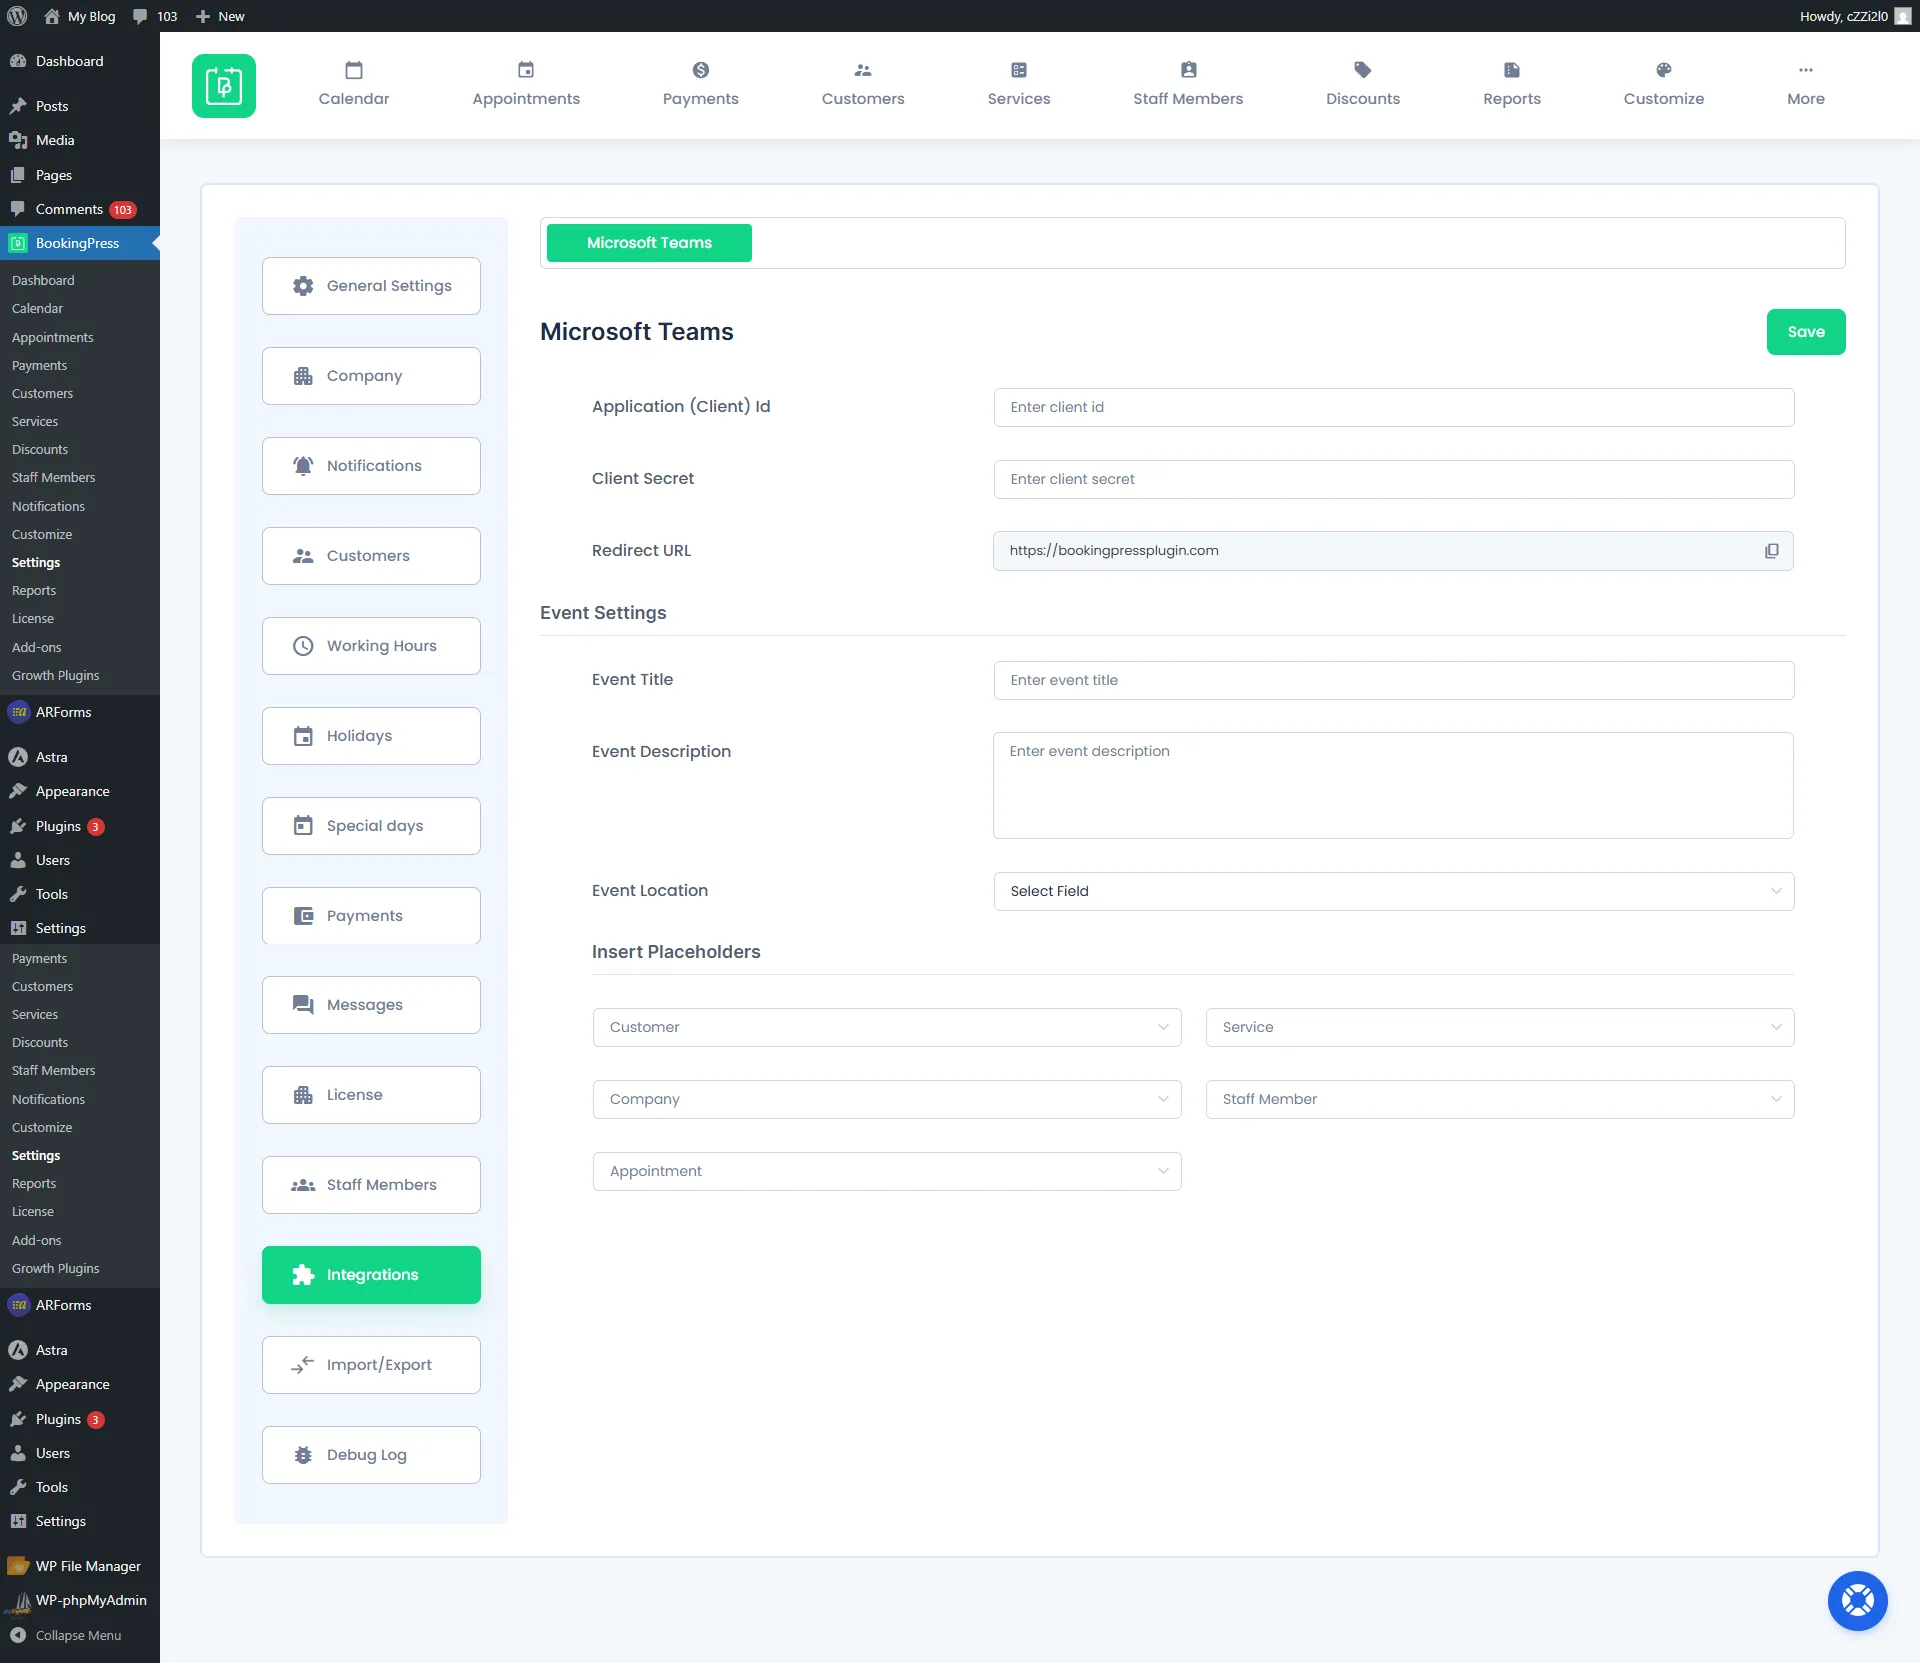
Event Settings:
Copy and Enter the title from placeholders from “Insert Placeholder” dropdowns to generate the Event Title dynamically according to your requirement.
Event Description:
Same way you will also be able to write a custom description on your own with the help of the placeholders.
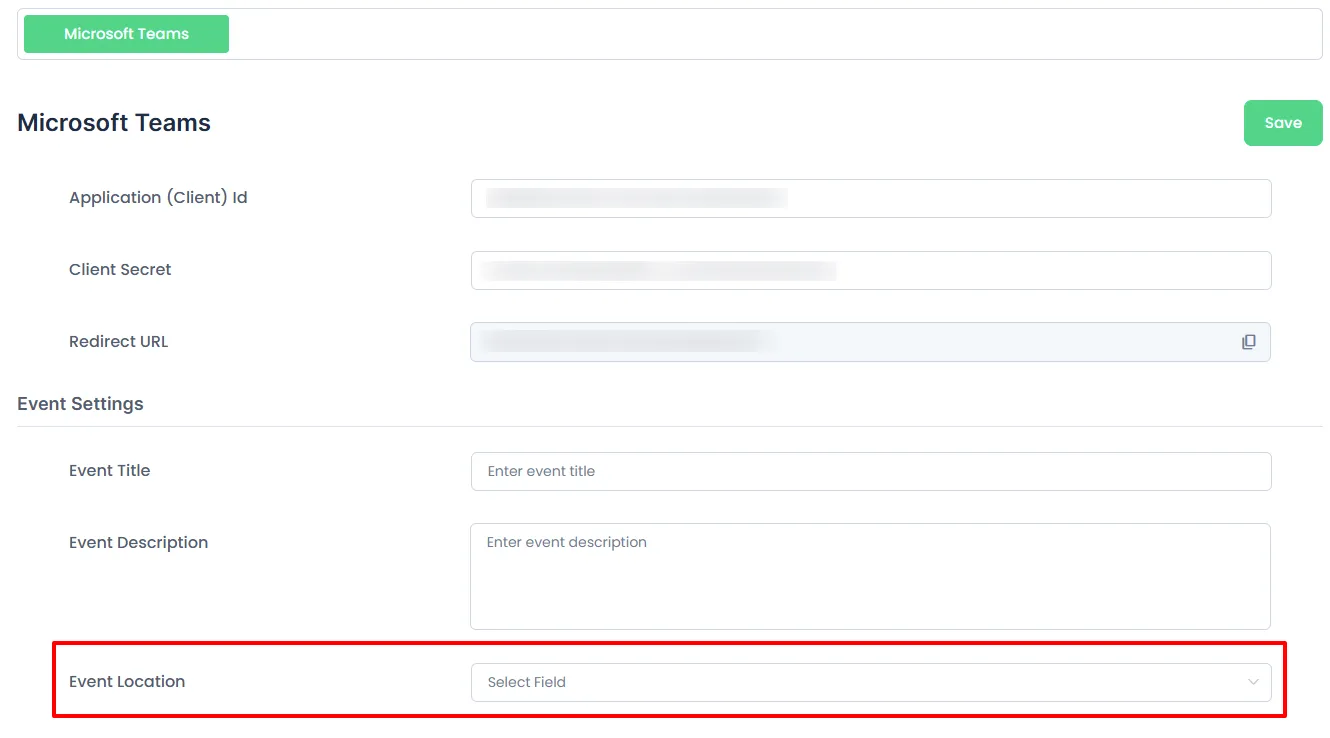
Event Location:
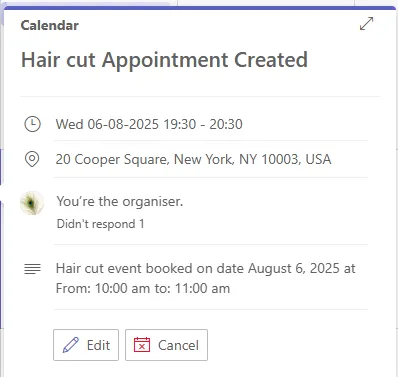
Here you will be able to choose a field from the list of fields that are present in the “Customize Custom Fields” section. After selecting a field from the list, when the user will submit the form and the data will be mapped as a location in the Outlook Calendar event configured with the respective Staff Member.
The details in the Outlook Calendar Event will be displayed in the location field
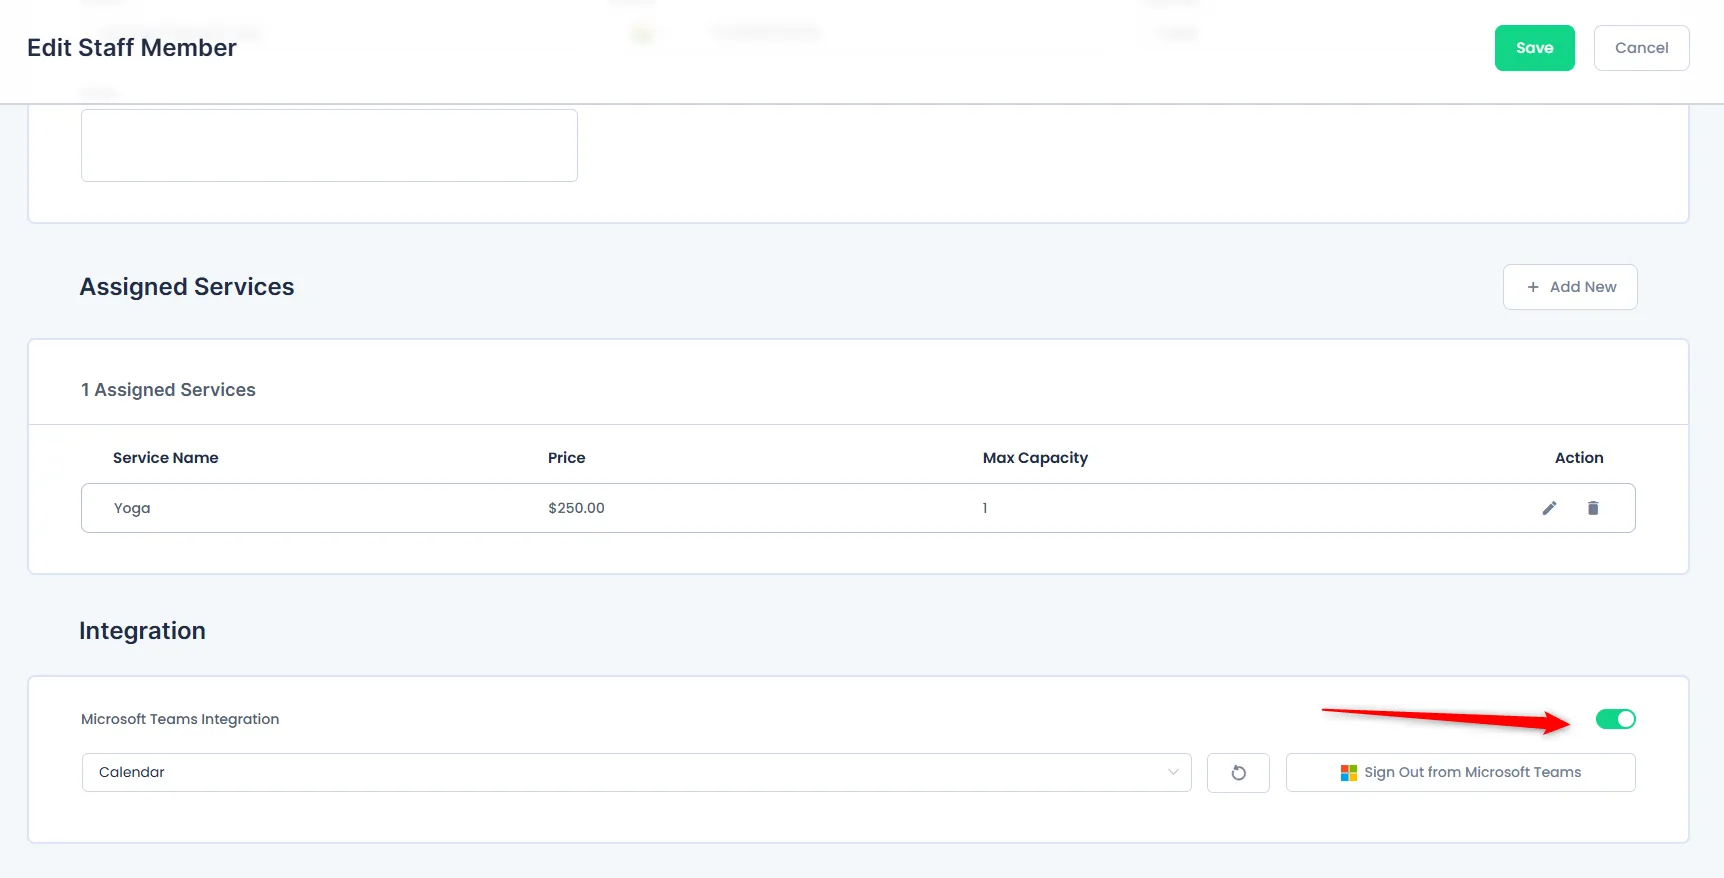
Integrating with the Staff Member
To connect with a staff member, go to BookingPress > Staff Members > Integration > toggle on the Microsoft Teams Integration and Sign In With Microsoft Teams.
Once signed in, you will see all your calendar options in the Select Calendar dropdown menu. Choose the calendar where you want to add appointments.
Refresh Calendar List
To refresh the list of calendars from Calendar, simply click on the “Refresh Calendar List” button. This will update the list as shown in the screenshot.
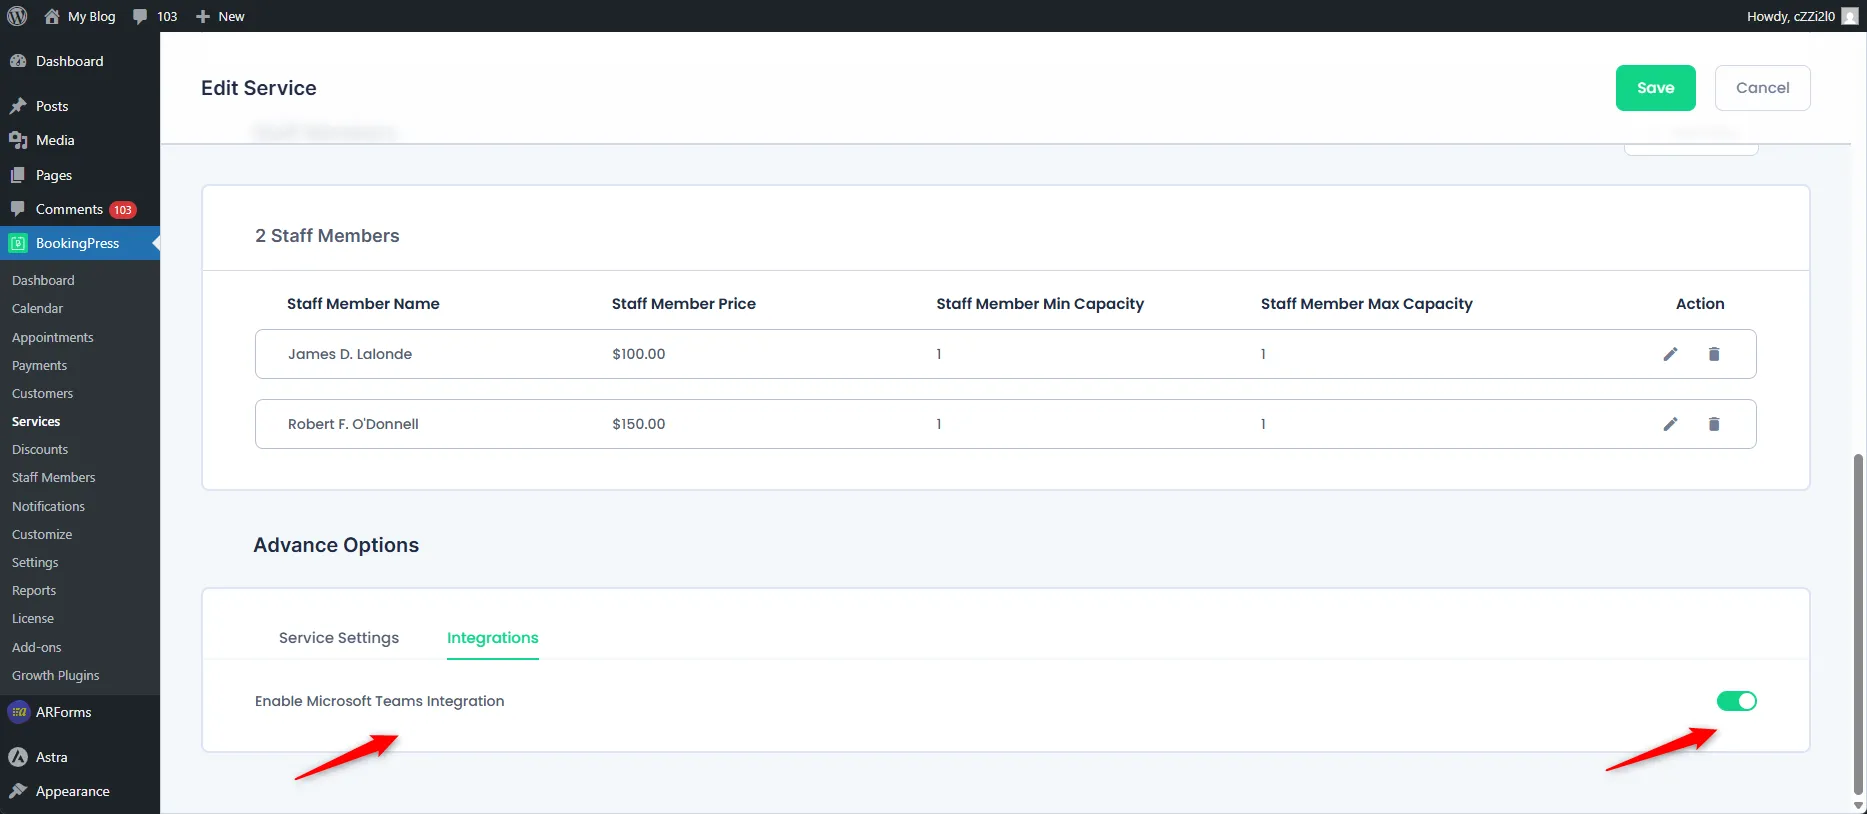
Enable from service:
After logged in with staff member, you need to enable Microsoft teams integration from particular service as well.
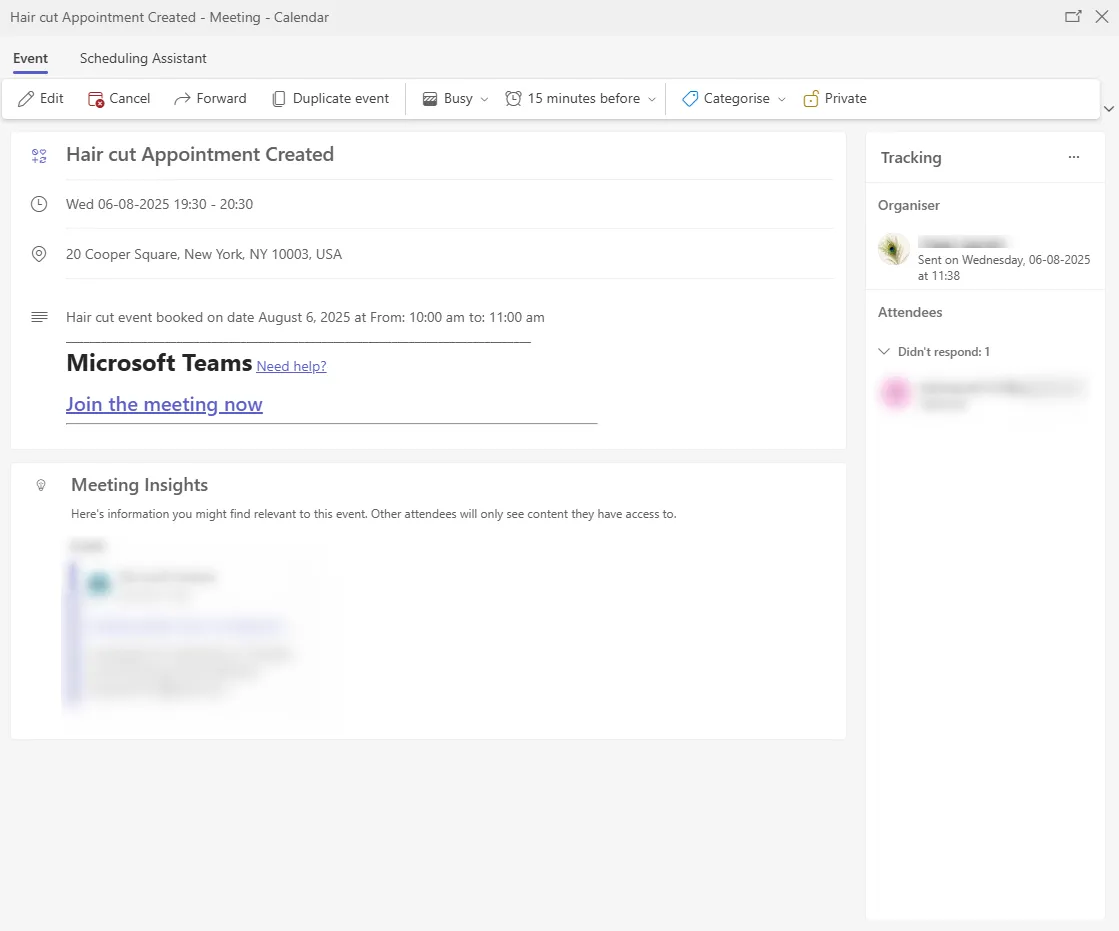
After booking an appoint it will display in enlarge mode of event you will see Microsoft teams meeting join link.
Insert Placeholders:
You will be able to select different required placeholder from different sections:
- Customer
- Company
- Service
- Staff Member
- Appointment
1. Customer:
Under customer section, you will be able to copy the following Placeholders:
%customer_email%: This placeholder will help to get the customer’s Email%customer_first_name%: This placeholder will help to get the customer’s first name.%customer_full_name%: This placeholder will help to get the customer’s full name.%customer_last_name%: This placeholder will help to get the customer’s last name.%customer_note%: This placeholder will help to get the customer’s note.%customer_phone%: This placeholder will help to get the customer’s phone number.
2. Company:
Under company section, you will be able to copy the following Placeholders:
%company_address%: This placeholder will help to get the Company’s address.%company_name%: This placeholder will help to get the Company’s name.%company_phone%: This placeholder will help to get the Company’s contact number.%company_website%: This placeholder will help to get the Company’s website.
3. Service:
-> Under service section, you will be able to copy the following placeholders:
%service_name%: This placeholder will help to get the Service’s name.%service_duration%: This placeholder will help to get the Service’s time duration.
4. Staff Member:
Under Staff Member section you will be able to copy the following placeholders :
%staff_member_email%: This placeholder will help to get the Staff Member’s email address.%staff_member_first_name%: This placeholder will help to get the Staff Member’s First Name.%staff_member_full_name%: This placeholder will help to get the Staff Member’s Full Name.%staff_member_last_name%: This placeholder will help to get the Staff Member’s Last Name.%staff_member_phone%: This placeholder will help to get the Staff Member’s Contact Number.
5. Appointment:
Under Appointment section, you will be able to copy the following placeholders :
%appointment_date%: This placeholder will help to get the particular date of the booked appointment.%appointment_date_time%: This placeholder will help to get the particular date and time of the booked appointment.%appointment_duration%: This placeholder will help to get the particular duration of the booked appointment.%appointment_start_time%: This placeholder will help to get the Starting Time of the booked appointment.%appointment_end_time%: This placeholder will help to get the Ending Time of the booked appointment.%appointment_amount%: This placeholder will help to get the particular Amount of the booked appointment.%appointment_status%: This placeholder will help to get the Status(whether approved, pending, rejected, etc…) of the booked appointment.%teams_join_url%: This placeholder will help to you to display teams meeting join link.
FAQ’s
The appointment date and time do not match in Calendar.
Ensure that the timezone settings in Calendar match those of your WordPress site. To do this:
1. Check your Calendar Timezone and then head over to WordPress settings.
2. Locate the timezone settings by heading over to WordPress --> Settings --> General --> Scroll down to Timezone and set it to match the timezone of your Calendar.
3. Save the changes, and the appointment date and time should synchronize correctly.
We are unable to login with microsoft account.
Ensure that you have enabled all permissions listed above and granted for admin.
We are logged in and calendar selected but event/appointment not created.
Ensure you have enabled settings in meeting policies. You can check above description for enabling teams policies settings.