Email Notification Setup
Email notifications in BookingPress allow you to automatically send booking updates to customers and staff based on appointment events.
In this guide, we’ll show you how email notifications work, how to configure them, and how to customize messages using placeholders.
How Automatic Email Notifications Works
BookingPress sends email notifications based on different appointment actions such as booking, approval, cancellation or rescheduling.
You can:
- Enable/disable notifications for customers.
- Enable/disable notifications for staff members.
- Customize email content using the built-in editor.
Customer Email Notifications
BookingPress allows you to send custom email notifications to customers based on specific booking events.
You can edit these emails directly in the text editor. Also, you can send emails to additional recipients using the CC Email Address field.
Available Customer Notification Events
1. Appointment Approved
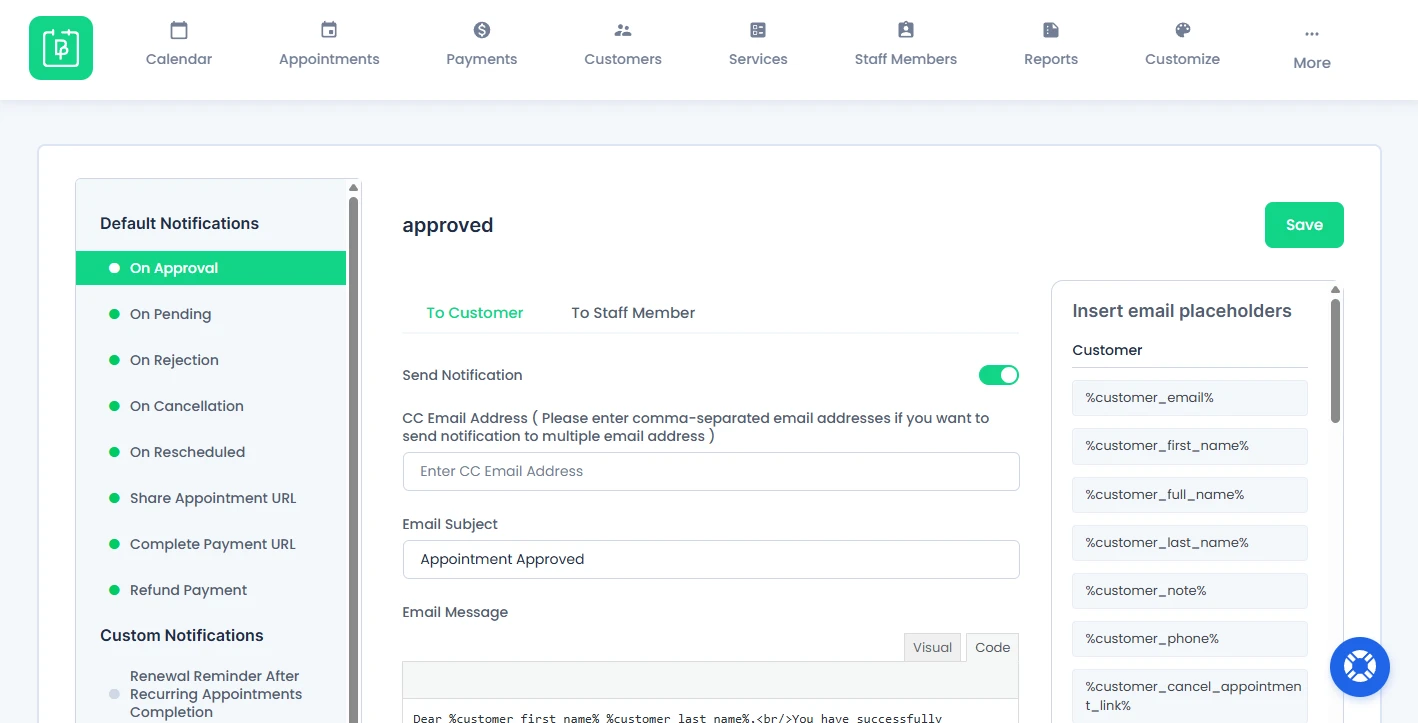
The email notification is sent when an appointment is booked or created and the status is Approved
2. Appointment Pending
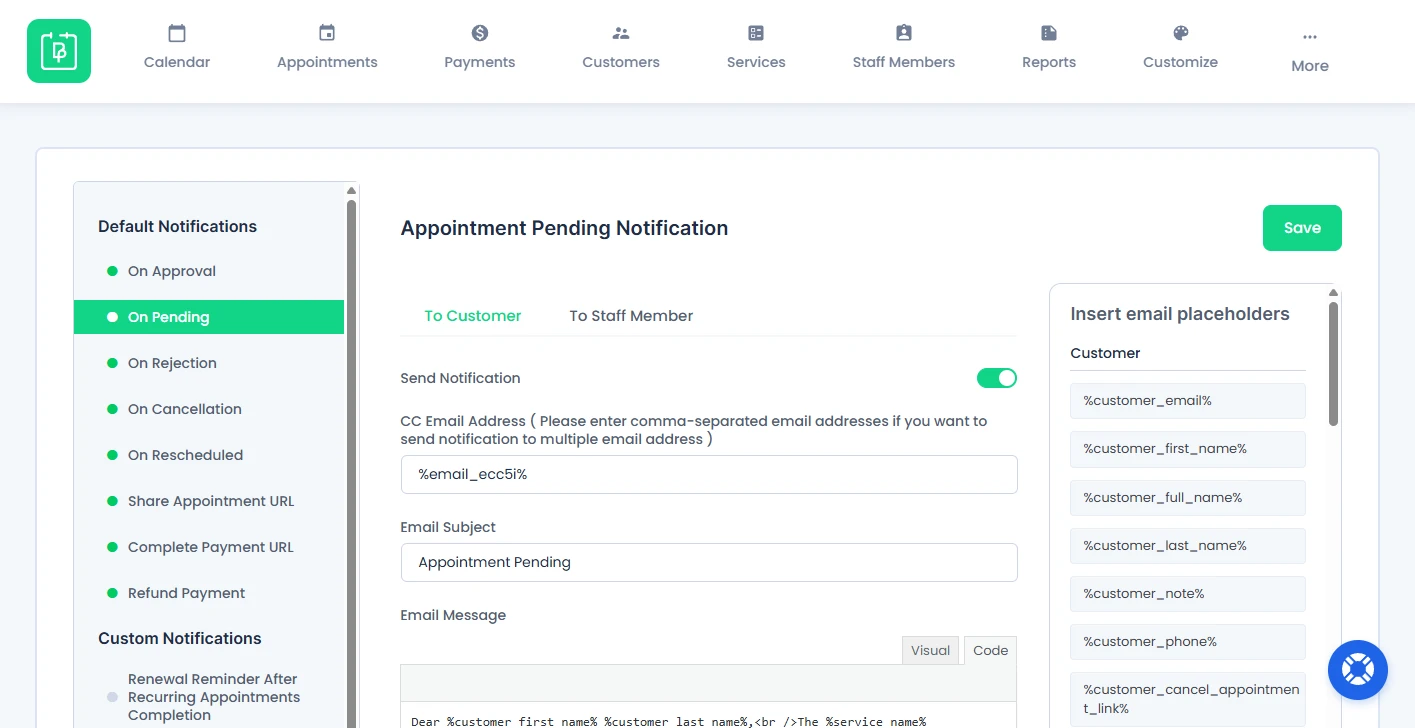
The email notification is sent when an appointment is booked and the status is Pending
3. Appointment Rejection
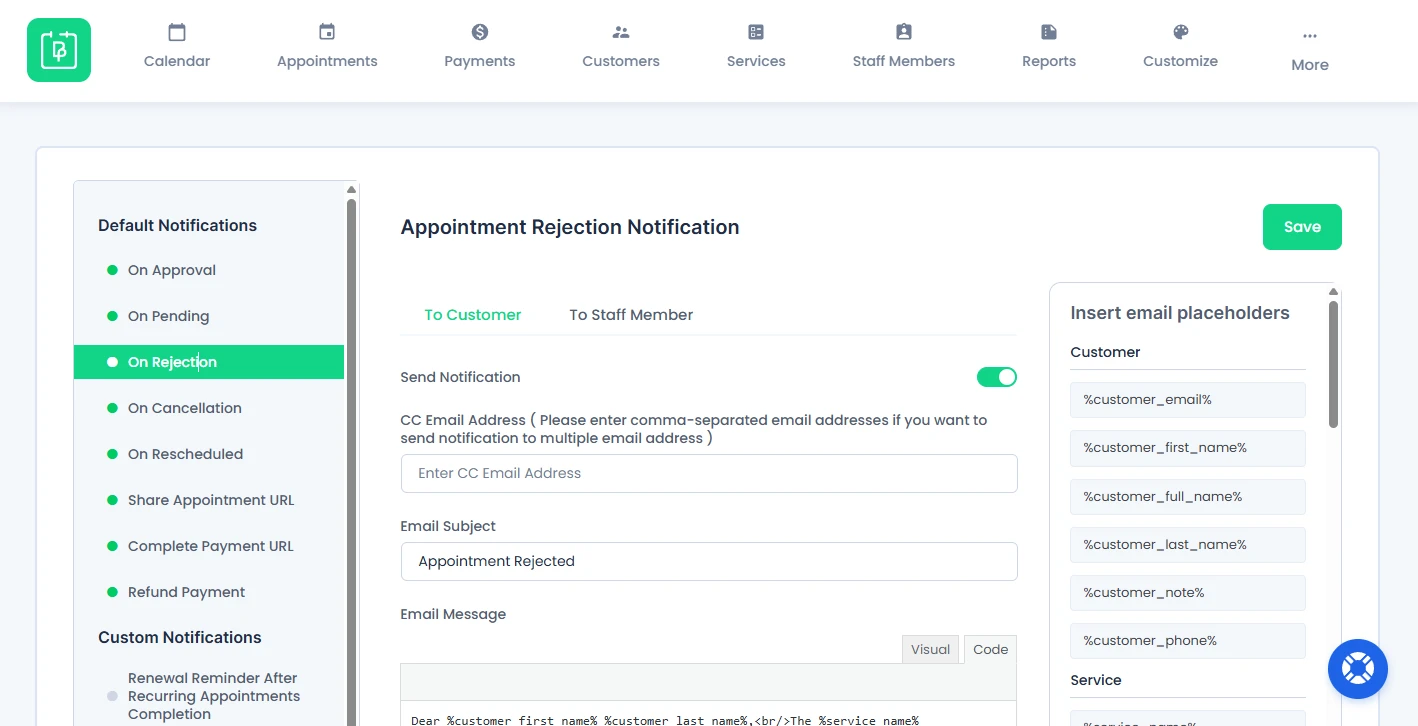
The email notification is sent when an appointment is rejected by the admin
4. Appointment Cancellation
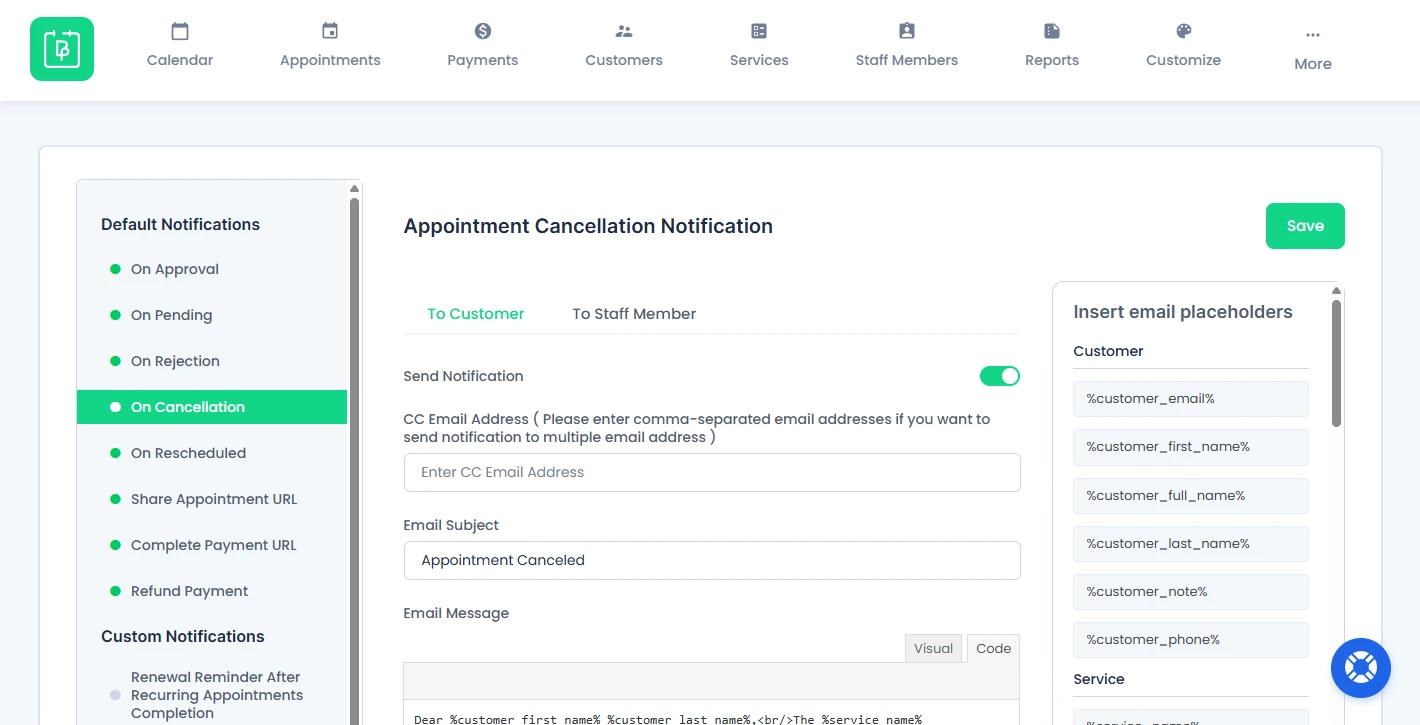
The email notification is sent when an appointment is canceled by the customer
5. Appointment Reschedule

The email notification is sent when an appointment is rescheduled.
6. Share Appointment URL

This option sends a booking link to the customer.
7. Complete Payment URL
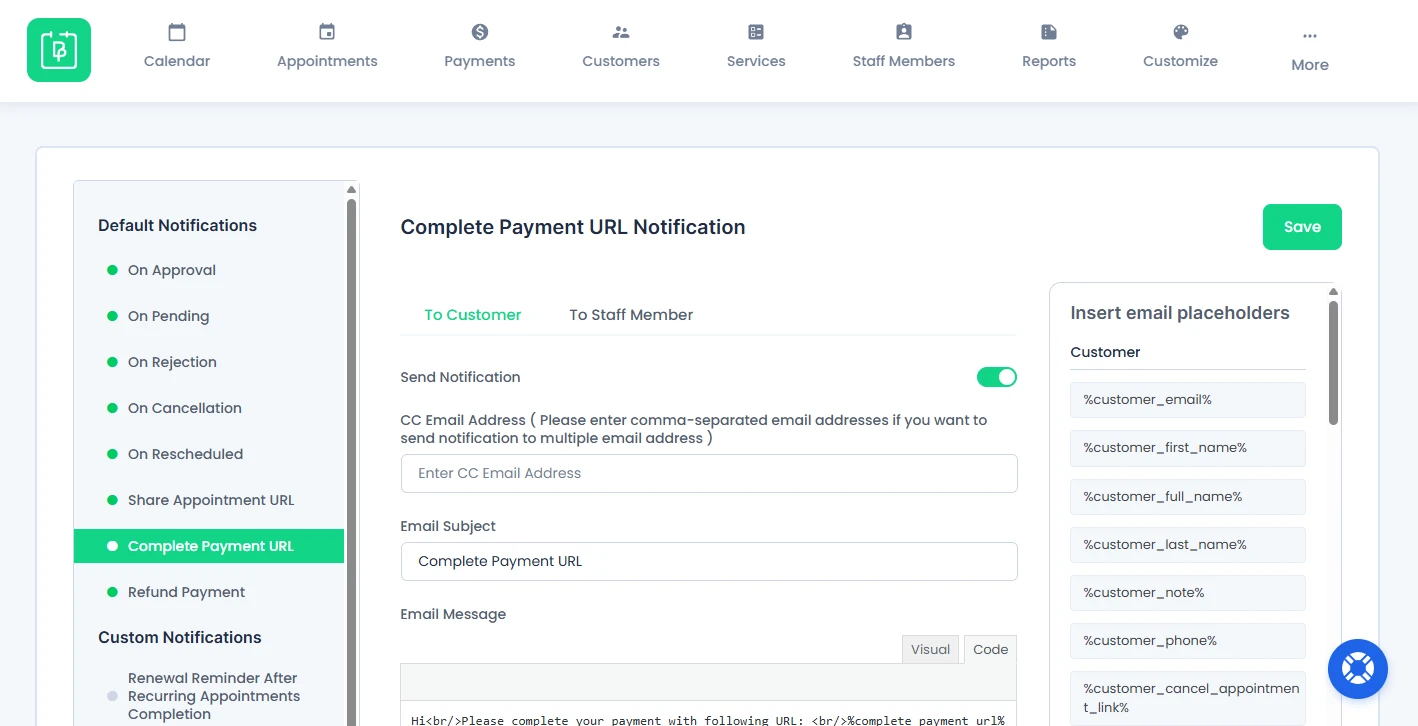
This sends a payment link to complete booking.
8. Refund Payment
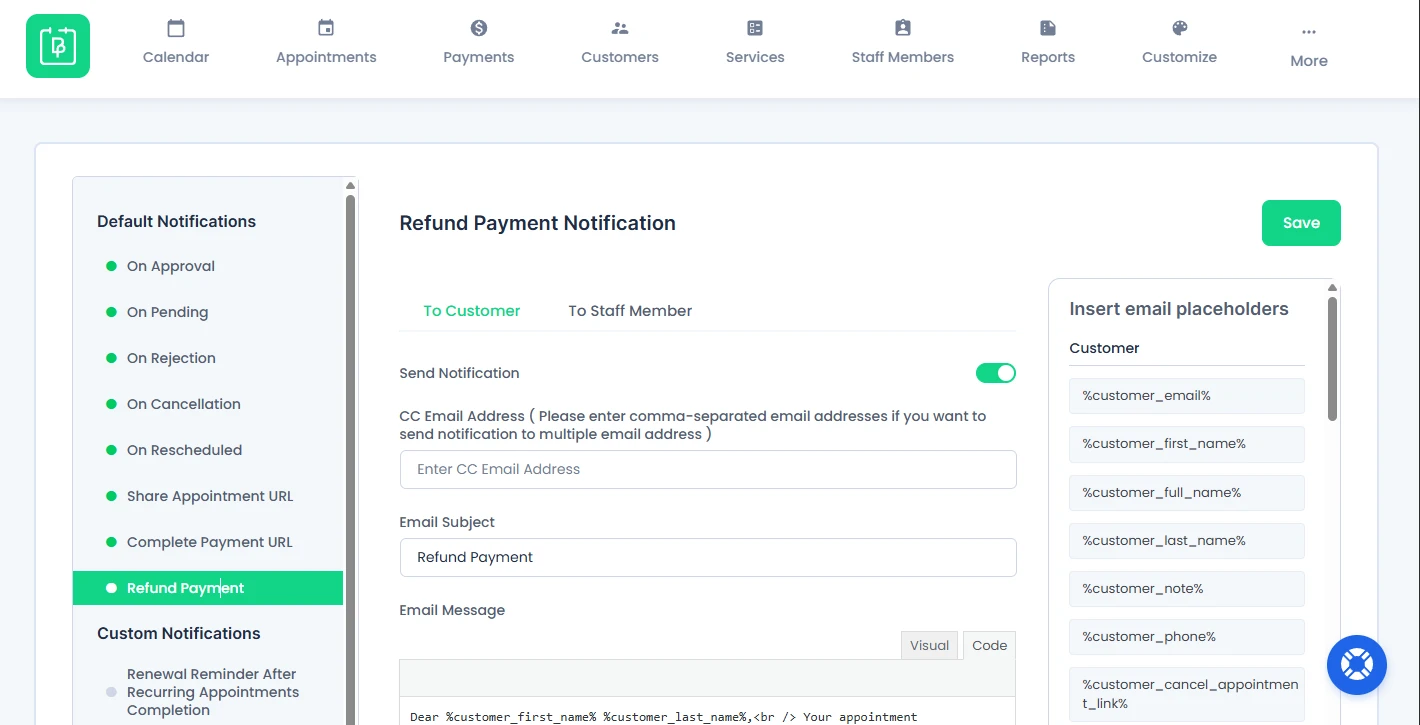
This option is sent when a refund is initiated.
Note: You can disable any automatic notification using the Send Notification toggle.
Staff Member Email Notifications
You can also send automatic email notifications to all your staff members. Just switch to “To Staff Member” from “To Customer” and draft your staff member notification message.

- Enable or disable notifications using the Send Notification toggle.
- Add additional recipients using the CC Email Address field.
The demo messages will automatically switch from “Customer” to “Staff member” as well for just-in-case you forget to edit it manually.
Custom Email Notifications
Apart from the pre-defined notifications, BookingPress allows you to add Custom Notifications.
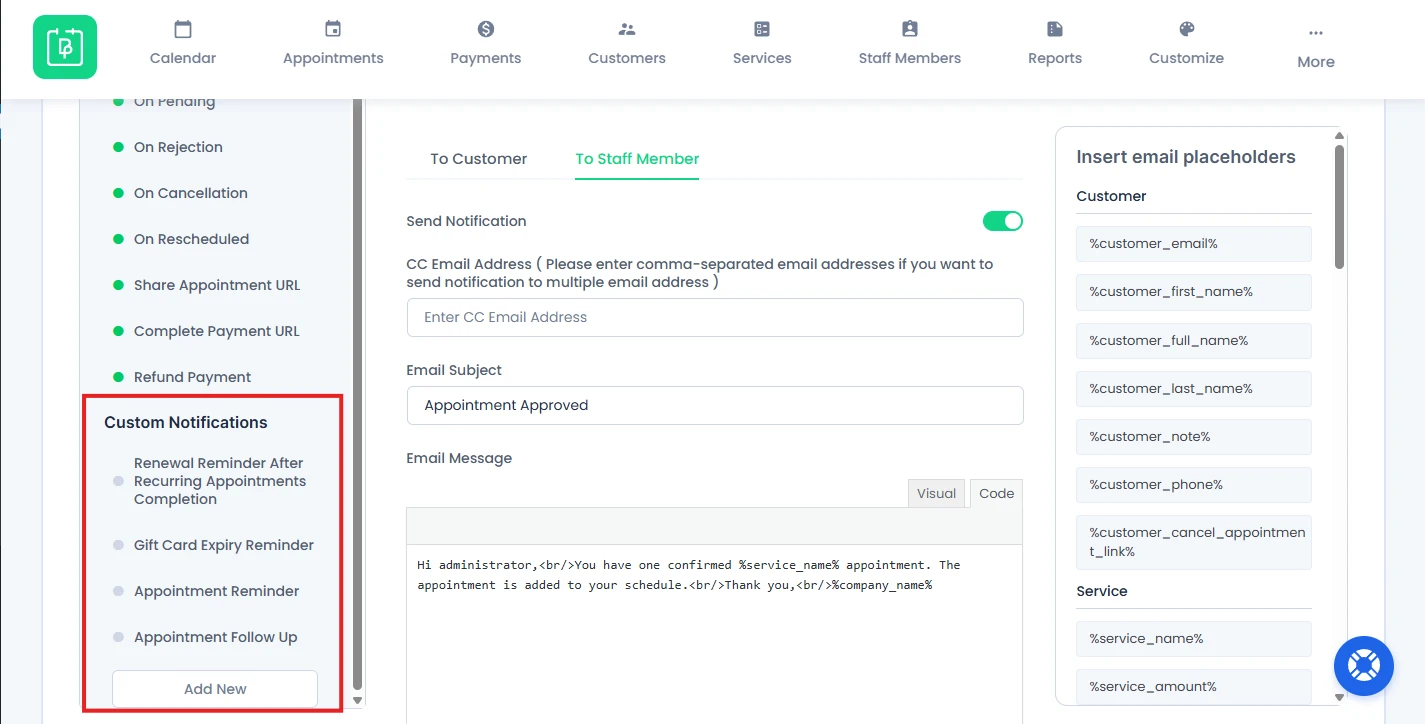
By default BookingPress provides four custom notifications:
- Renewal Reminder After Recurring Appointments Completion (Shows only if Recurring Appointment Addon is activated)
- Gift Card Expiry Reminder (Shows only if Gift Card Addon is activated)
- Appointment Reminder.
- Appointment Follow up.
These are not mandatory as they are scheduled Notifications.
How to Create a Custom Notification
For sending a custom email notification, you must create a custom notification by clicking on the “Add New” button under Custom Notifications section, in the side menu bar of Notifications page.
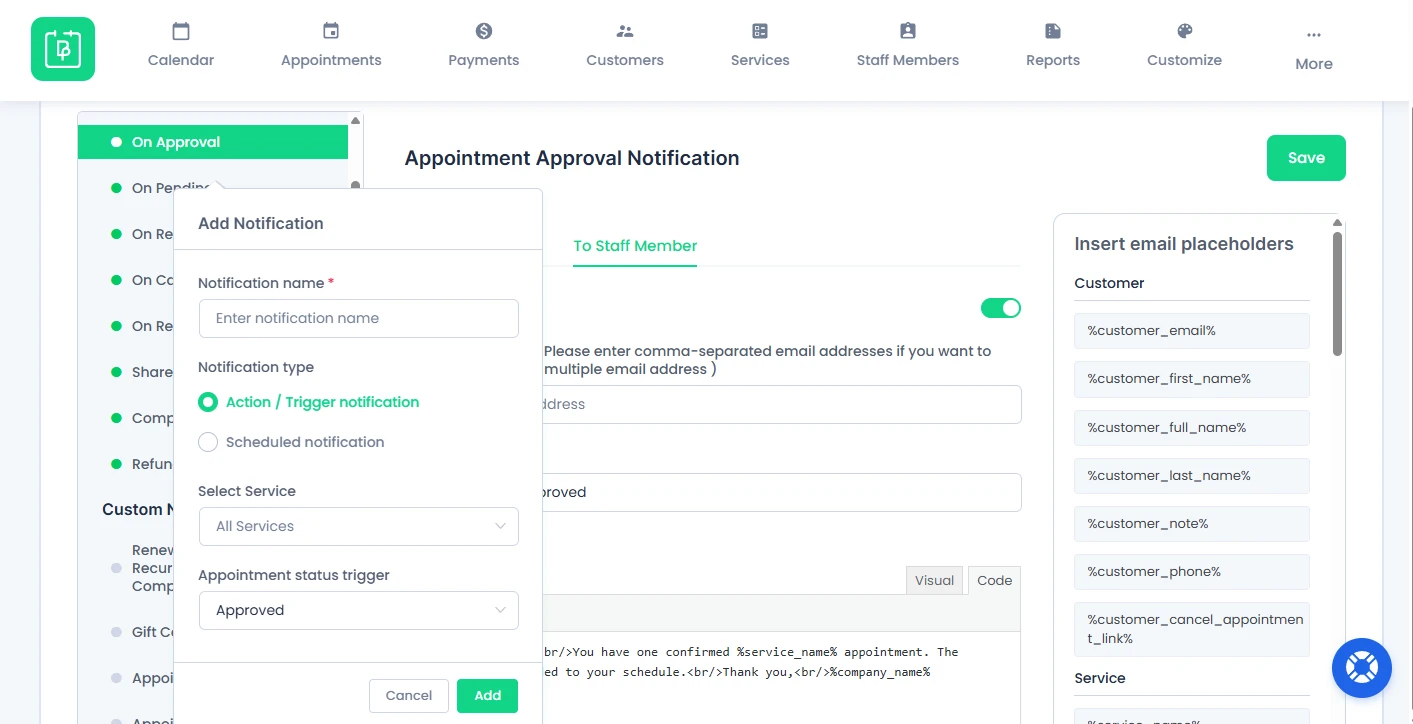
A new popup box will appear and inside that, you can set:
Notification name
First, you have to name the notification.
Notification Type

Next, there are two types of notifications you can create:
Action/Trigger notification.
If you select the trigger/action then the notification will be sent when based on the “Event Action” that is triggered, like if the appointment is “Approved, Pending, Cancelled, or Rejected.”
Scheduled notification.
If you want to send the notification at a specific time interval, like before an appointment or after an appointment, then you can set the notification type to “Scheduled Notification”. If you will select the “Scheduled Notification” option, then you will need to set the timings by which you want to send the notification.
Suppose, you have selected the notification to be sent before the 6 hours of an appointment. Then you can set the “Schedule” to “Before” Time to “6 hours” and the notification will be sent accordingly based on the client’s appointment date and timing. Or if you want to send a notification after 6 Hours, suppose for the feedback, set the notification schedule to “After” and time accordingly.
Select Service
After that, you can select the service for which you intend to send the notification for a specific “Event”.
By default, the option will be selected as “All Services”, which means this custom notification will be sent on every service’s action. But you can select any specific services too. Or if you want to select more than one service, then you can simply add multiple services to which the “Notification” will be sent depending on the “Event Action”.
Appointment status trigger
At last, you can set the Trigger of the notifications, it can be set to :
- Approved
- Pending
- Canceled
- Rejected
- No-Show
- Completed
After the Custom Notification is set, simply click on the “Add” button and you are set to send the custom notification.
You can also delete any custom notification when needed.
Email Notification Placeholders
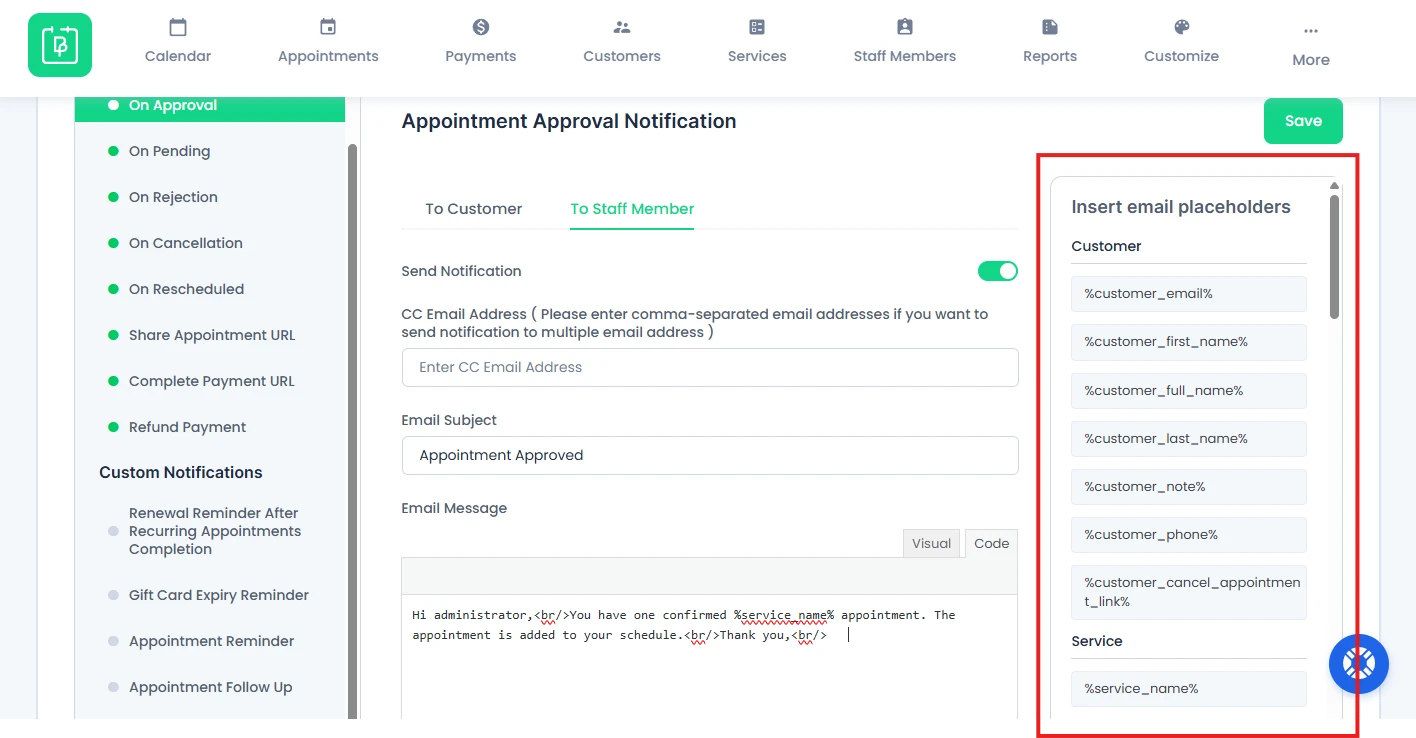
BookingPress offers Placeholders which are used to dynamically add real data into email messages.
In simple words, they automatically replace values such as customer name, service details, and appointment information.
Furthermore, in the same way, the data is generated by the customer’s input data. If the notification for sending the Email “To Staff Member” is enabled, then the placeholders will be placed according to the Staff Member’s data.
The Placeholders are divided into five groups:
- Customer
- Service
- Company
- Staff Member
- Appointment
- Custom Fields (Extra if you have created any custom fields)
Customer Placeholders
| Placeholder | Description |
%customer_email% | Displays the customer’s email. |
%customer_first_name% | Displays the customer’s first name. |
%customer_full_name% | Displays the customer’s full name. |
%customer_last_name% | Displays the customer’s last name. |
%customer_note% | Displays the customer’s note. |
%customer_phone% | Displays the customer’s phone number. |
%customer_cancel_appointment_link% | Displays appointment cancellation link. |
Service Placeholders
| Placeholder | Description |
%service_name% | Displays the service name. |
%service_amount% | Displays the service price. |
%service_duration% | Displays service duration. |
%service_description% | Displays service description. |
%category_name% | Displays the service category name. |
Company Placeholders
| Placeholder | Description |
%company_name% | Displays the company name. |
%company_phone% | Displays the company phone number. |
%company_website% | Displays the company website. |
%company_address% | Displays the company address. |
Staff Member Placeholders
| Placeholder | Description |
%staff_email% | Displays the staff member’s email. |
%staff_first_name% | Displays the staff member’s first name. |
%staff_full_name% | Displays the staff member’s full name. |
%staff_last_name% | Displays the staff member’s last name. |
%staff_phone% | Displays the staff member’s phone number. |
Appointment Placeholders
| Placeholder | Description |
%appointment_date% | Displays appointment date. |
%appointment_date_time% | Displays appointment date and time. |
%appointment_weekday% | Displays weekdays. (e.g., Monday) |
%appointment_duration% | Displays appointment duration. |
%appointment_start_time% | Displays start time. |
%appointment_end_time% | Displays end time. |
%appointment_amount% | Displays appointment price. |
%appointment_status% | Displays status. (Approved, Pending, etc.) |
%booking_id% | Displays booking ID. |
Fetching CC Email Address from the Basic Details Step
BookingPress allows you to fetch Customer CC emails directly from the Basic Details step. You can achieve this in two ways:
1. Using Custom Fields
If you have created a Custom Field for CC Email, follow these steps:
First, go to the BookingPress →Customize → Custom Fields. Now create a CC Email field.
Next, head back to BookingPress → Notifications for adding the Custom Field placeholder in the CC section.
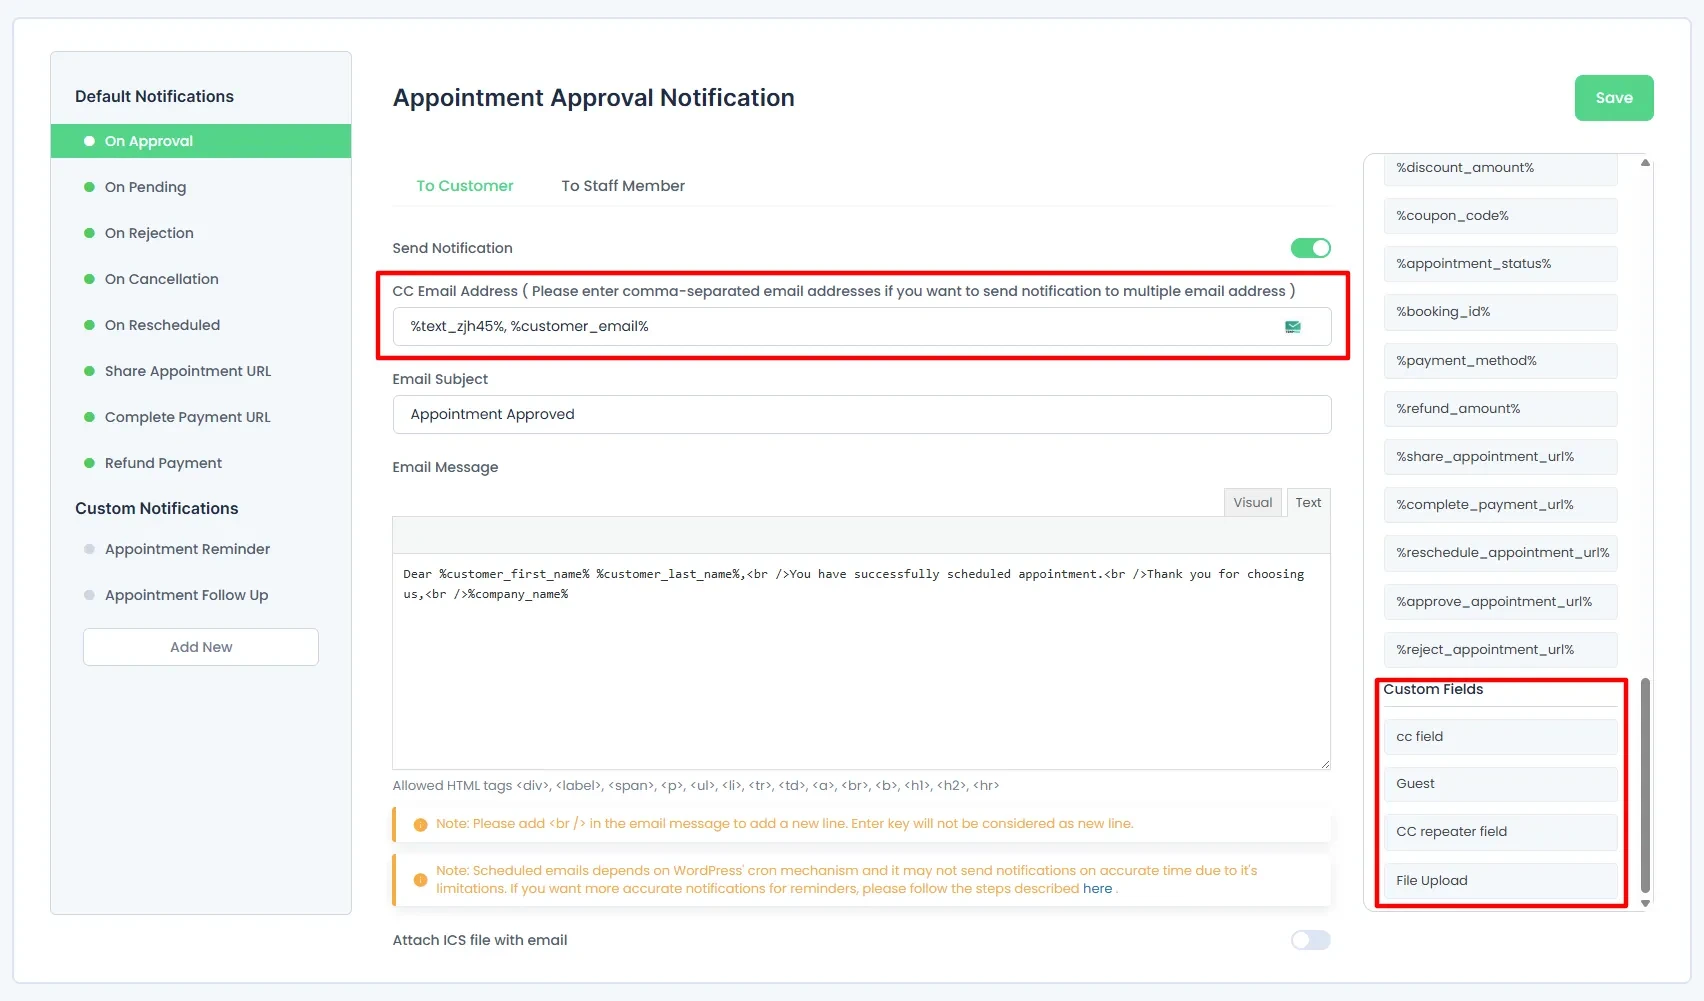
When a customer enters their CC email in the Basic Details step, it will automatically populate in the CC section. This makes sure the recipient receives the Customer Notification.
2. Using Repeater Fields
If you want to send notifications based on the quantity of people booked, use the Repeater Field feature:
- Add the BookingPress Email field inside the Repeater Field.
- In BookingPress →Notifications, use the placeholder
%customer_email%in the CC Email Address field.
This makes sure that each person listed in the appointment receives the notification.
For more details on customizing the Repeater Field, refer to the documentation here.
Approve & Reject Bookings via Email Notifications
The Approve/Reject Link features allows admin and staff members to approve or reject requests directly through a URL sent via email. This feature streamlines the approval process, enabling quick and efficient action with just one click.
Approval and Rejection URLs
When an appointment is created, two unique URLs are generated—one for approval and one for rejection. These URLs are embedded in the email sent to the admin or staff members.
Important Note: These links will expire in 48 hours, so they must be used within this time frame.
- Approval Link: Works only in case the appointment status is pending.
- Rejection Link: Works in case the appointment status is either approved or pending.
Single-Click Actions:
By clicking the approval or rejection link in the email, the administrators or staff members can instantly perform the desired action on the appointment without needing to manually navigate to the appointment management interface.
Placeholders in Templates:
For integrating these URLs into your email communication, just add the placeholders to the relevant templates. The placeholders will be automatically replaced with the URLs when the email is sent.
%approve_appointment_url%: Sends a link to directly approve an appointment to an admin/staff member.%reject_appointment_url%: Sends a link to directly reject an appointment to an admin/staff member.
How Email Notifications Work
First of all, customers book an appointment from the BookingPress booking form.
After the booking is successful, the BookingPress system triggers the Email notification automatically.
Now Email notification is sent to customer and/or staff at the same time. Inside the Email message, all placeholders will be replaced with the real time data.
Need a hand?
Our world-class support team is happy to help. Send us a message and we’ll take it from there.