Payments
The BookingPress Payments page lets you manage all your appointment payments in one place. You can easily view, manage and delete payment data of bookings from here.
Here is the quick overview of the Payments page in the BookingPress.
How to Manage Payments?
You can view and filter all your appointments from the WordPress → BookingPress → Payments.
Here, you get to access all transaction records and filter them based on specific criteria such as date, staff member, customer name, service and payment status.
Please Note: You can control how many payment records should be shown per page. Just go to General Settings → Default Items Per Page, and set the desired number of payment records per page.
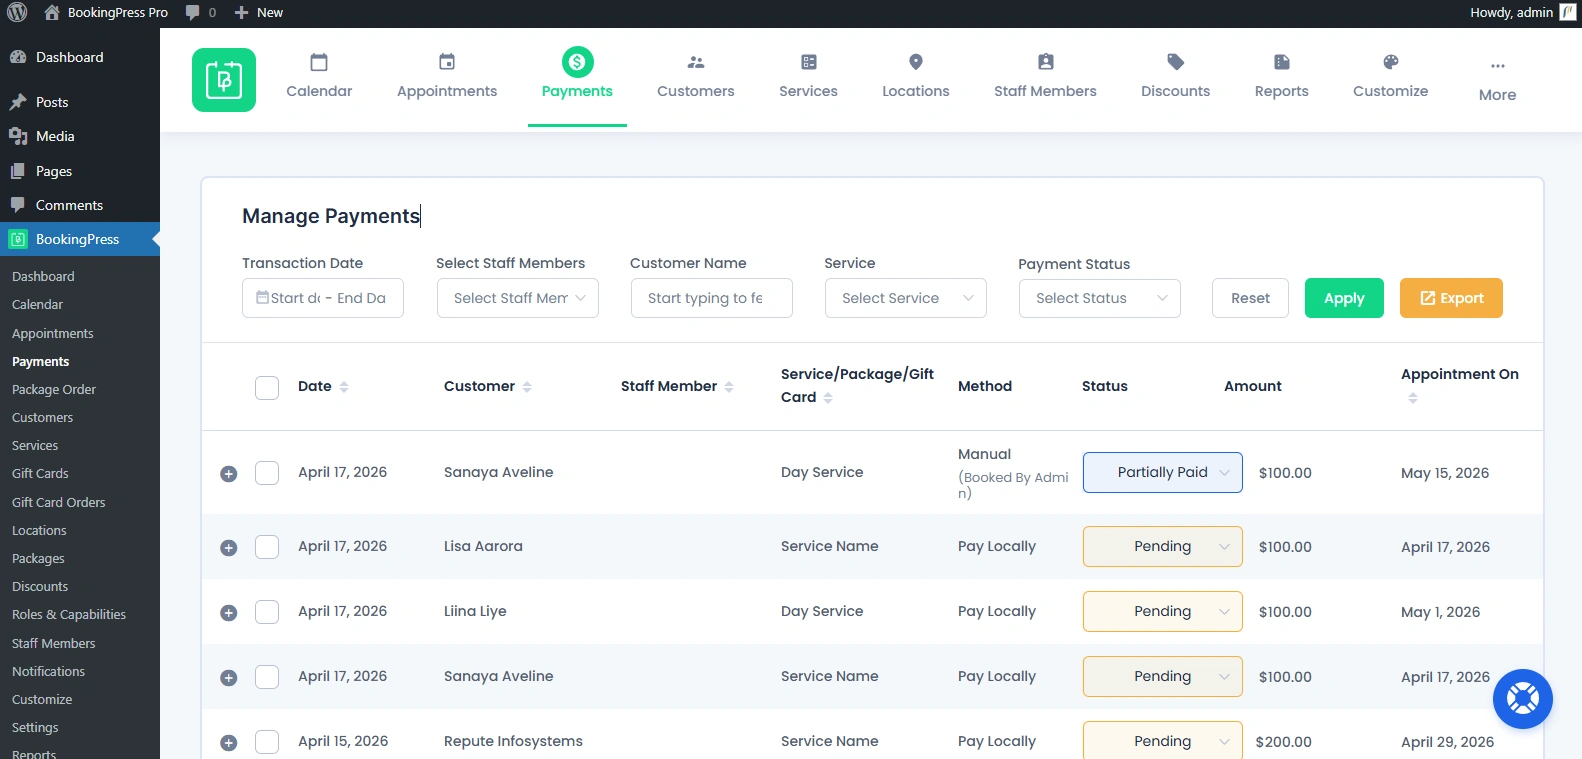
View Payments

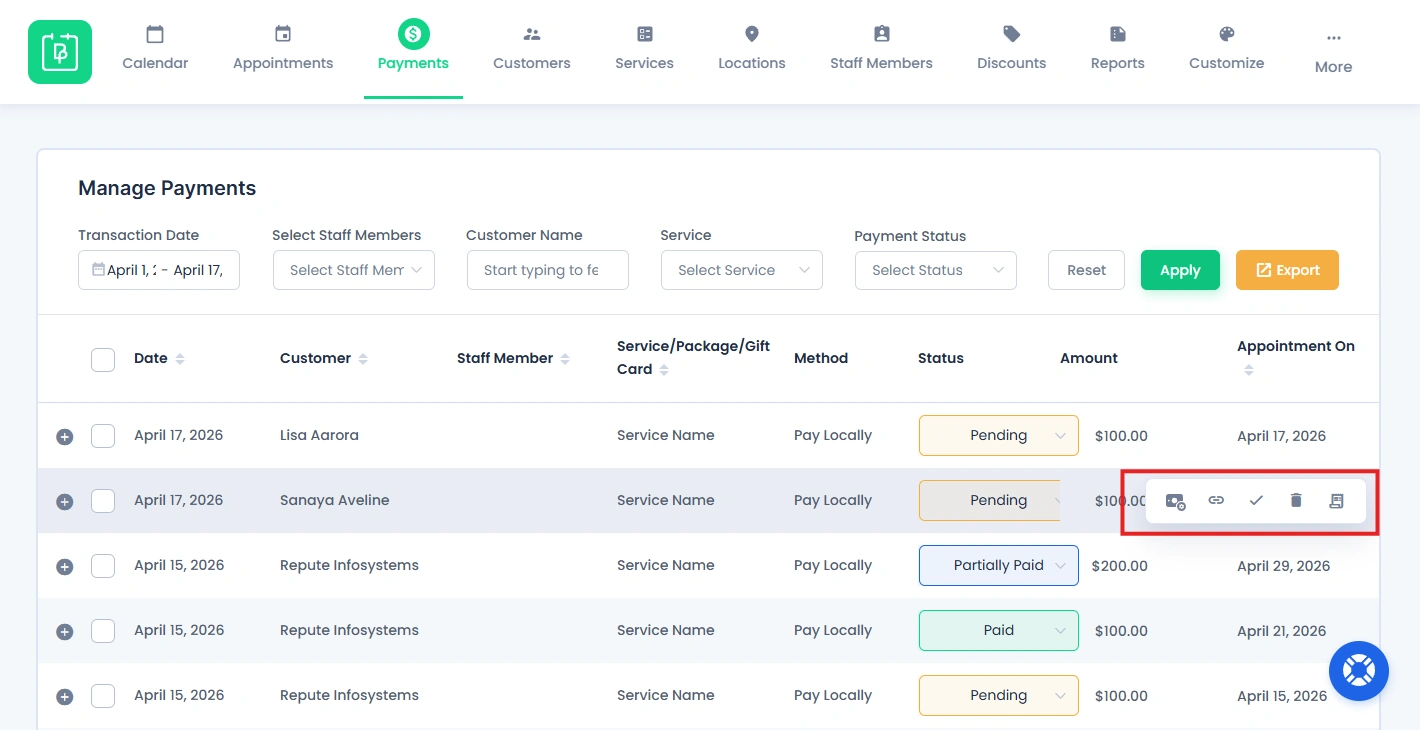
Reach the Payments page inside the BookingPress, and the system will show a list of all payment records.
Here you’ll be able to see key details of each transaction for booking:
- Date
- Customer
- Staff Member
- Service/Package/Gift
- Payment Method
- Status
- Amount
- Appointment On
Each record represents a transaction linked to an appointment. You can also arrange them in ascending and descending order by simply clicking on each key detail.
Filter Payments
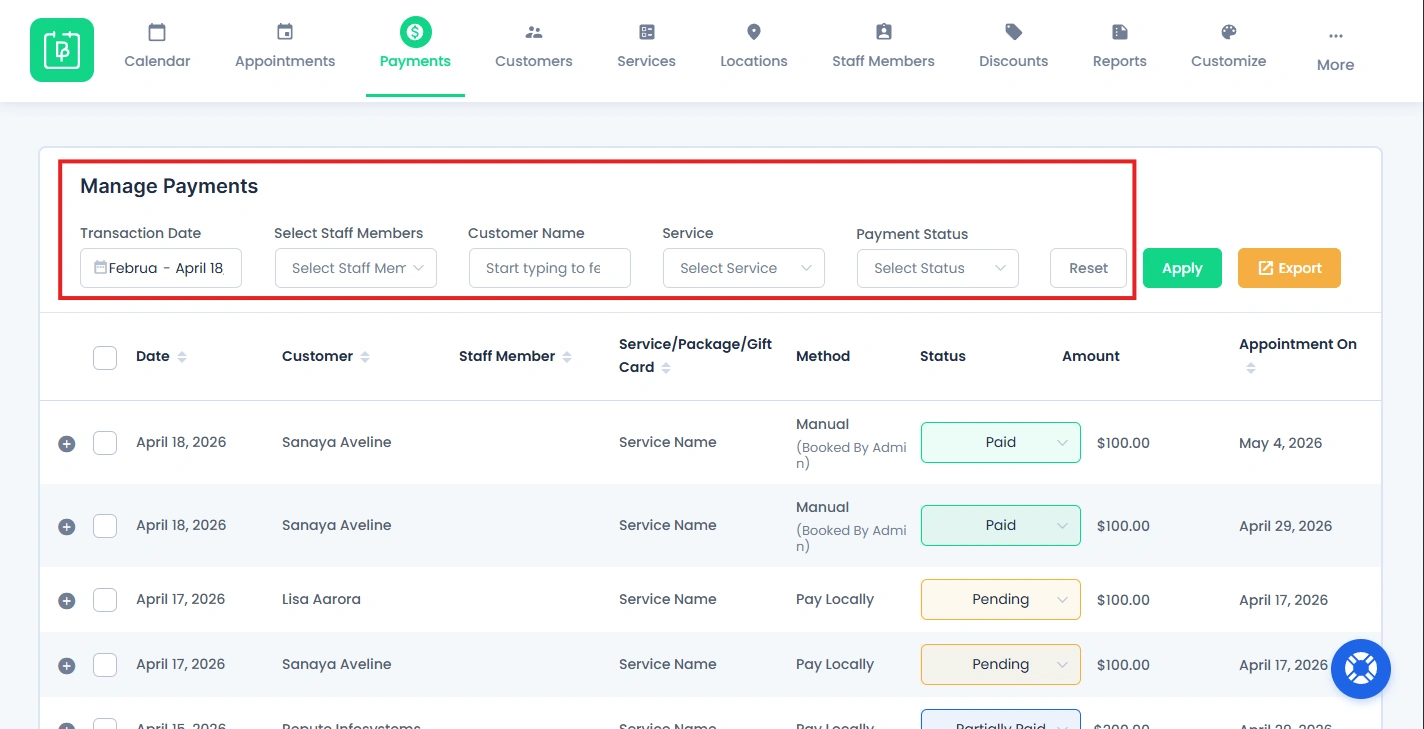
If you want to look for a specific payment record or narrow down payment results, use the filters available at the top of the page.
Here are the all available filters in the Payments:
- Transaction Date: View payments within a selected date.
- Staff Member: Look for payments assigned to a specific staff.
- Customer Name: Shortlist payment by customer.
- Service Name: Filter by service type.
- Payment Status: Sort by status. (Pending, Paid, Failed, more)
Using these filters to find the specific transaction records is real quick. Plus, helps you analyze payment data more effectively.
How to Check Payment Details?
You can easily access complete data for any payment transaction, including service details, pricing, and payment summary.
Here’s how to view a specific payment in BookingPress:
- First, go to the Payments in the BookingPress dashboard.
- Find the payment record you want to view in detail.
- Simply hover over the record, and click to open the details.
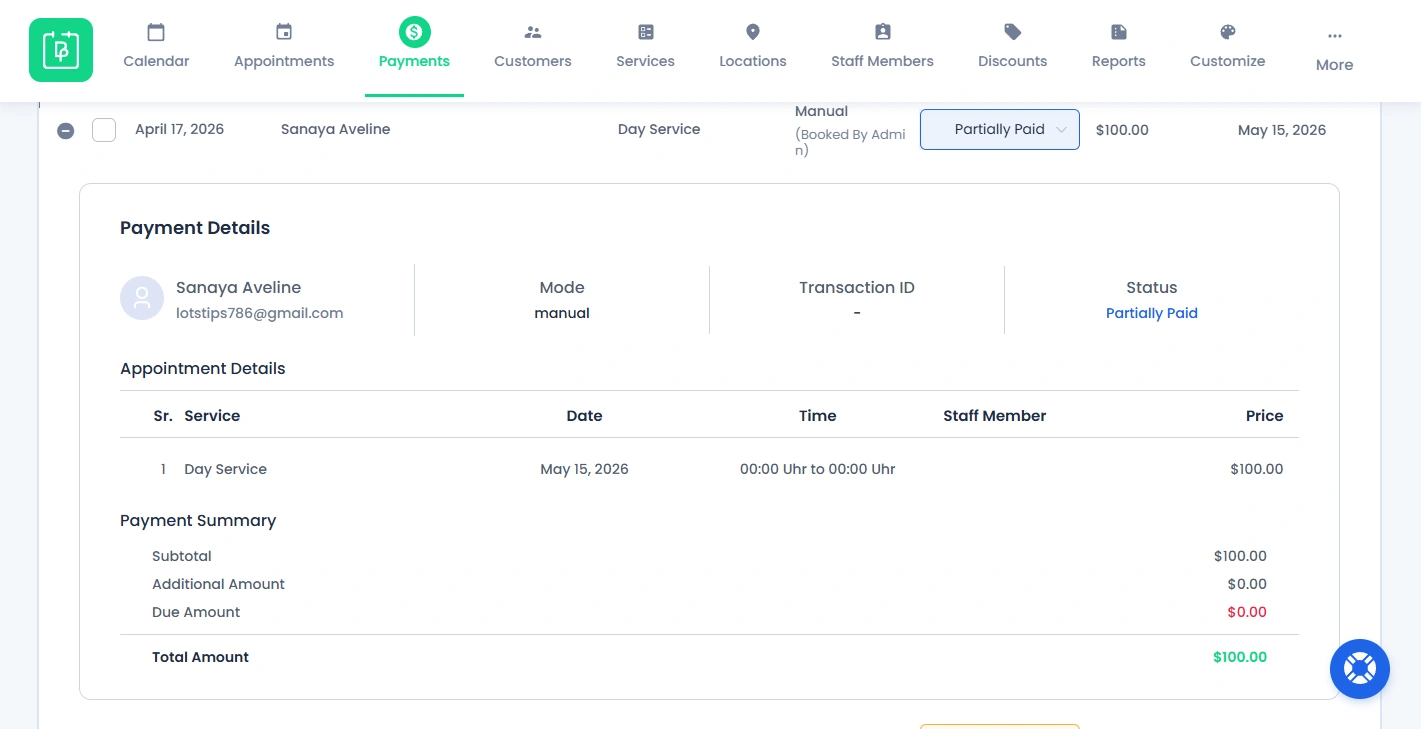
A popup window (modal) will appear with full payment information just below with all the detail you need like:
- Customer name and email address.
- Mode of payment.
- Transaction ID.
- Payment Status.
- Appointment details. (Service, Date, Time, Staff Member and Price)
- Payment Summary. (Subtotal, Additional Amount, Due Amount)
- Total Amount.
This helps you review all transaction details and verify payment data at a glance.
How to Manage Payments (Actions)
The Payments page allows you to take action on existing transactions such as collecting pending payments and adjusting amounts after booking.
For managing payments, hover over a payment record to reveal action icons like additional amount, send payment link, approve, delete and invoice.
Add Additional Amount
The Additional Amount feature inside the Payments allows you to add extra charges to any existing payment record. You can use it for adding additional service charges requested after booking, late fees or penalties, or service upgrades or custom charges.
It helps keep post-booking service adjustments transparent and properly recorded.
Here’s how to add additional amount to an existing payment data:
- First, go to the BookingPress → Payments.
- Hover over the payment record and you’ll see the icon of Additional Amount.
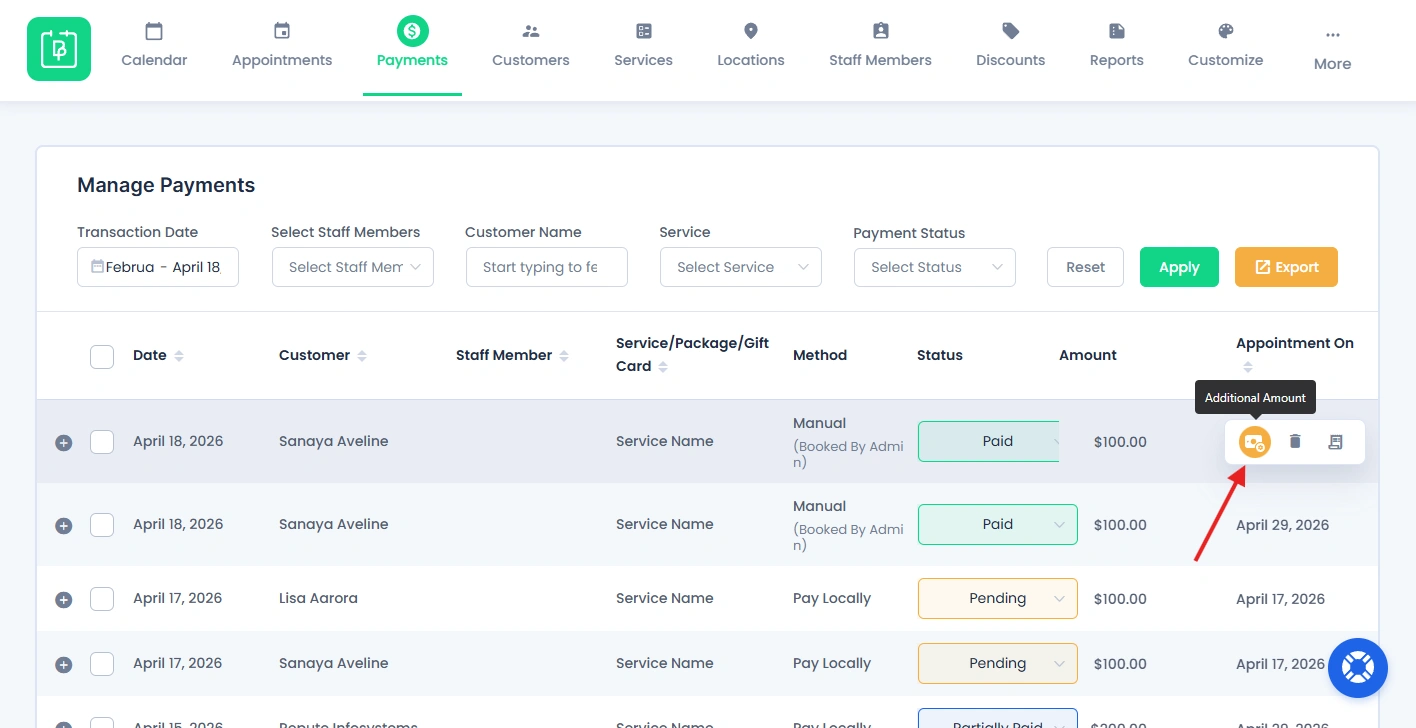
- Click on it and enter the following details in the popup box:
- Details – Reason for the extra charge (e.g.- extra charges added – Hair treatment)
- Amount – The additional charge value
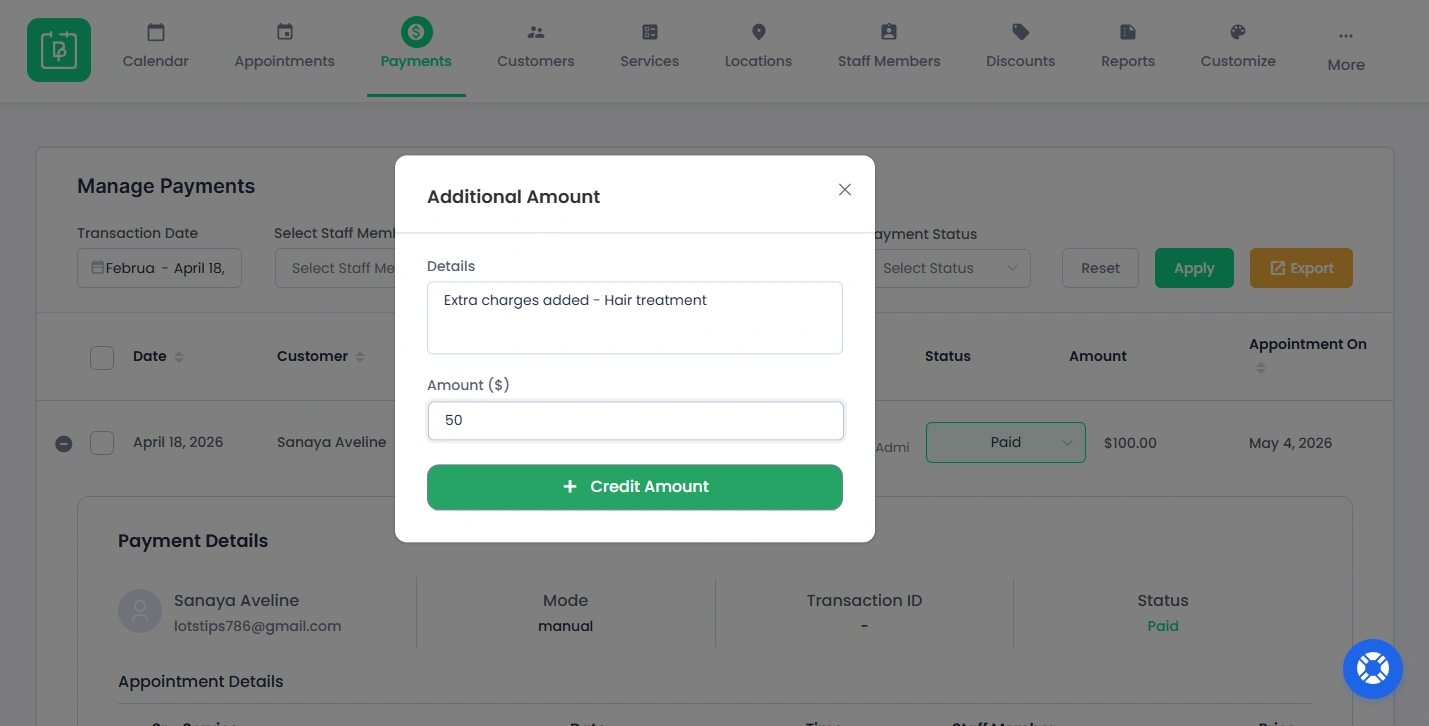
- After entering, just Click “+ Credit Amount” to save changes.
Note :
- The additional amount is added to the total payment automatically.
- You can see the updated total under the “Payment Details” section.
- Tax will be calculated automatically. (Only if the Tax addon is activated)
Send a Payment Link To Customer
You can send a payment link to customers who have not completed their payment. You can send the payment link when the payment is pending or when the customer needs a manual direct link.
Please note: The Send Payment Link option will only be displayed for those payment records whose “Appointment Status” is also pending.
Here’s how to send payment link to customer:
- After reaching the Payments page inside BookingPress, hover over a payment record.
- Click the “Send Payment Link” option.
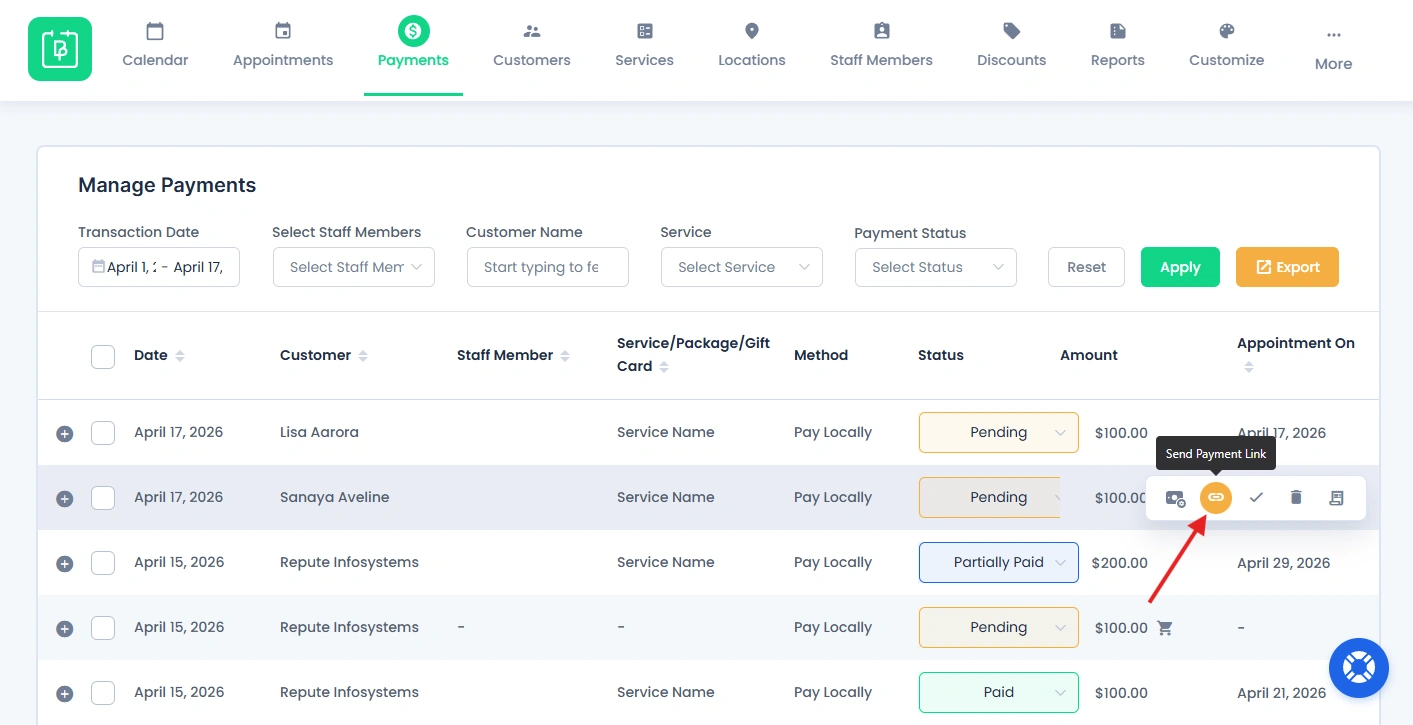
- A modal box will popup with a checkbox for “Share With”.
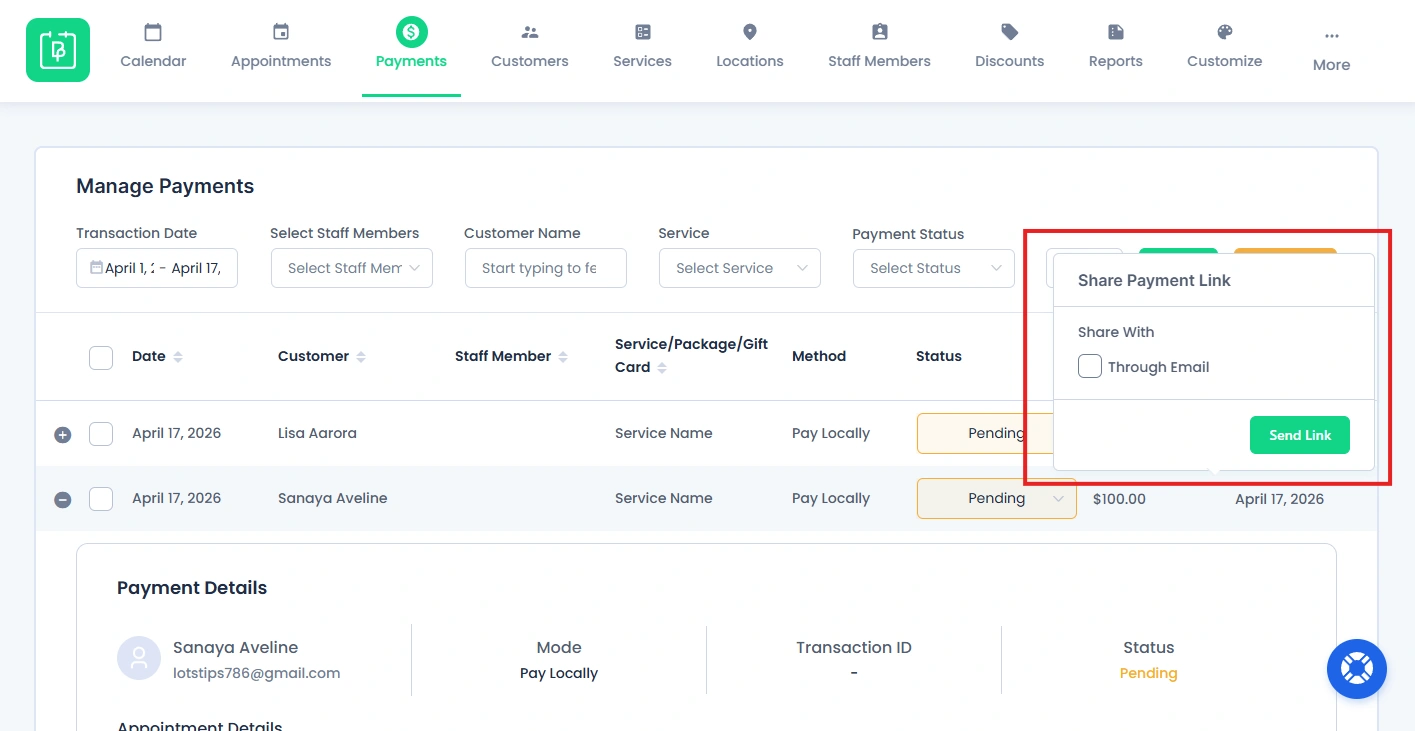
- Tick on the “Through Email” checkbox for sending an Email notification to the registered email address of the customer with a payment link.
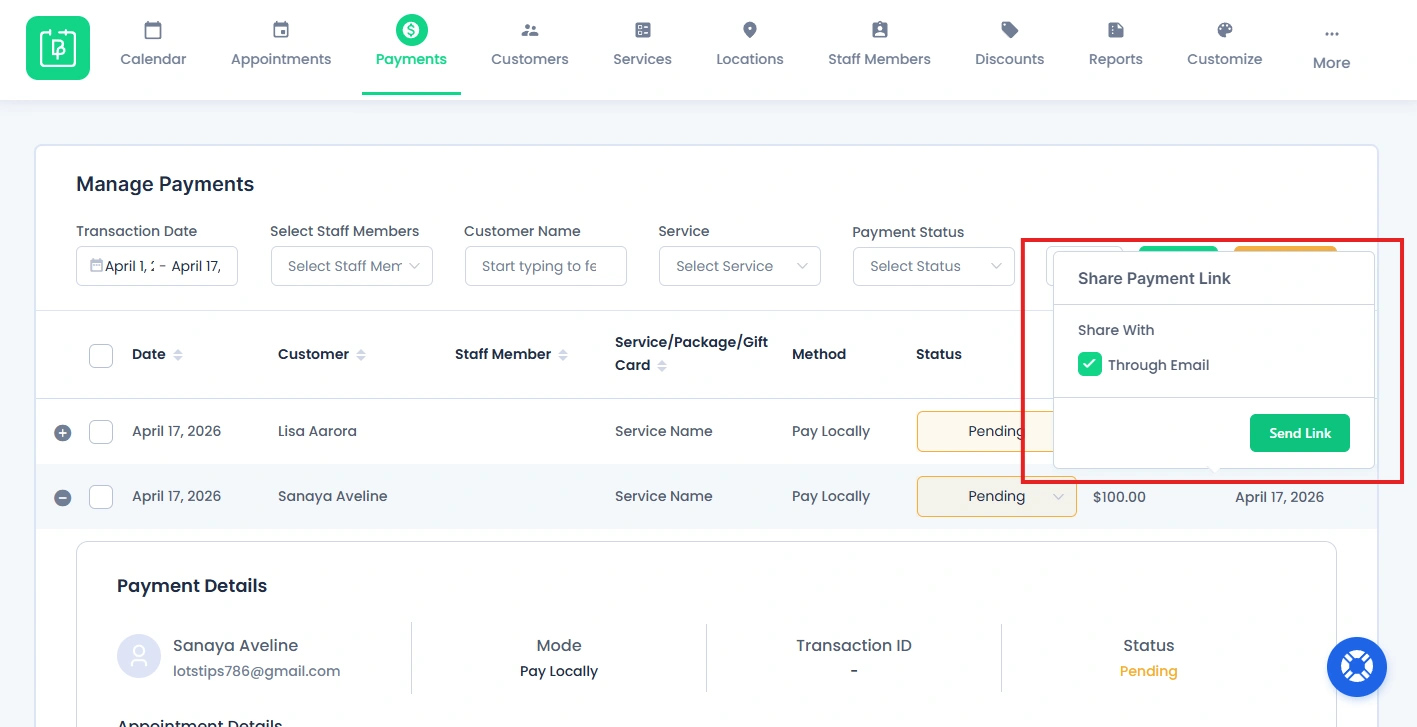
Using the payment link, customers now can pay the amount to finalize the booking of the appointment.
Approve Payment and Appointment
If you want to approve appointment and make payment paid at once for a particular record, here’s how to do it:
Note: This ✔ option will only appear when the payment status and appointment status both are pending.
- Click on the ✔ icon next to the Send Payment Link Option.
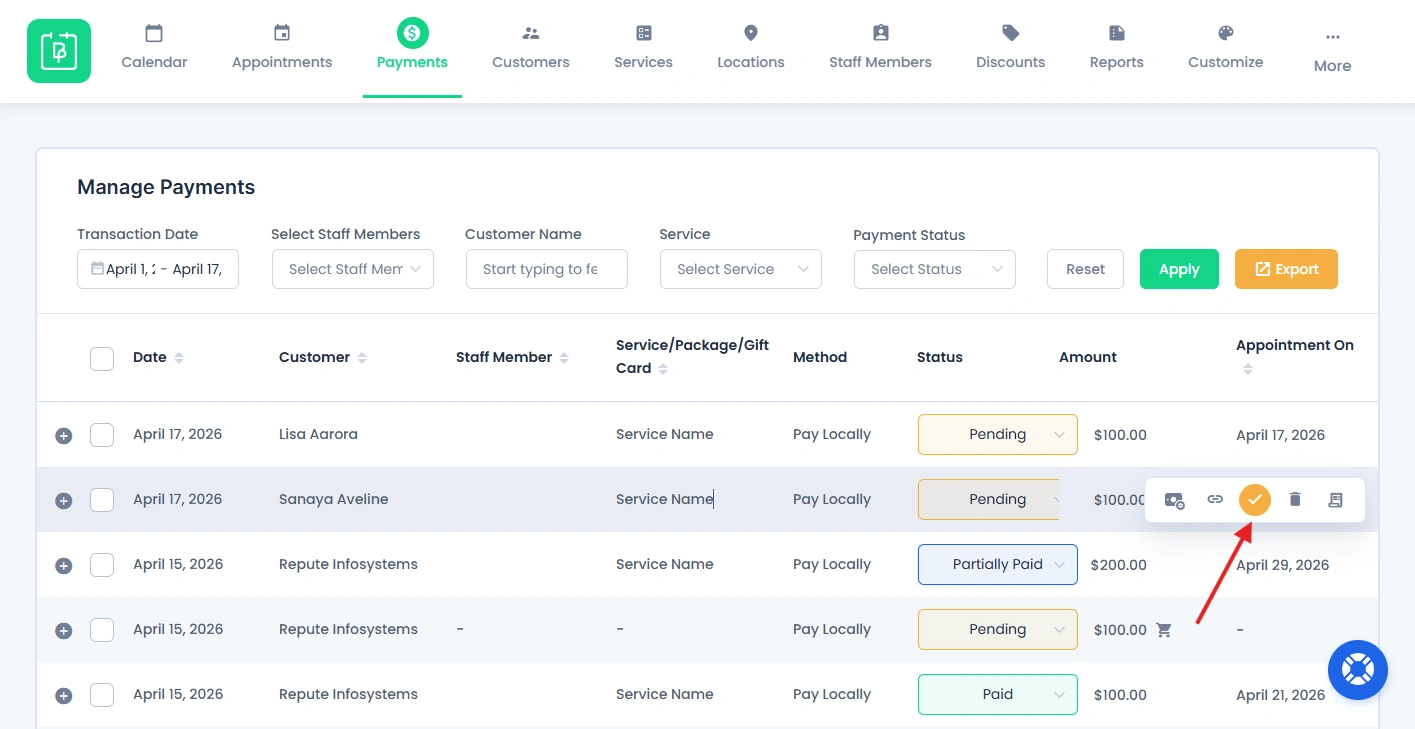
- After, a small popup box will appear, asking,”Are you sure you want to approve the Payment (Appointment will automatically be approved)?”
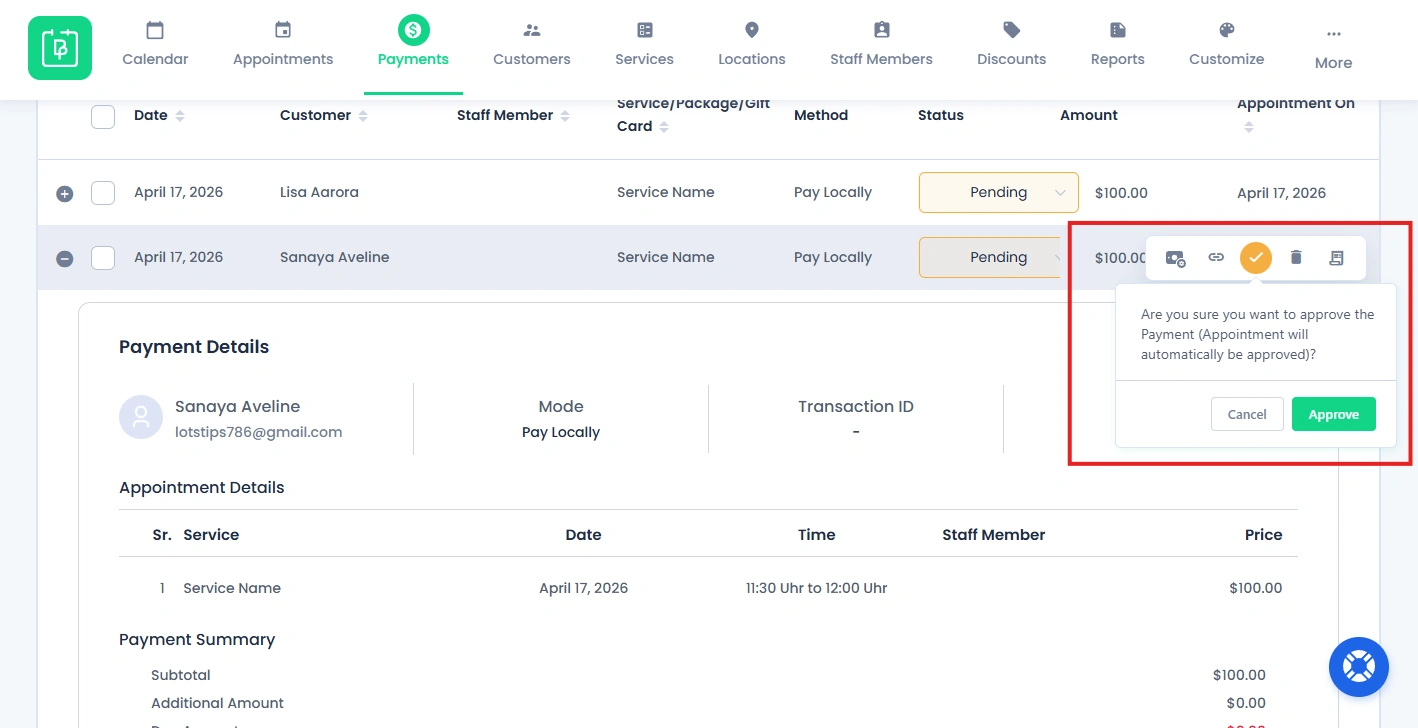
- Click on the “Approve”.
Now the appointment status is “Approved” and the payment status is “Paid”.
Delete Payment Records
You can delete payment records either one-by-one, or in bulk from the Payments section.
Note: Deleted payment records cannot be recovered, so please make sure that you have selected the records you actually want gone.
If you want to delete a specific payment record:
- Inside the Payments page, hover over the payment record you want to delete.
- From the action bar, click on the Delete icon.
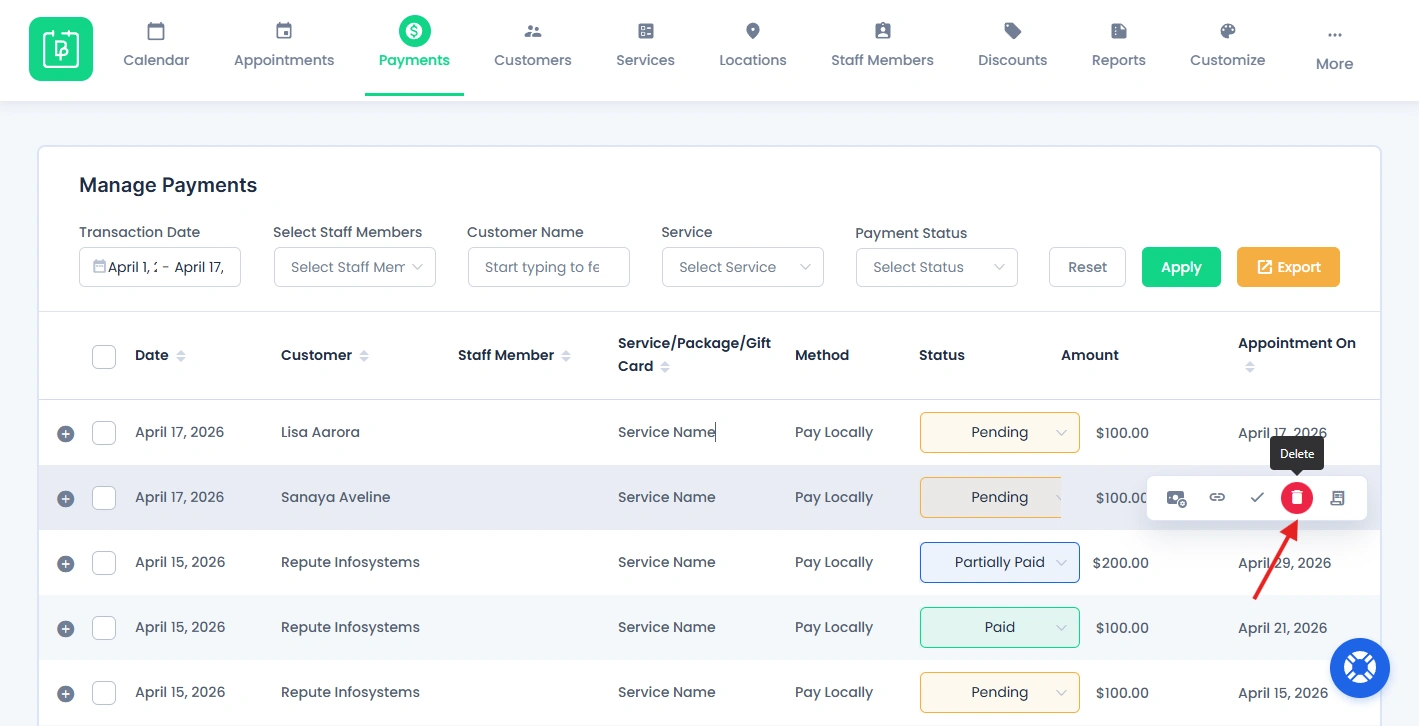
- A confirmation dialog box will appear.
- Click on the Delete button for deleting the payment record.
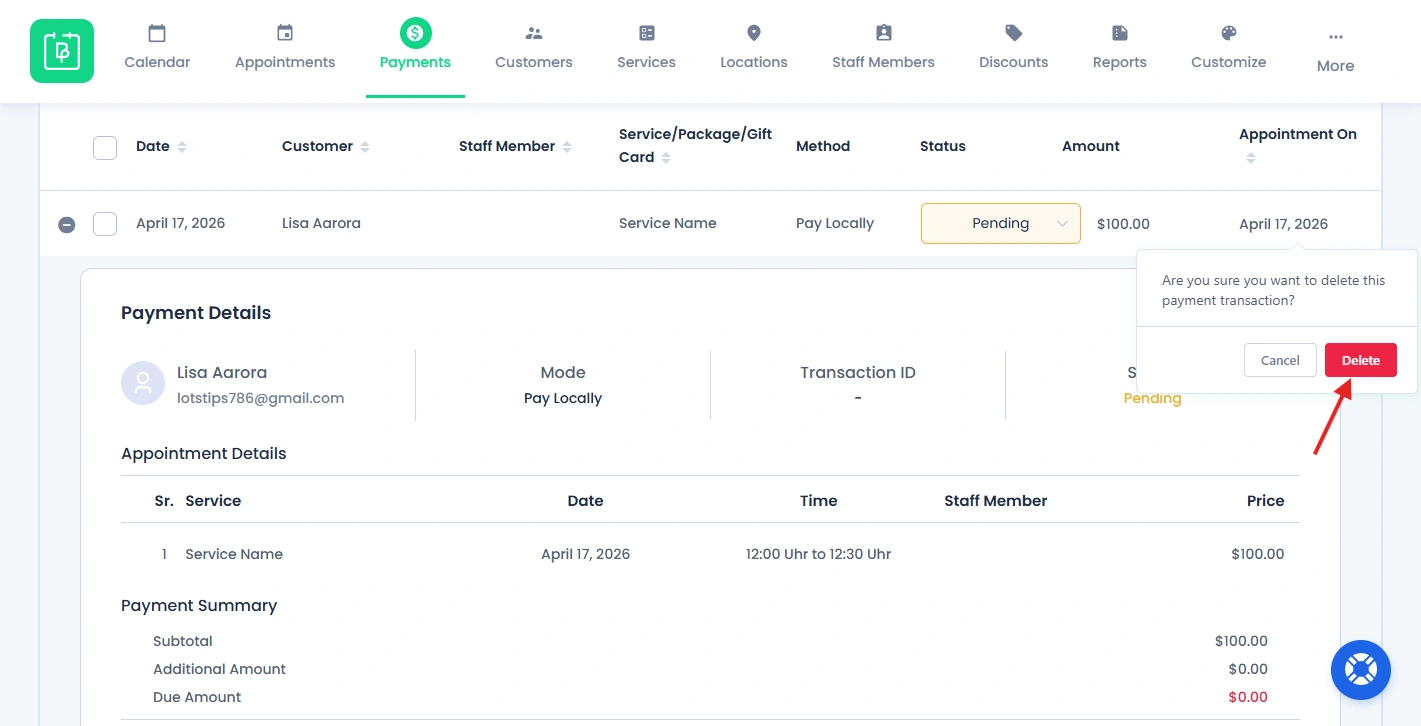
The selected payment will be deleted right away.
If you want to delete multiple payment records at once:
- Select the payment records by checking the checkboxes.
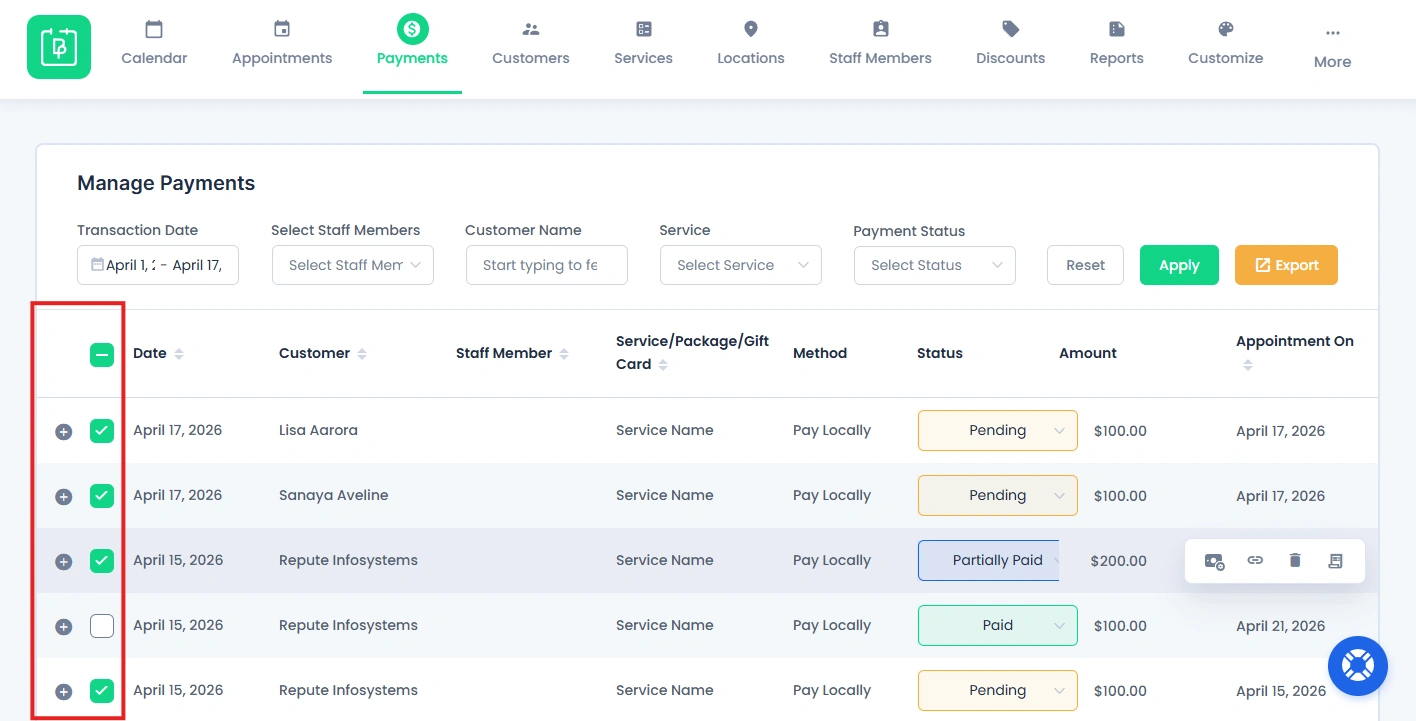
- Once at least one record is selected, a dialog box with “Bulk Action” options will appear at the footer.
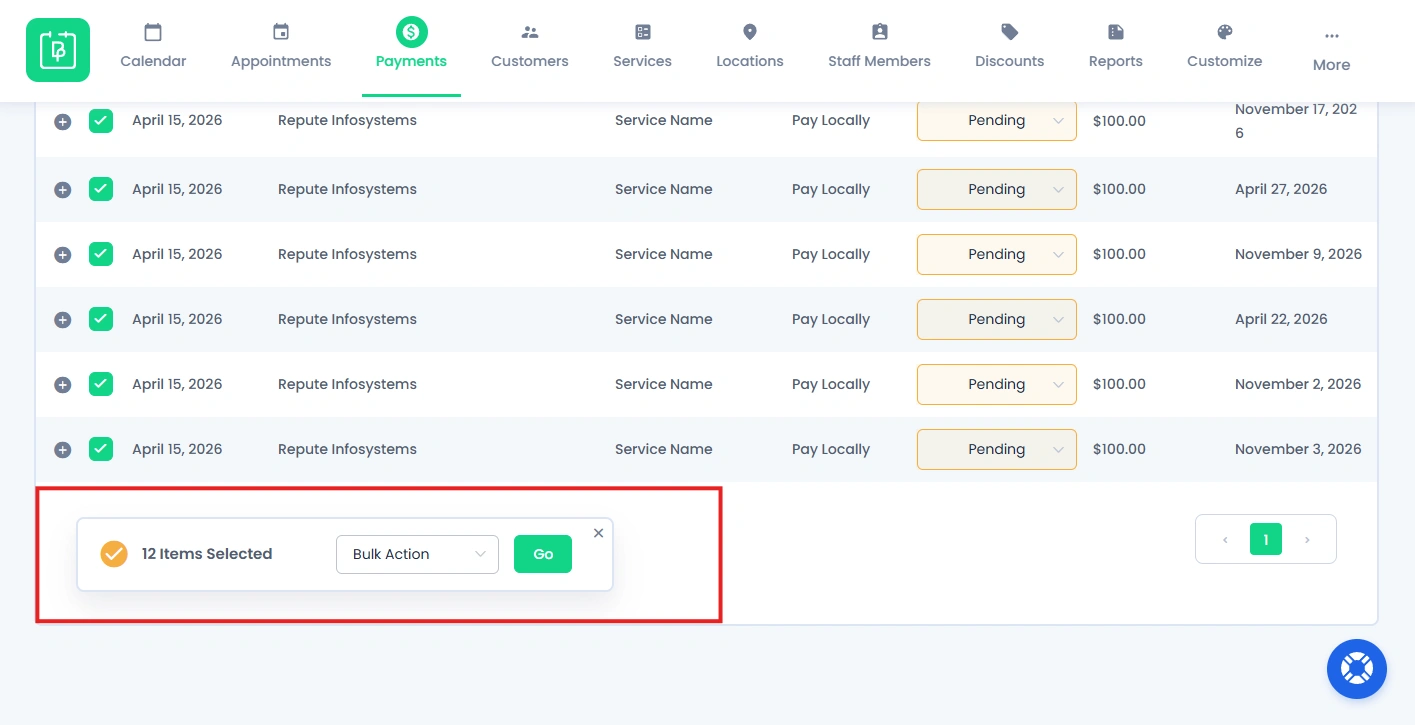
- Open it and select the “Delete” as the bulk action.
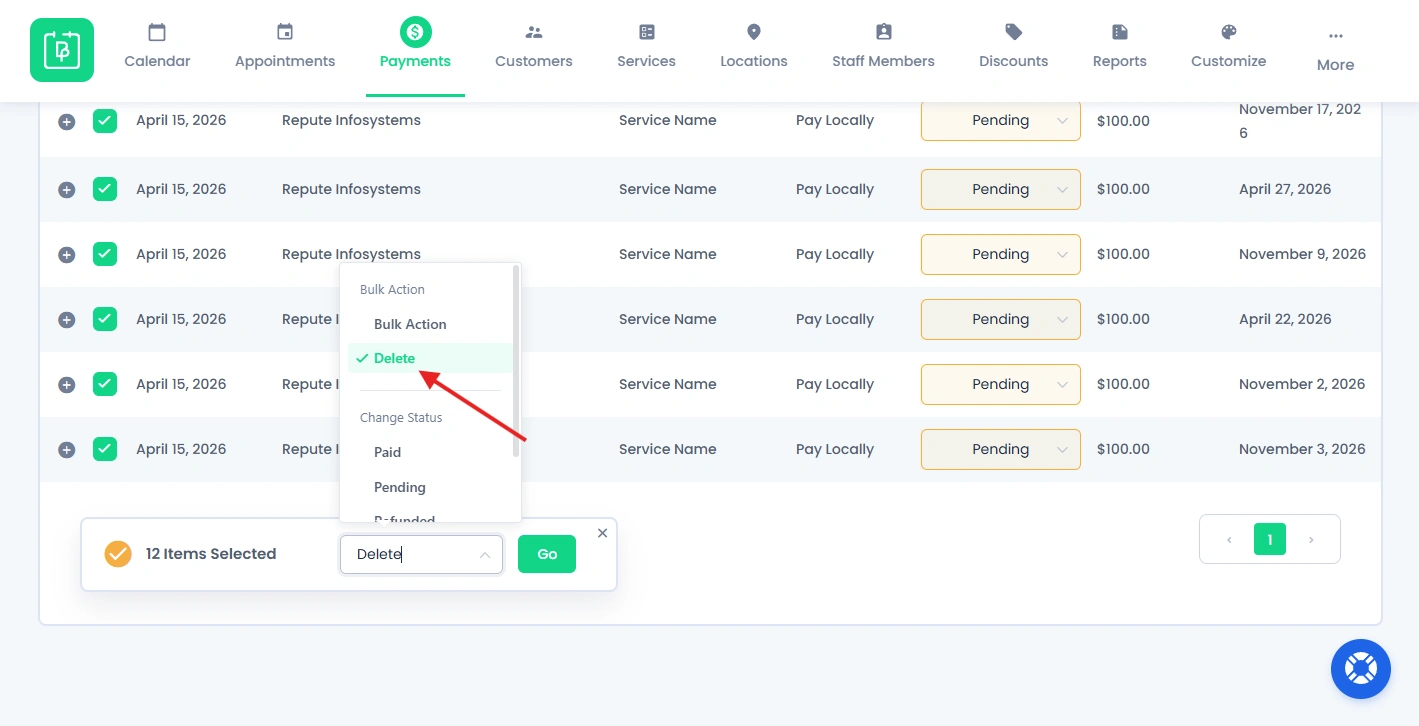
- You can now go ahead and click on the Go button.
All selected payment records will be deleted immediately.
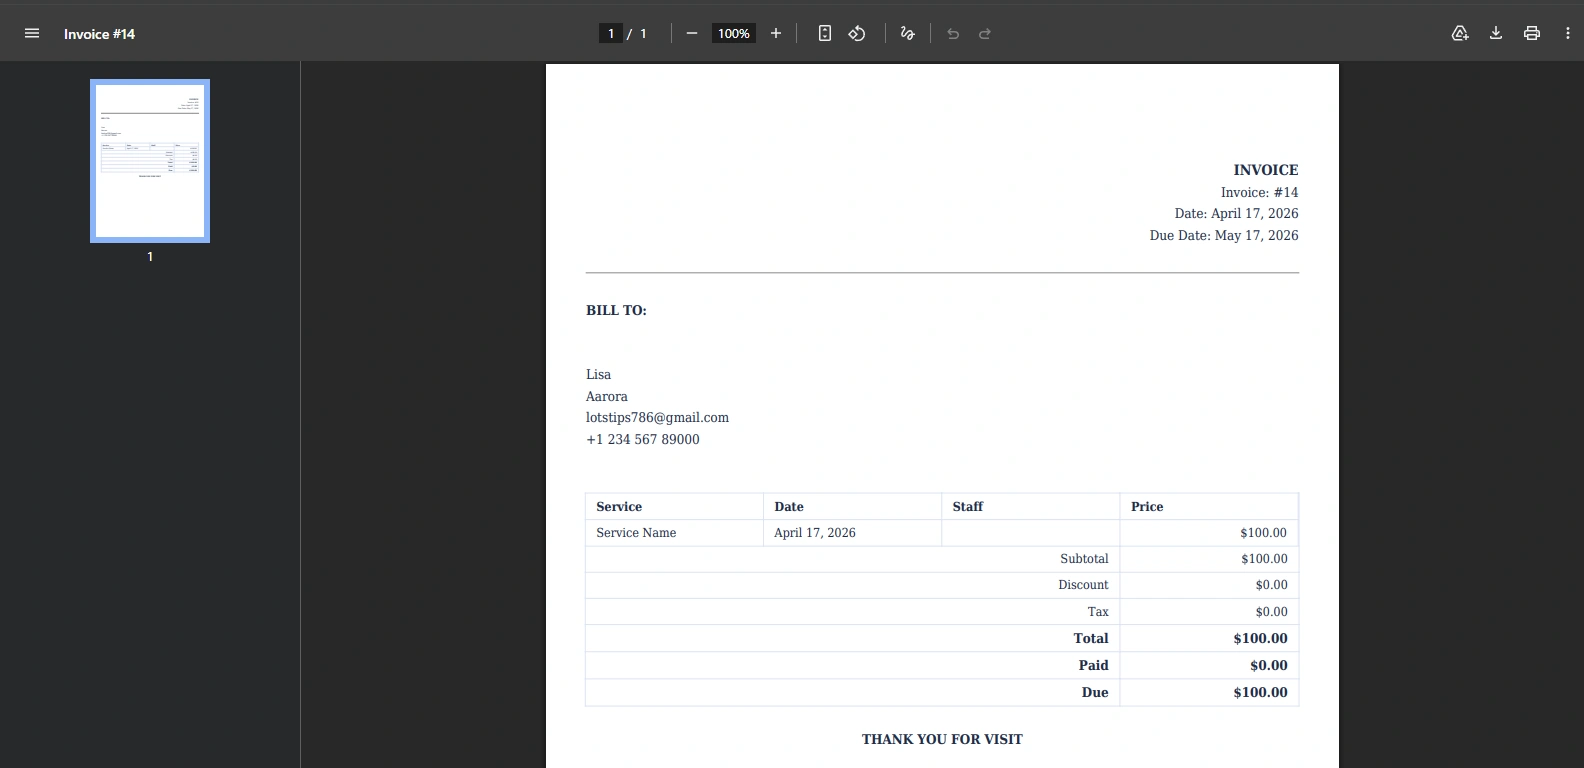
Generate an Invoice for a Payment Record
You can easily generate and download an invoice for a payment, directly from the Payments section.
- First, hover the payment record which you want for the invoice.
- Inside the same action bar, at last, you’ll see the Invoice icon.
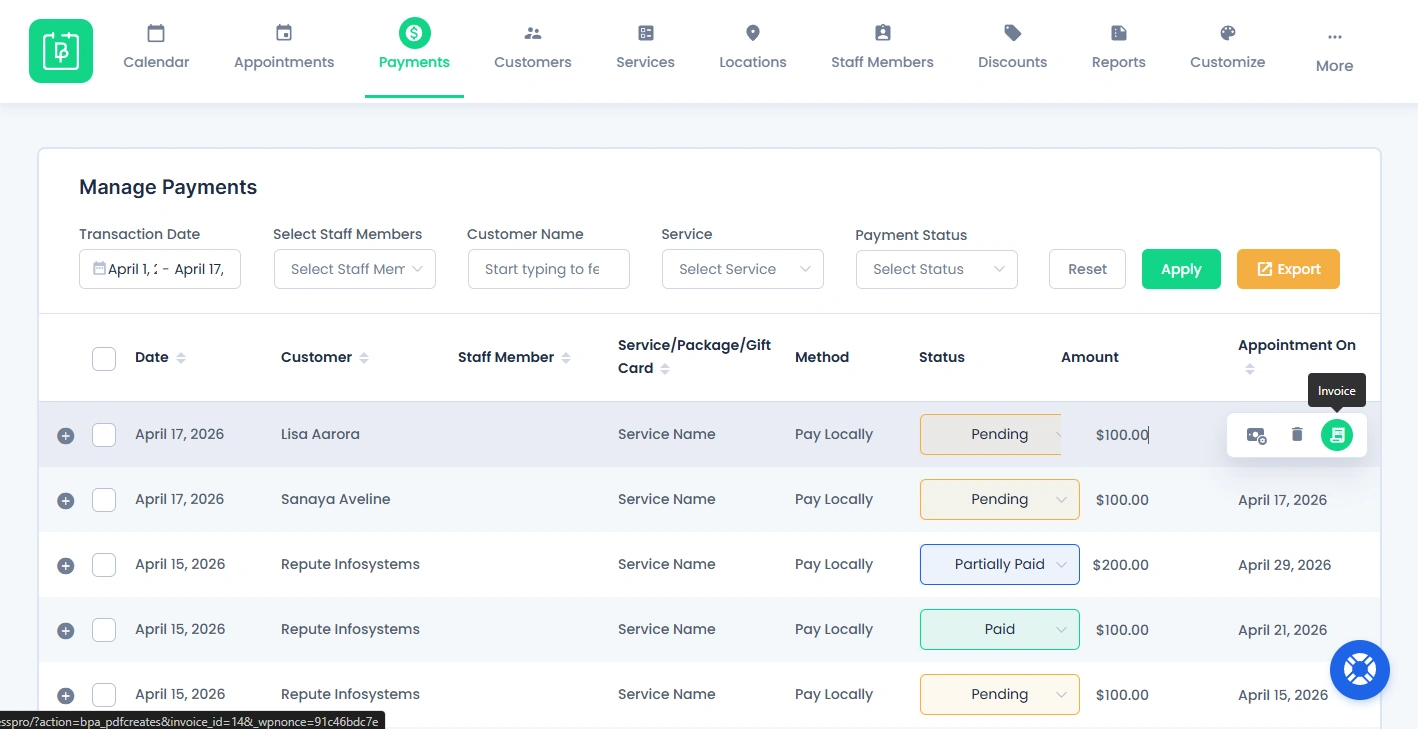
- Simply click on the Invoice icon, and the invoice will be generated and opened as a PDF in a new browser tab.
Important Note: The invoice option will be shown only if the Invoice Addon is activated.
Export Payment Data
You can export all the payment data by clicking on the “Export” button at the top right corner of the Payments page.
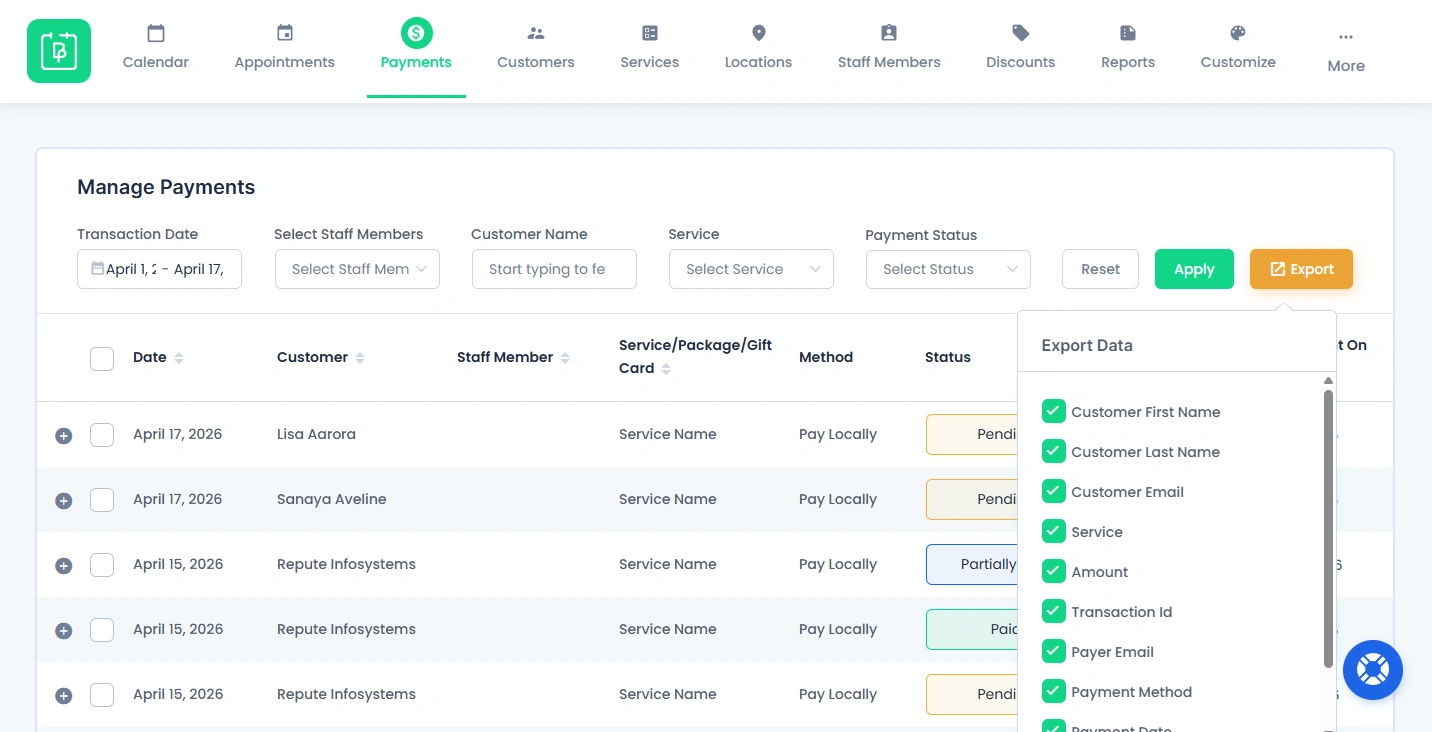
Here, you can select the specific fields you want to include in your file such as:
- Customer name
- Customer email
- Service
- Amount
- Transaction Id
- Payer Email
- Payment method
- Payment Date
- Payment Status
Once you select all the fields data you want, simply hit the “Export” button in the popup. Now, data will be downloaded in .csv file format.

After downloading, you just open the csv. file in any software or excel sheet.
This makes it easy to use for reporting or external analysis.
Need a hand?
Our world-class support team is happy to help. Send us a message and we’ll take it from there.