The BookingPress Resources Addon allows you to manage resources needed for your appointments. This lets you manage limited resources such as cars, boats, equipment, rooms, or supplies and control their availability based on quantity.
Here we’ll show you how to set up and manage resources in BookingPress.
How to Enable the Resources Addon
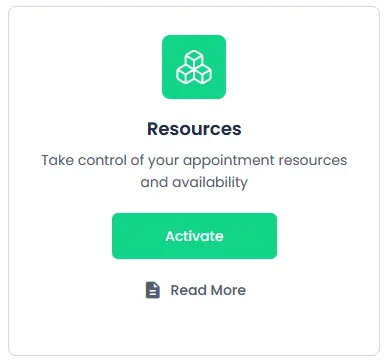
To start managing resources in BookingPress, you first must activate the Resources addon from your BookingPress dashboard.
- From your WordPress dashboard, head over straight to BookingPress → Add-ons.
- Activate the “Resources” addon which you’ll find under the available modules.
- Click the Activate button.
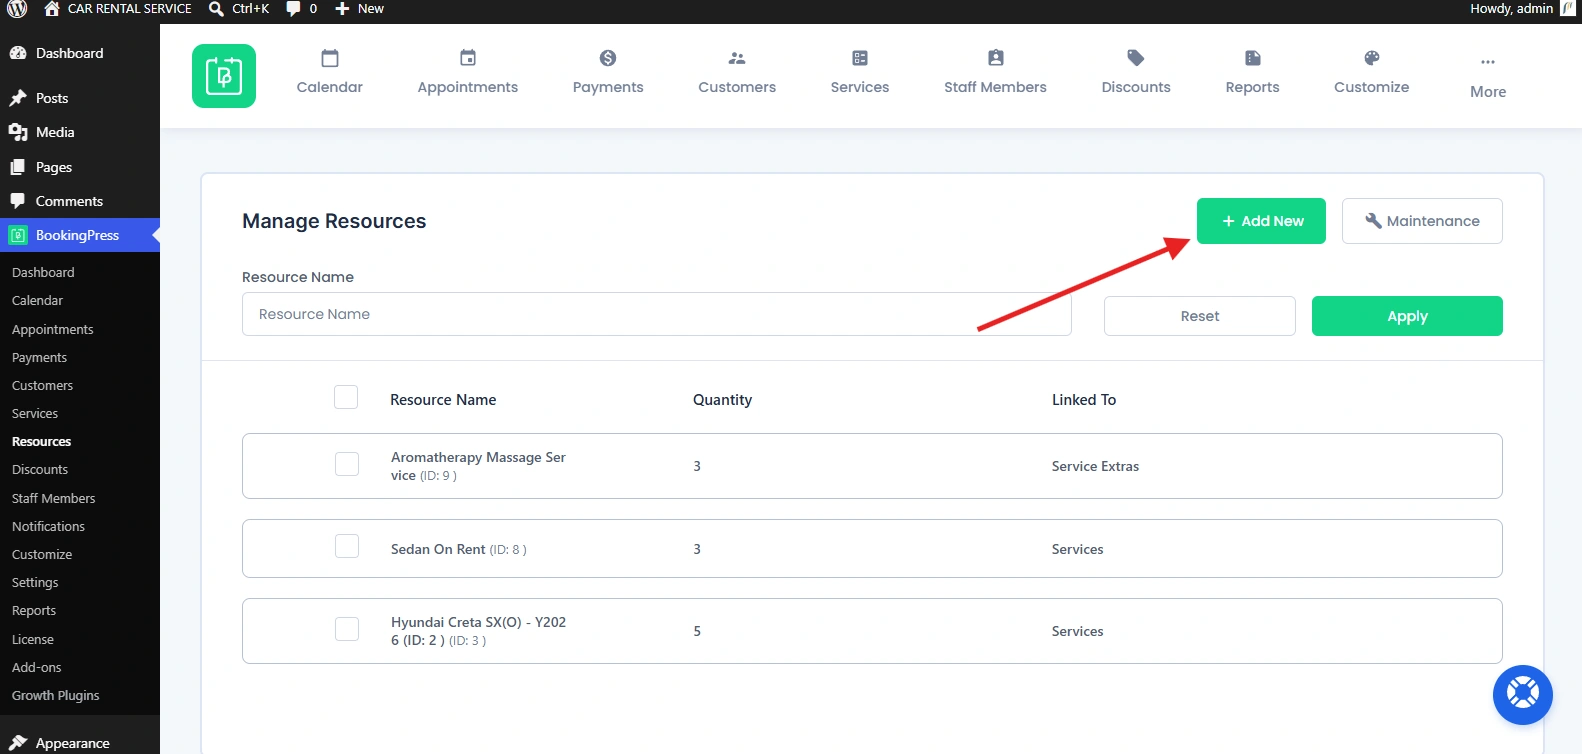
After activating the addon, a new Resources menu will appear in your BookingPress dashboard. Click on the Resources menu and you’ll be able to add, assign and manage all your business resources from there.
How to Add a New Resource in BookingPress?
You can easily add a new resource inside BookingPress Resources. Click on the Add New button at the top right corner which will slide open the Add Resource Panel.
Basic Details of Resource
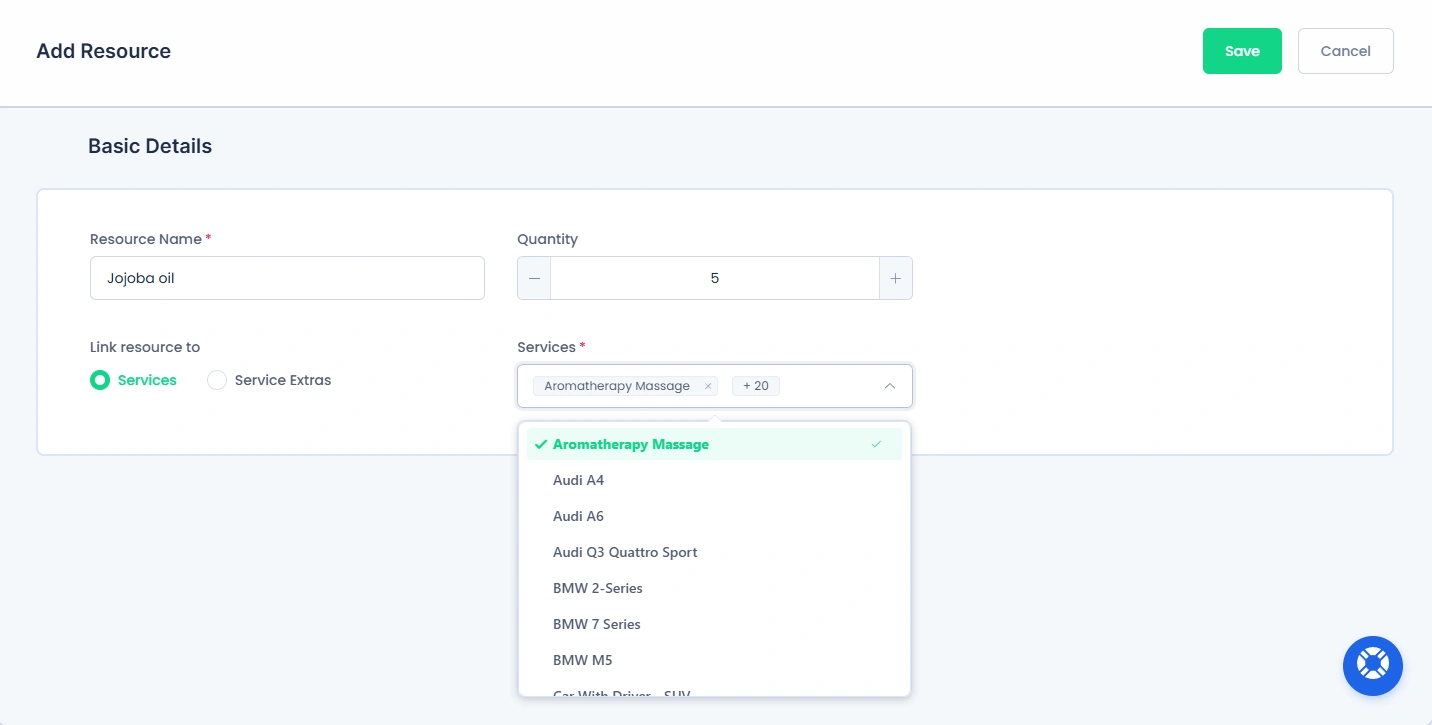
Let’s now start by filling the Basic Details of the resource such as:
- Resource Name: Enter the name of the resource you want to manage
- Quantity: Enter the total number of resources available. For example, if you have three cars available for rental, set the quantity to 3
- Link Resource To: Decide where you want to use the resource as:
- Services: Link the resource directly to one or more main services
- Service Extras: Link the resource to service extras that need limited availability
If you linked resources to Services, then select the available Services from the drop down menu. If you linked resources to Service Extras, then select the Service (Quantity per service) from the drop down menu.
After all the details are added, click the Save button to create the resource. The resource you add will show up in the Resources list along with its quantity and where it is linked.
How Does Resource Quantity Work?
The resource quantity decides how many units of that resource can be used for the same booking time slot.
For instance you got two resources called “Aroma Oil” and “Jojoba oil” with a quantity of 3.
If “Aroma Oil” and “Jojoba oil” are linked to service extras, customers can select up to three units of that resource for the same time slot.
This means the available quantity can be used in different combinations. For example:
- 3 units of Aroma Oil.
- 3 units of Jojoba oil.
- 2 units of Aroma Oil + 1 unit of Jojoba oil.
- 1 unit of Aroma Oil + 2 units of Jojoba oil.
After when the available resource quantity has been fully used for a particular time slot, that resource will no longer be available for another booking during that same time slot.
How Does Resource Capacity Affect Service Extras?
Suppose you have a service with the following extras:
- Aroma Oil Stock
- Aroma Oil Upgrade
- Hot Stones
If these extras are connected to resources with limited quantities, BookingPress checks the available resource quantity when a customer selects a time slot.
For example, if only three units of a required resource are available and those resources have already been used by existing bookings, another customer cannot select the same resource for that exact time slot.
This resource availability is checked separately from the available capacity of the time slot.
So, even if a time slot still has booking capacity, the service or service extra may become unavailable in the front-end if its required resource has no quantity left.
What Happens When a Resource Is Not Available?
When the required resource quantity is no longer available, BookingPress will notify the customer during the booking process.
For example at the calendar step inside the Booking form where customers pick their preferred date & time slot, the customer may see a message like….
“Aroma Oil Stock, Aroma Oil Upgrade & Hot Stones are not available for this time.”
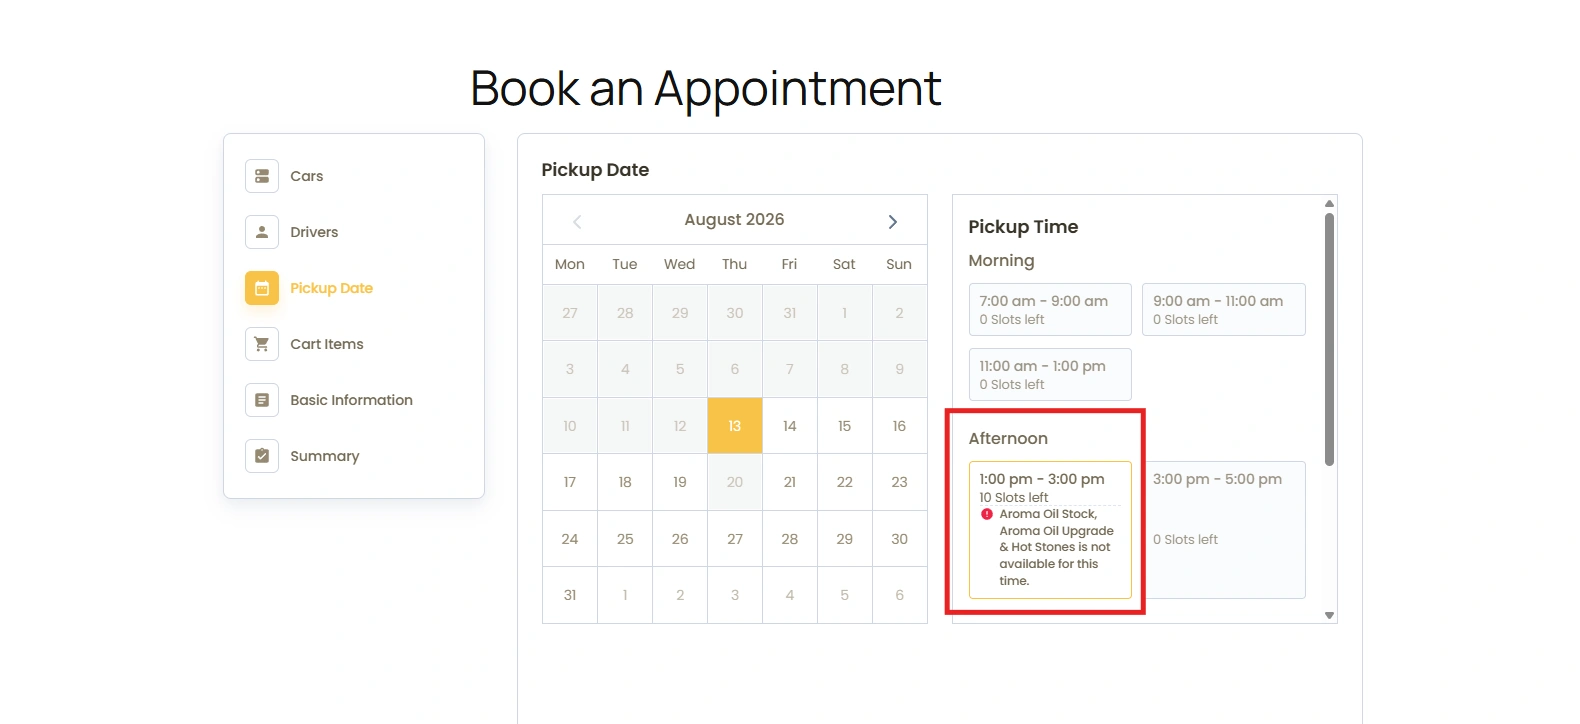
The affected time slot can still show available appointment capacity, but the required resource is unavailable for that specific time.
If the customer clicks on that time slot, a popup will appear asking, “Aroma Oil Stock, Aroma Oil Upgrade & Hot Stones are not available for the selected time slot. Do you want to remove extra & continue?”
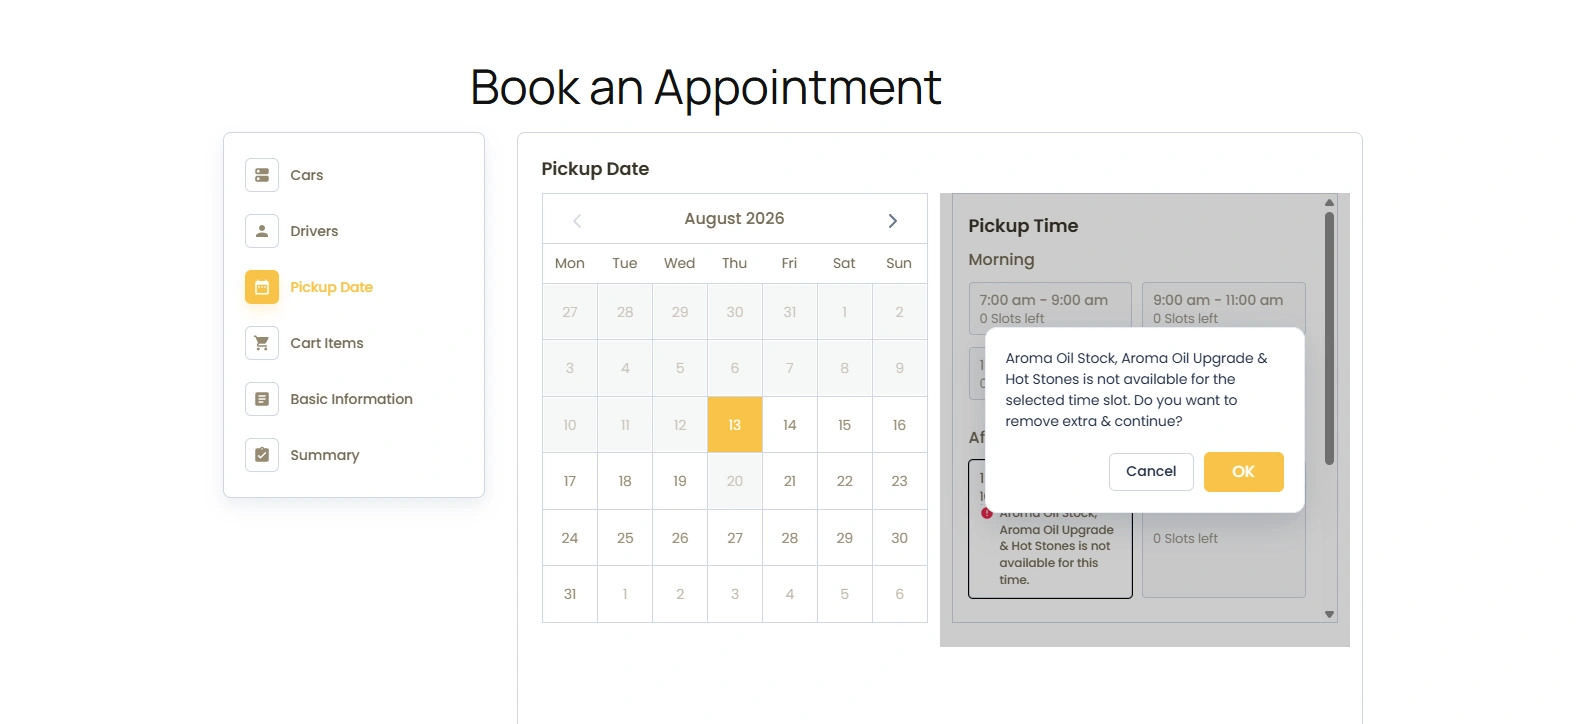
If the customer clicks OK, all service extras will be removed and they can continue with the booking without those extras.
This way customers stop from selecting resources that have already reached their available quantity.
How to View and Manage Resources?
After adding your resources, you can view and manage them from BookingPress → Resources. Here the Manage Resources page gives you a complete overview of all your resources along with their quantities and where they are linked.
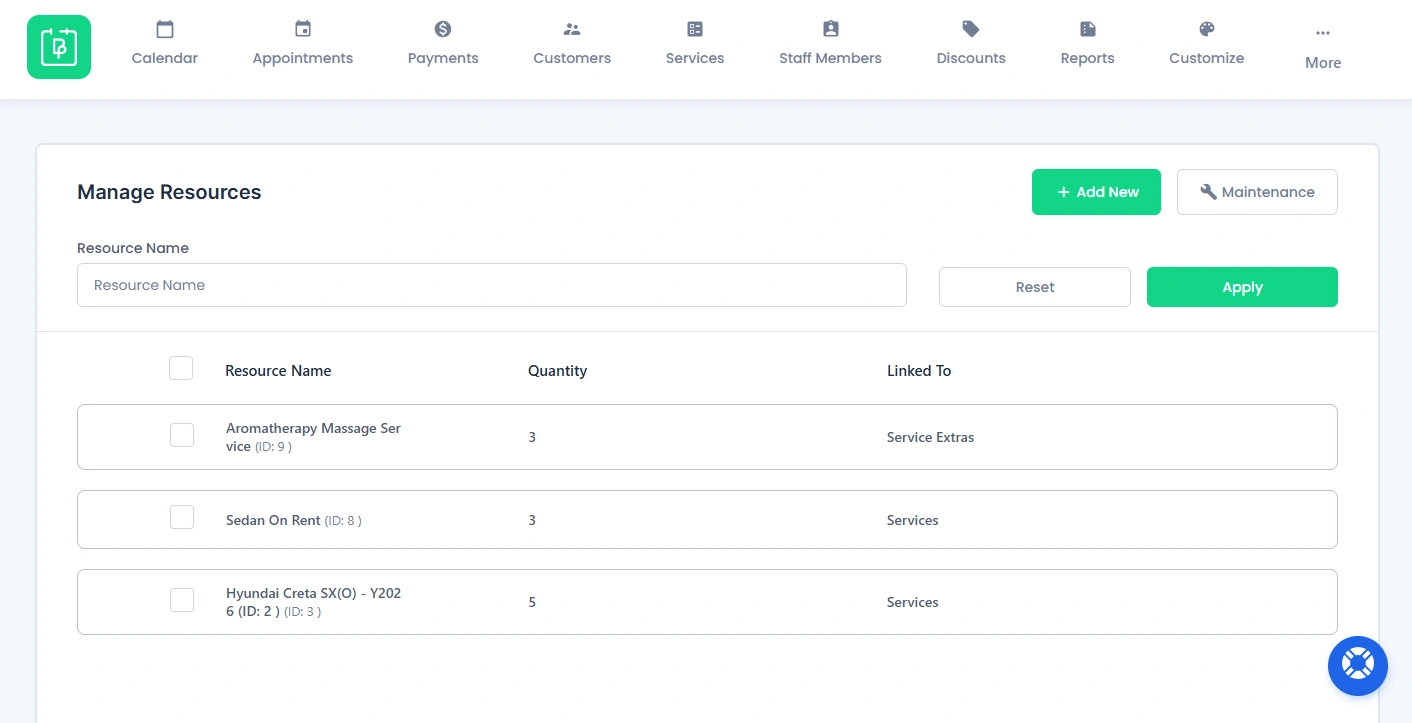
The resource list can show details such as:
- Resource Name
- Quantity
- Linked To
Search and Filter Resource
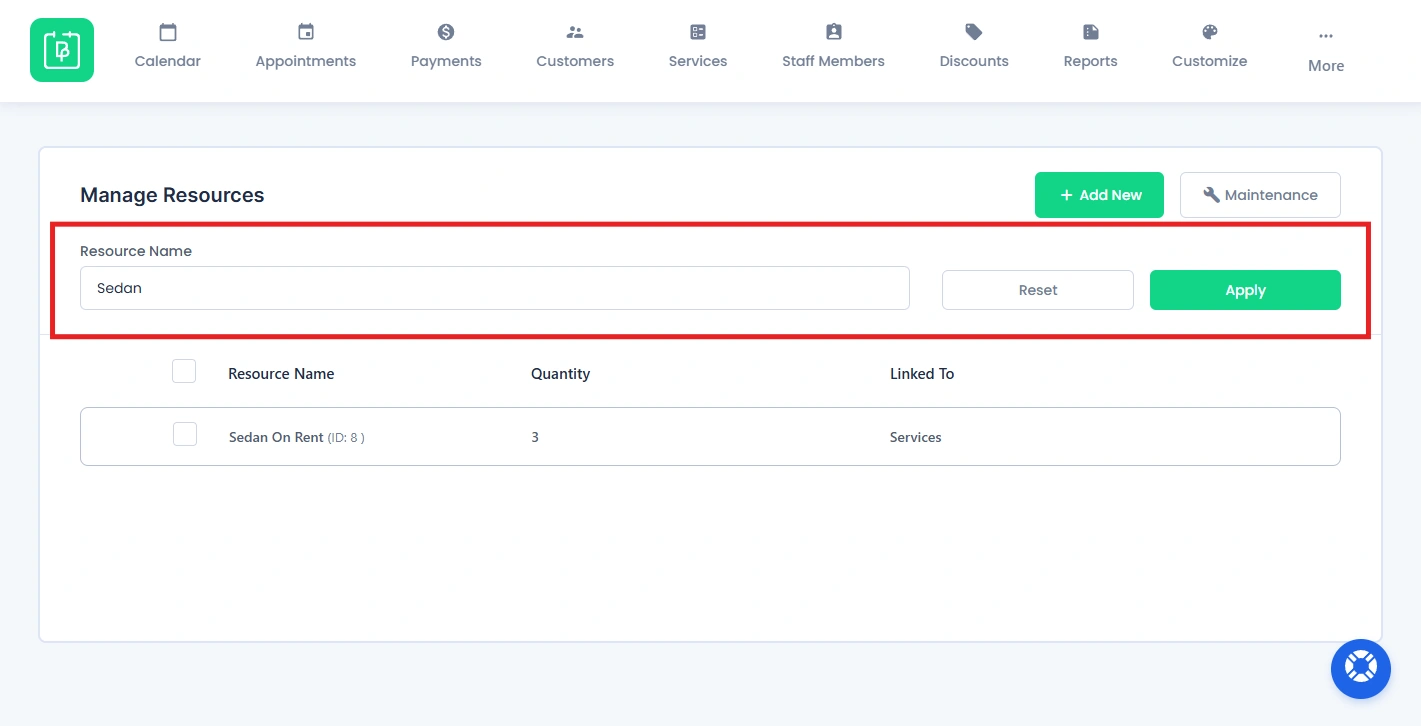
If you want to find a specific resource and don’t want to waste time scrolling down, use the search bar available on the page.
Inside the search bar, simply enter the resource name, and hit the “Apply” button. After you find the resource you were looking for, don’t forget to click the “Reset” button to get back to the original list with all resources.
This is very useful when managing a large number of resources or quickly wanting to find a specific resource.
Edit a Resource
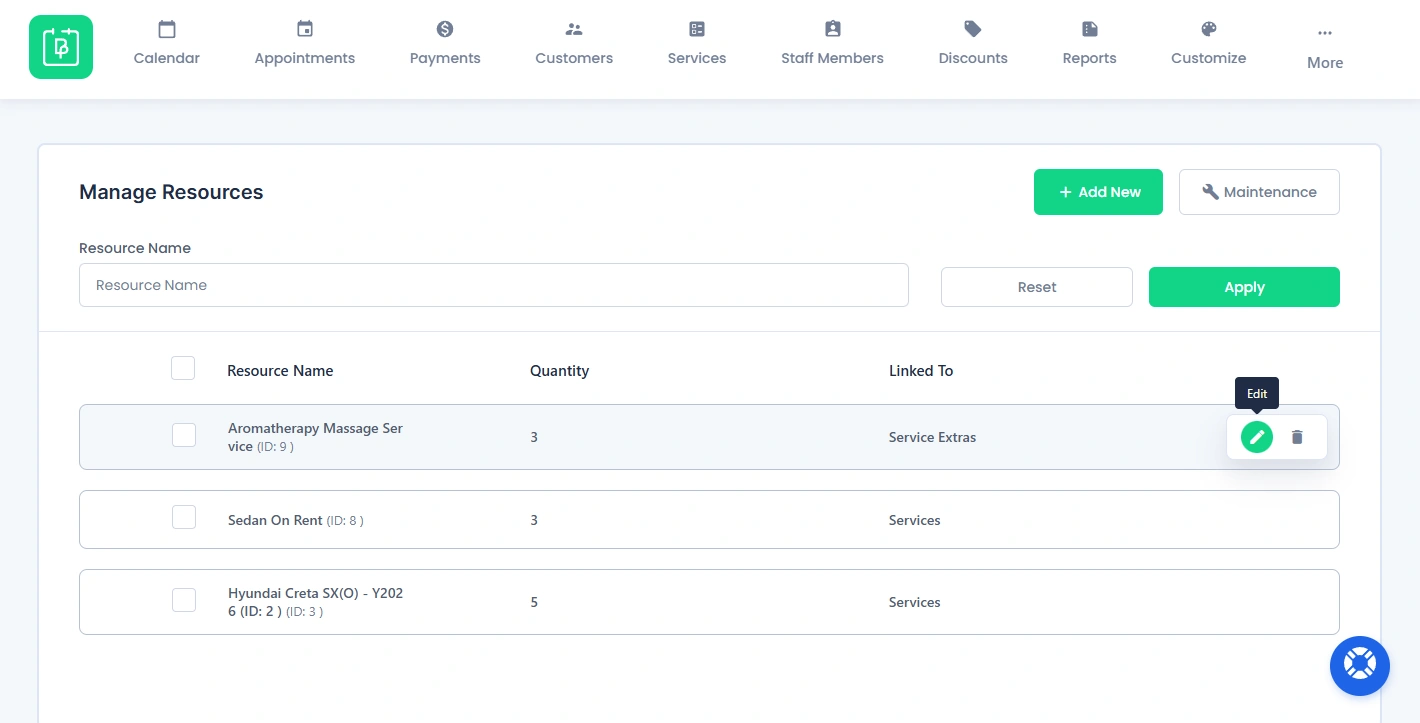
If you wanna change an existing resource, you can edit it right from the Resources page. Simply click the Edit icon for the resource you want to update.
This will open the resource details where you can update information such as:
- Resource name
- Quantity
- Linked services
- Linked service extras
After updating, hit the Save to update the resource.
Delete a Resource
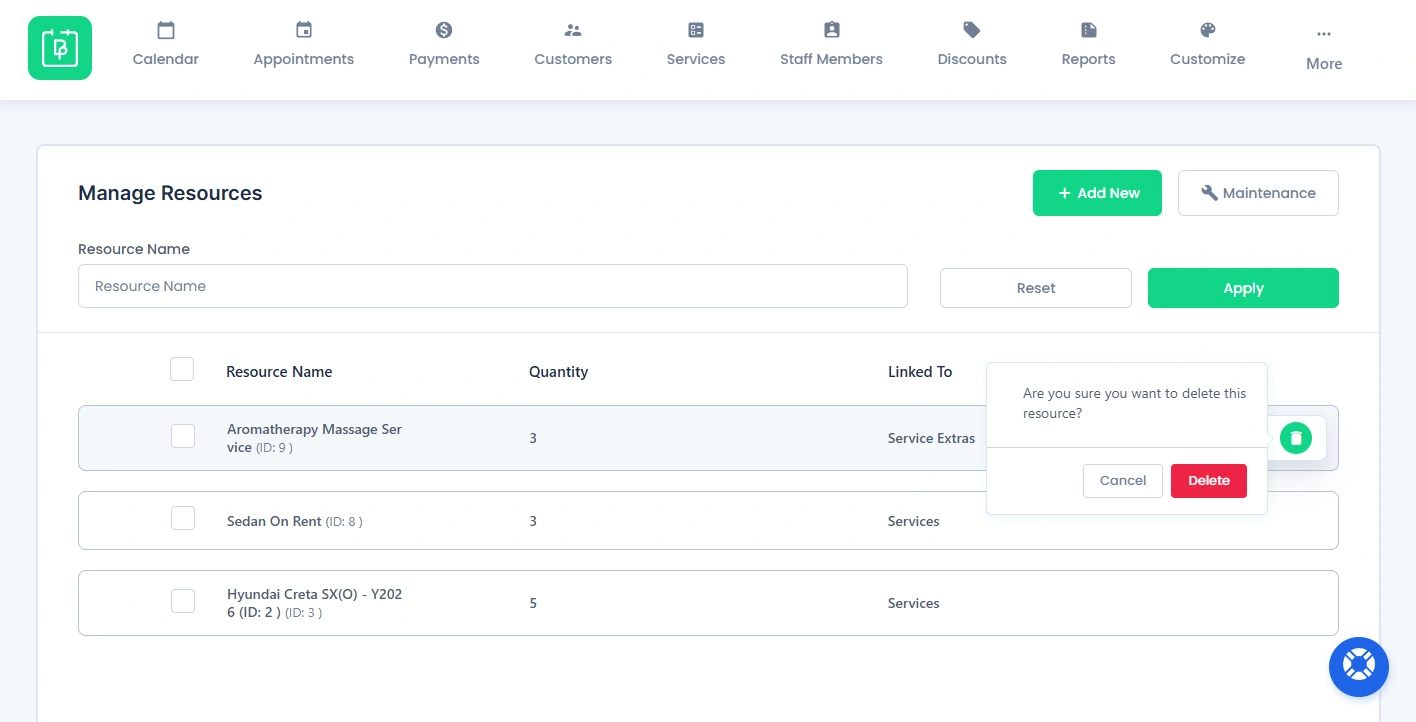
You can also remove a resource that you no longer need by simply clicking on the Delete icon for the resource and confirm the action in the popup box.
Make sure you no longer need the resource before deleting it, as removing a resource can affect the availability management of the services or service extras linked to it.
How to Manage Resource Maintenance?
Sometimes a resource may be temporarily unavailable because it needs maintenance, servicing, repair or some other scheduled downtime.
For example if you run a car rental business with three cars. If two cars are being serviced from 1:00 AM to 3:00 AM, only one car should remain available for bookings during that period.
The “Maintenance” option allows you to block a specific quantity of a resource for a particular date and time.
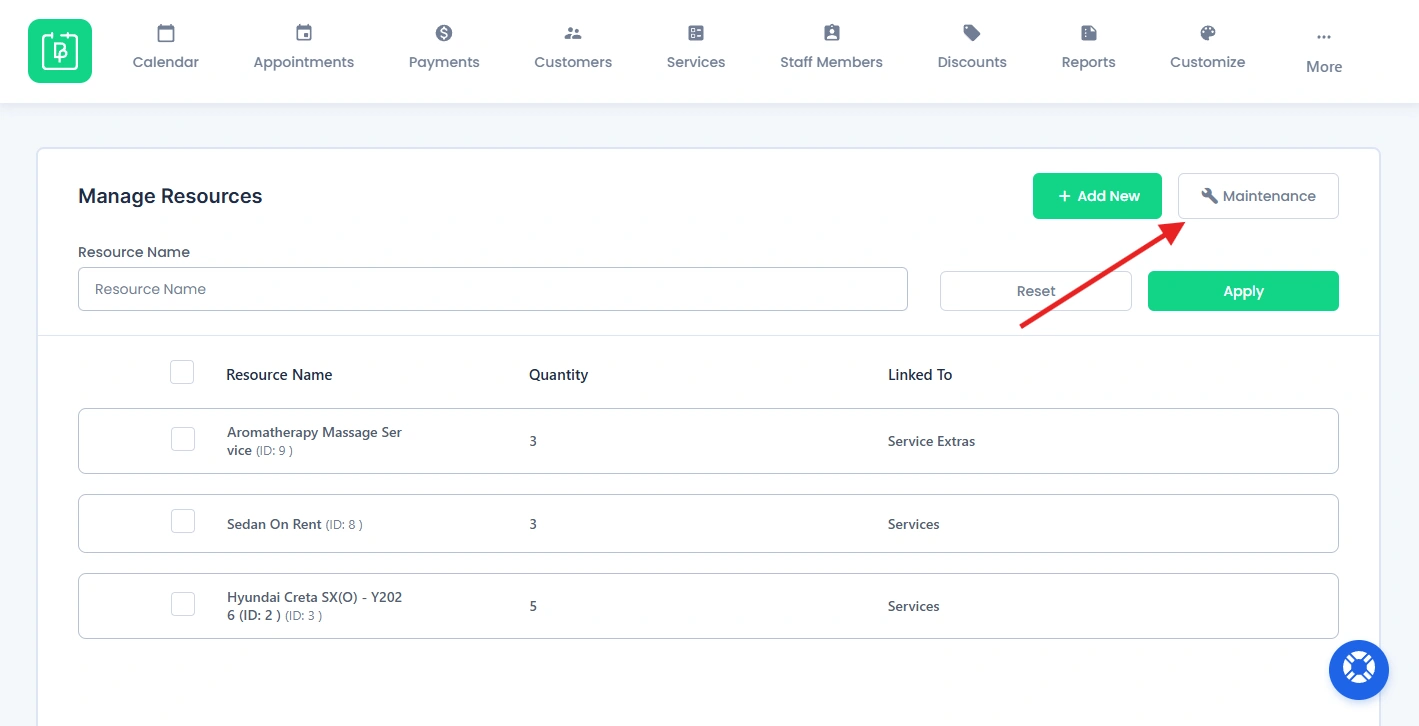
Thus, manage resource maintenance, inside the Resources page, click the Maintenance button on the top-right corner. This will open the “Resource Maintenance” page.
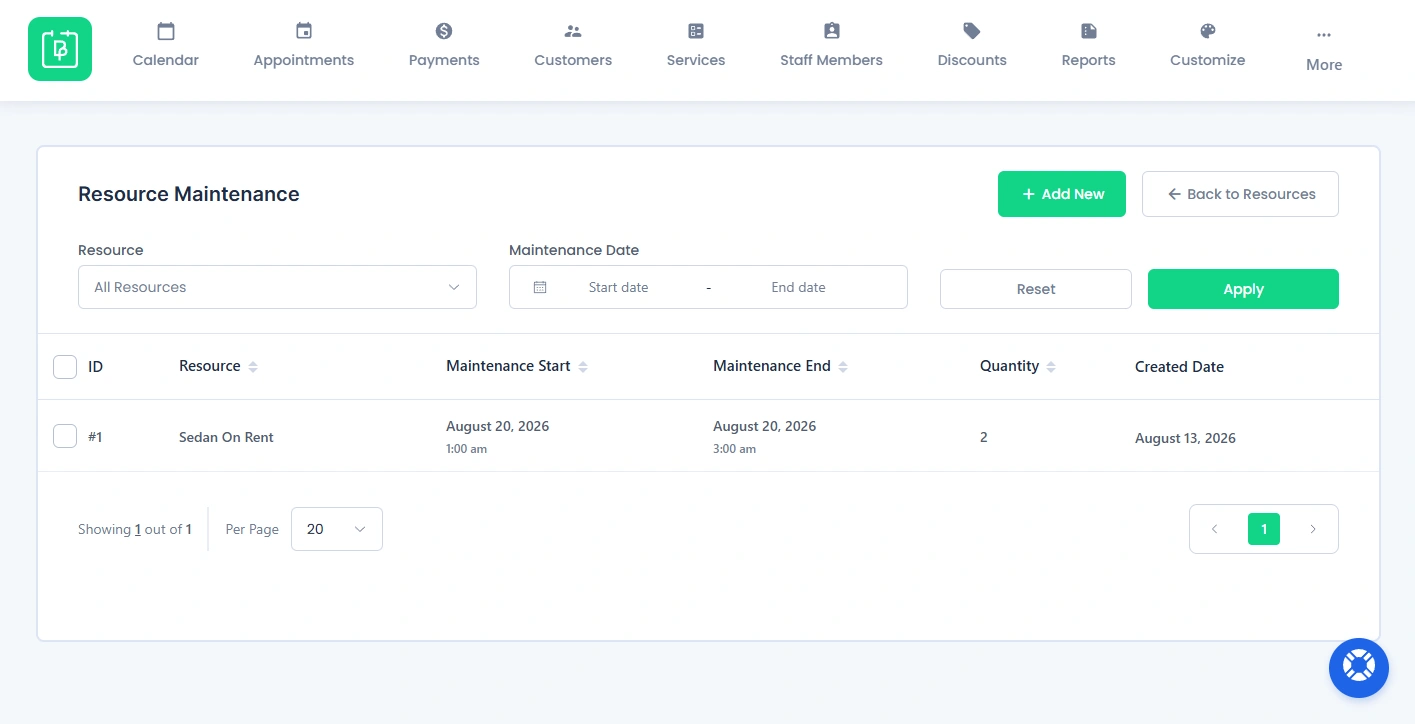
Here you can view all scheduled maintenance entries along with details such as:
- ID
- Resource
- Maintenance Start
- Maintenance End
- Quantity
- Created Date
Search and Filter Resource Maintenance Record
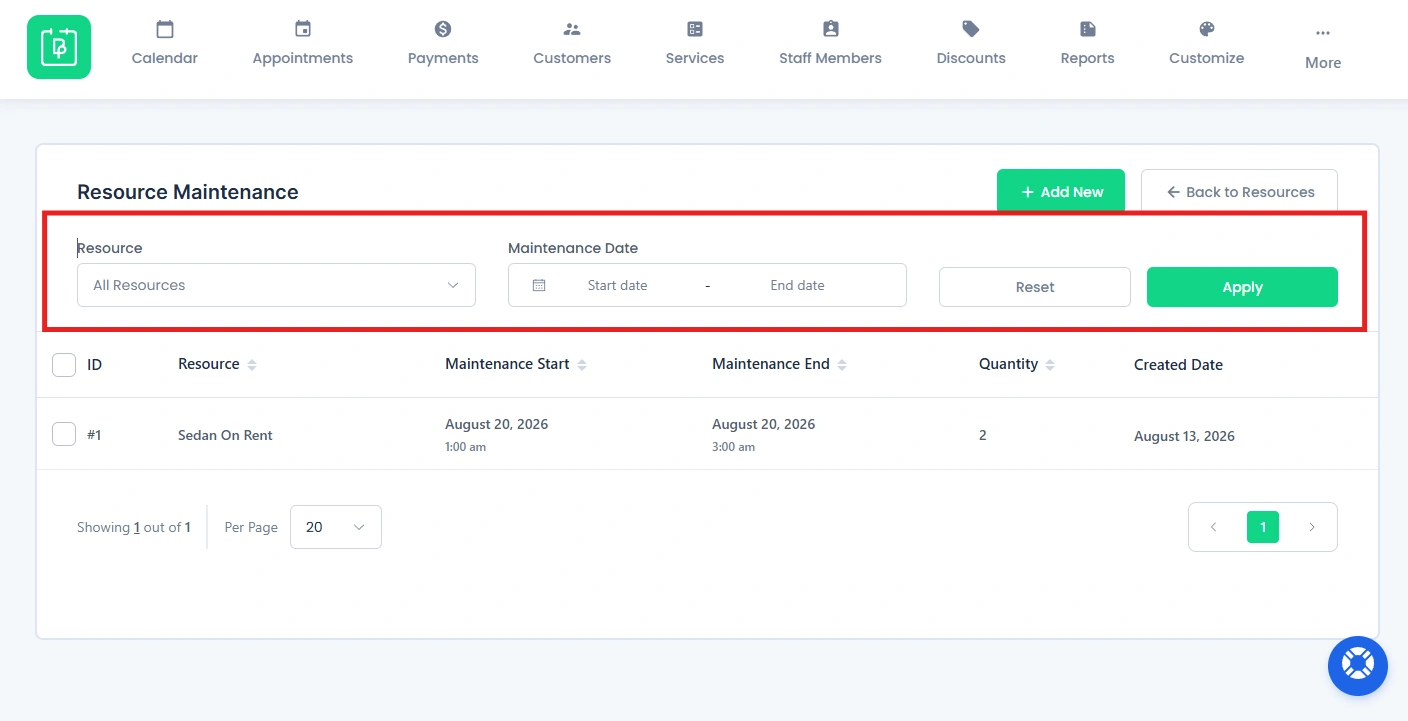
If you’re looking for a specific maintenance record, then you can easily use the search and filter options available for the Resource Maintenance.
- Resource: Select the resource available from the drop down list.
- Maintenance Date: Pick a maintenance start and end date from the date range calendar.
After applying your filters, hit the “Apply” button to see a shortlisted list of maintenance records. Later, when you find the resource maintenance record you were looking for, don’t forget to click the “Reset” button to get back to the original list.
This is very useful when managing a large number of maintenance records or quickly wanting to find a specific schedule.
Add a Resource Maintenance Schedule
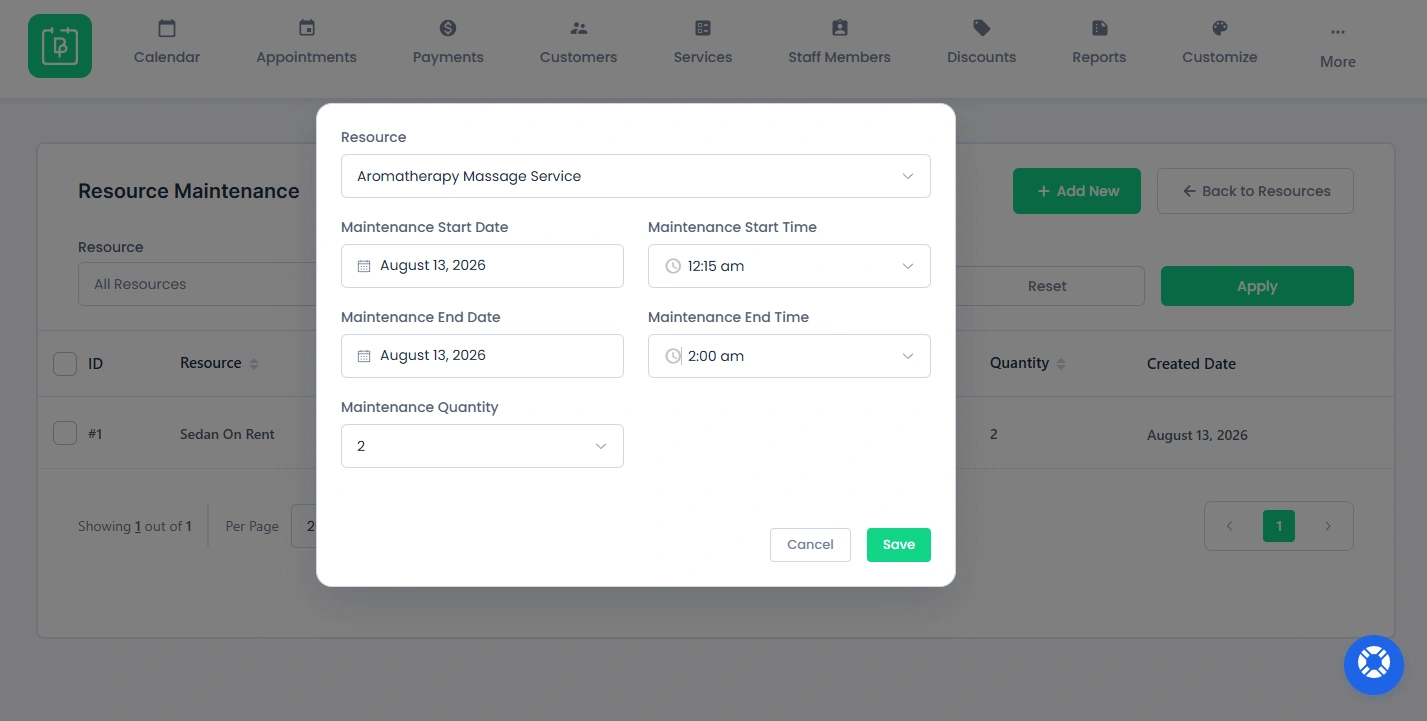
To schedule maintenance for a resource, click the Add New button on the Resource Maintenance page.
A popup will show up where you can fill in all the maintenance details such as:
- Resource: Select the resource that will be unavailable.
- Maintenance Start Date: Select the date from the calendar when maintenance will begin.
- Maintenance Start Time: Select the starting time for maintenance.
- Maintenance End Date: Pick the date from the date range calendar when maintenance will end.
- Maintenance End Time: Select the ending time from the drop down list for maintenance.
- Maintenance Quantity: How many units of the resource will be unavailable during the maintenance period.
After adding all the required details, don’t forget to click the Save. Your maintenance schedule will then appear in the Resource Maintenance list.
Edit a Resource Maintenance Record
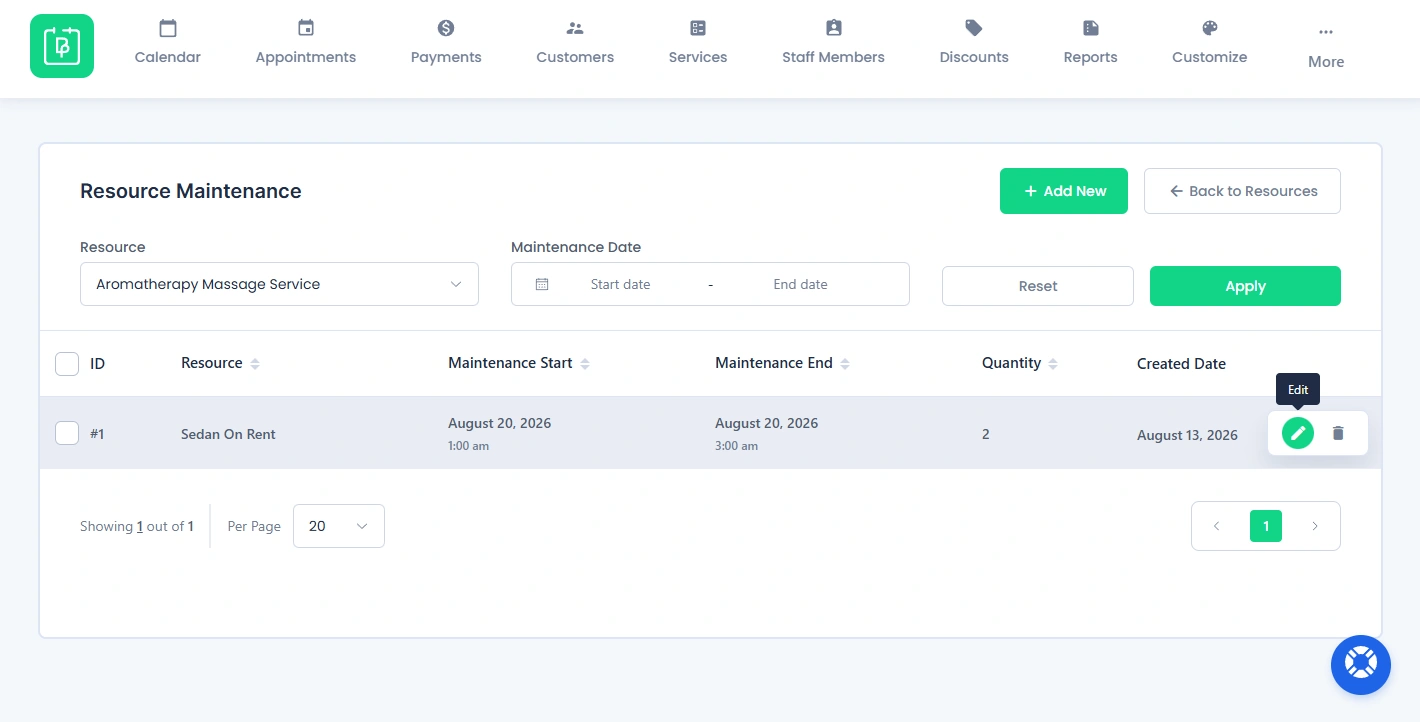
If you want to change an existing resource maintenance record, simply click the Edit icon for the record you want to update.
This will open the resource maintenance details where you can update any info such as:
- Resource
- Maintenance Start Date
- Maintenance End Date
- Maintenance Start Time
- Maintenance End Time
- Maintenance Quantity
After updating, hit the Save to update.
Delete a Resource Maintenance Record
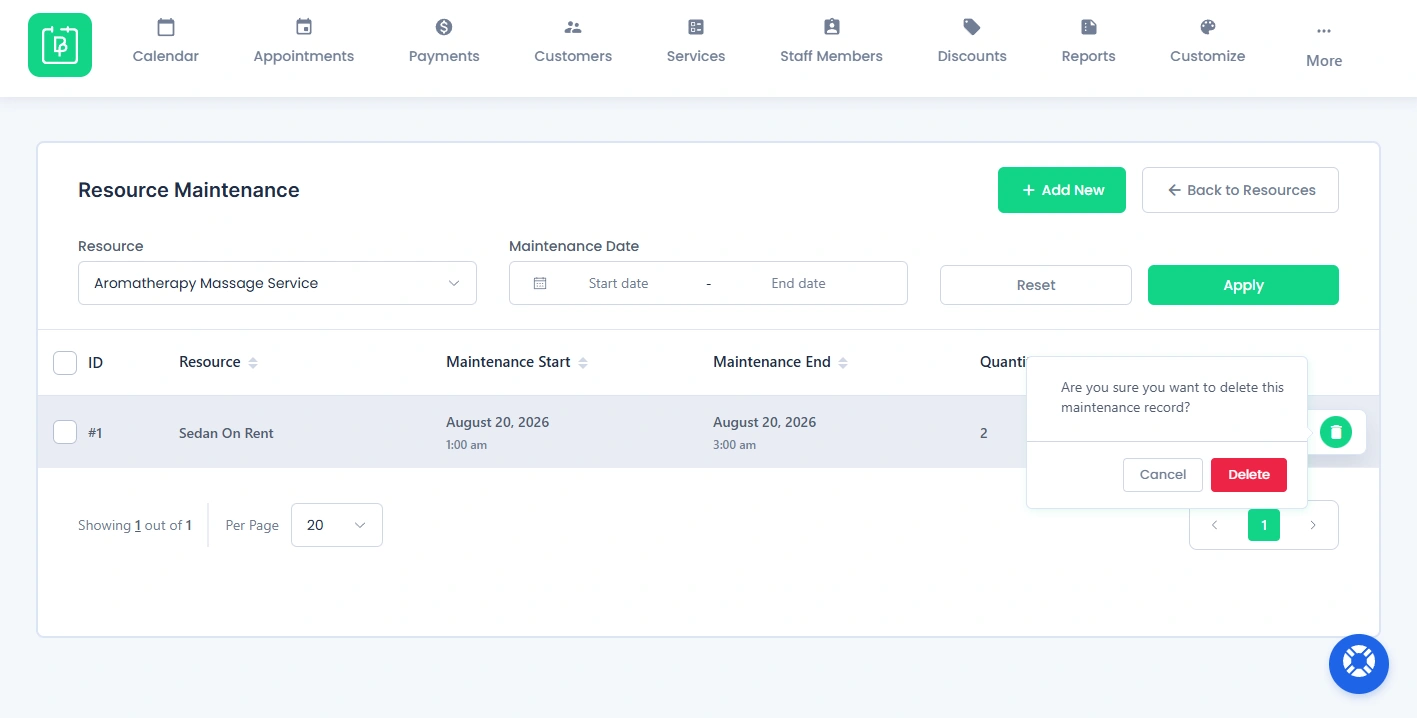
You can also remove any maintenance record you no longer have use of by just clicking on the Delete icon of that specific record.
This will make a confirmation popup appear asking if you are sure you want to delete this maintenance record. If yes, hit the Delete button to confirm the deletion of that record.
Just make sure you no longer need the resource maintenance record before deleting it.
How Does Resource Maintenance Affect Availability?
Resource maintenance temporarily lowers the available quantity of a resource for the selected date and time.
For example, suppose your car rental business has 3 cars available.
If 2 cars are scheduled for maintenance from 1:00 AM to 3:00 AM, BookingPress will consider only 1 car available during that period. Thus customers can still book the service if the remaining resource capacity is available.
However, once all resources are unavailable due to maintenance, customers won’t be able to book that service for the affected time period.
This is useful for businesses where the resource itself must provide the services such as rental cars, equipment, rooms, machines or other limited assets.
Need a hand?
Our world-class support team is happy to help. Send us a message and we’ll take it from there.
 14-day money-back guarantee