

The Distance Cost Calculator add-on in BookingPress lets you charge customers a travel fee when you provide services at their location. You can calculate the fee based on the driving distance or travel time from your business location, or set fixed fees for specific postcodes.
This add-on is very useful for mobile cleaners, therapists, mechanics, tutors, photographers and so on. It automatically calculates the fee during booking and gives the total amount to customers.
Below, we’ll show you how to set up and use a Distance Cost Calculator addon in BookingPress
How to Install and Activate the Distance Cost Calculator Add-on
To automatically calculate distance and travel fees in BookingPress, you first need to activate the Distance Cost Calculator add-on from your BookingPress dashboard.
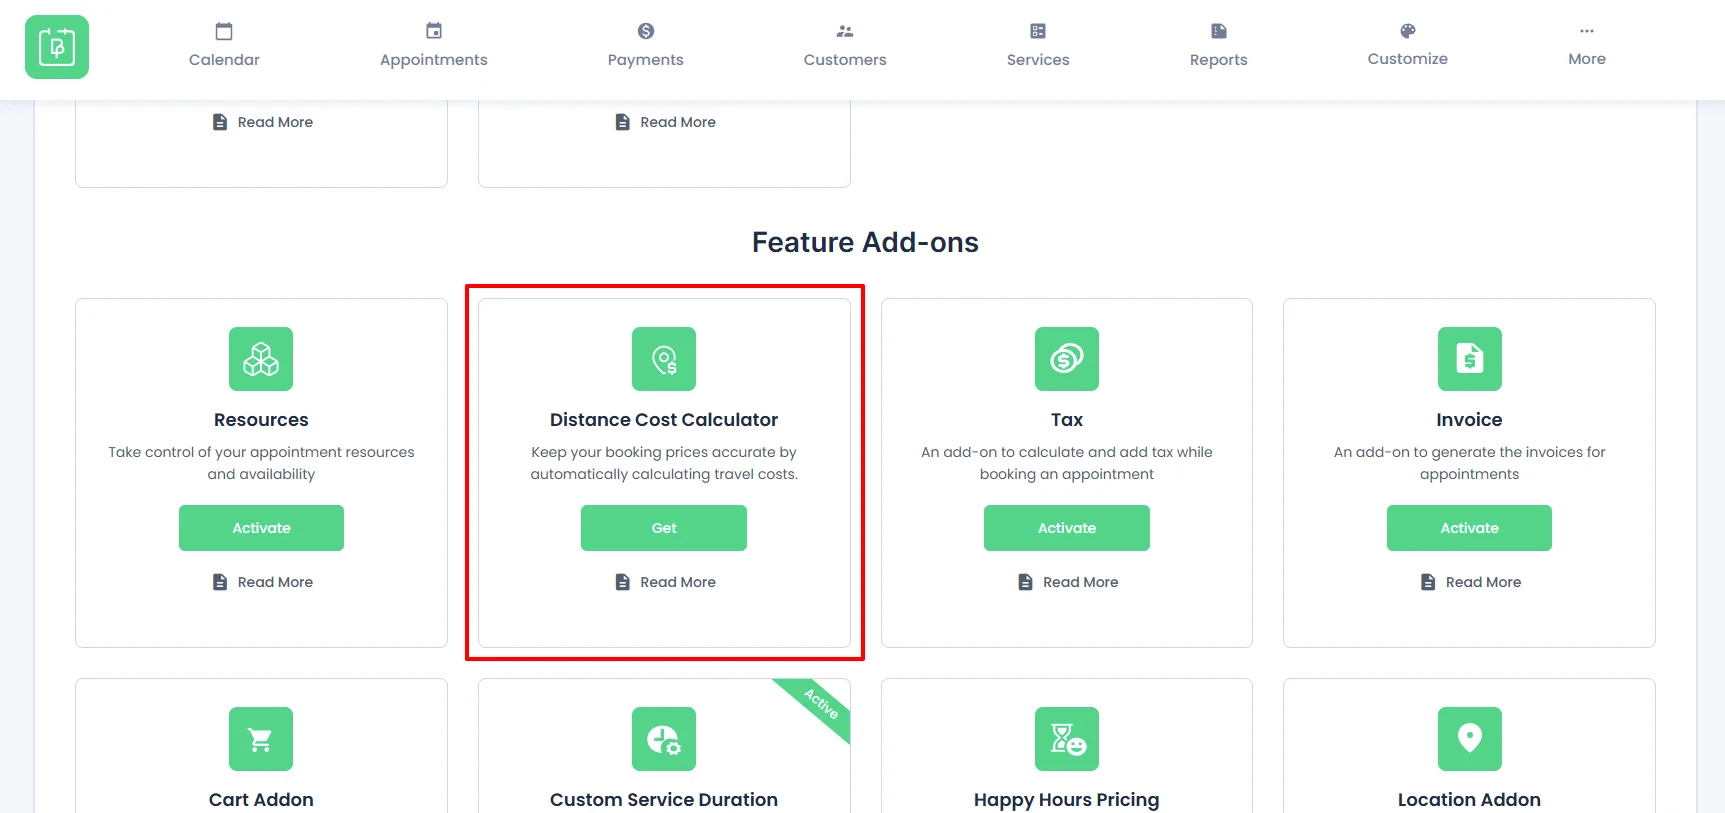
- From your WordPress dashboard, head over to the BookingPress → Add-ons.
- Activate the “Distance Cost Calculator” addon which you’ll find under Feature Add-ons.
- Click the Activate button.
How Does the Distance Cost Calculator Work?
The BookingPress Distance Cost Calculator lets any business that travels to its customers(such as mobile cleaners, therapists, mechanics, tutors, photographers and more) charge a travel fee on top of the service price.
This travel fee is calculated in two ways. You can set whatever way that suits your business model.
- API (Driving Distance): Calculates fees from the real driving distance or travel time between the business location and the customer’s address, using a maps provider (Google, Mapbox, HERE, Geoapify or OpenRouteService).
- Manual Postcode: Calculates travelling fees from a fixed fee per postcode or postcode zone that you set up. No maps account is needed.
The customer sees the fee live on the booking form as soon as they fill in their address. The fee is added to the Summary and the total, charged with the booking, saved with the appointment, and shown in e-mails, the thank-you page, My Bookings and the admin.
Before You Get Started
Make sure you have the following before configuring your BookingPress Distance Cost Calculator:
- WordPress 6.7 or later. BookingPress only registers its abilities on WordPress 6.7 and newer.
- PHP 7.4 or later. This BookingPress add-ons works with PHP 7.4 and higher versions only
- BookingPress free & pro. BookingPress Pro 6.4.1 version or later.
- Maps provider account. API method only. One of Google, Mapbox, HERE, Geoapify or OpenRouteService.
How to Configure the Distance Cost Calculator Settings
You can easily access the Distance Cost Calculator Settings in BookingPress by going to BookingPress → Settings → Distance Cost Calculator. This tab will only appear after you activate the addon from BookingPress Add-ons.
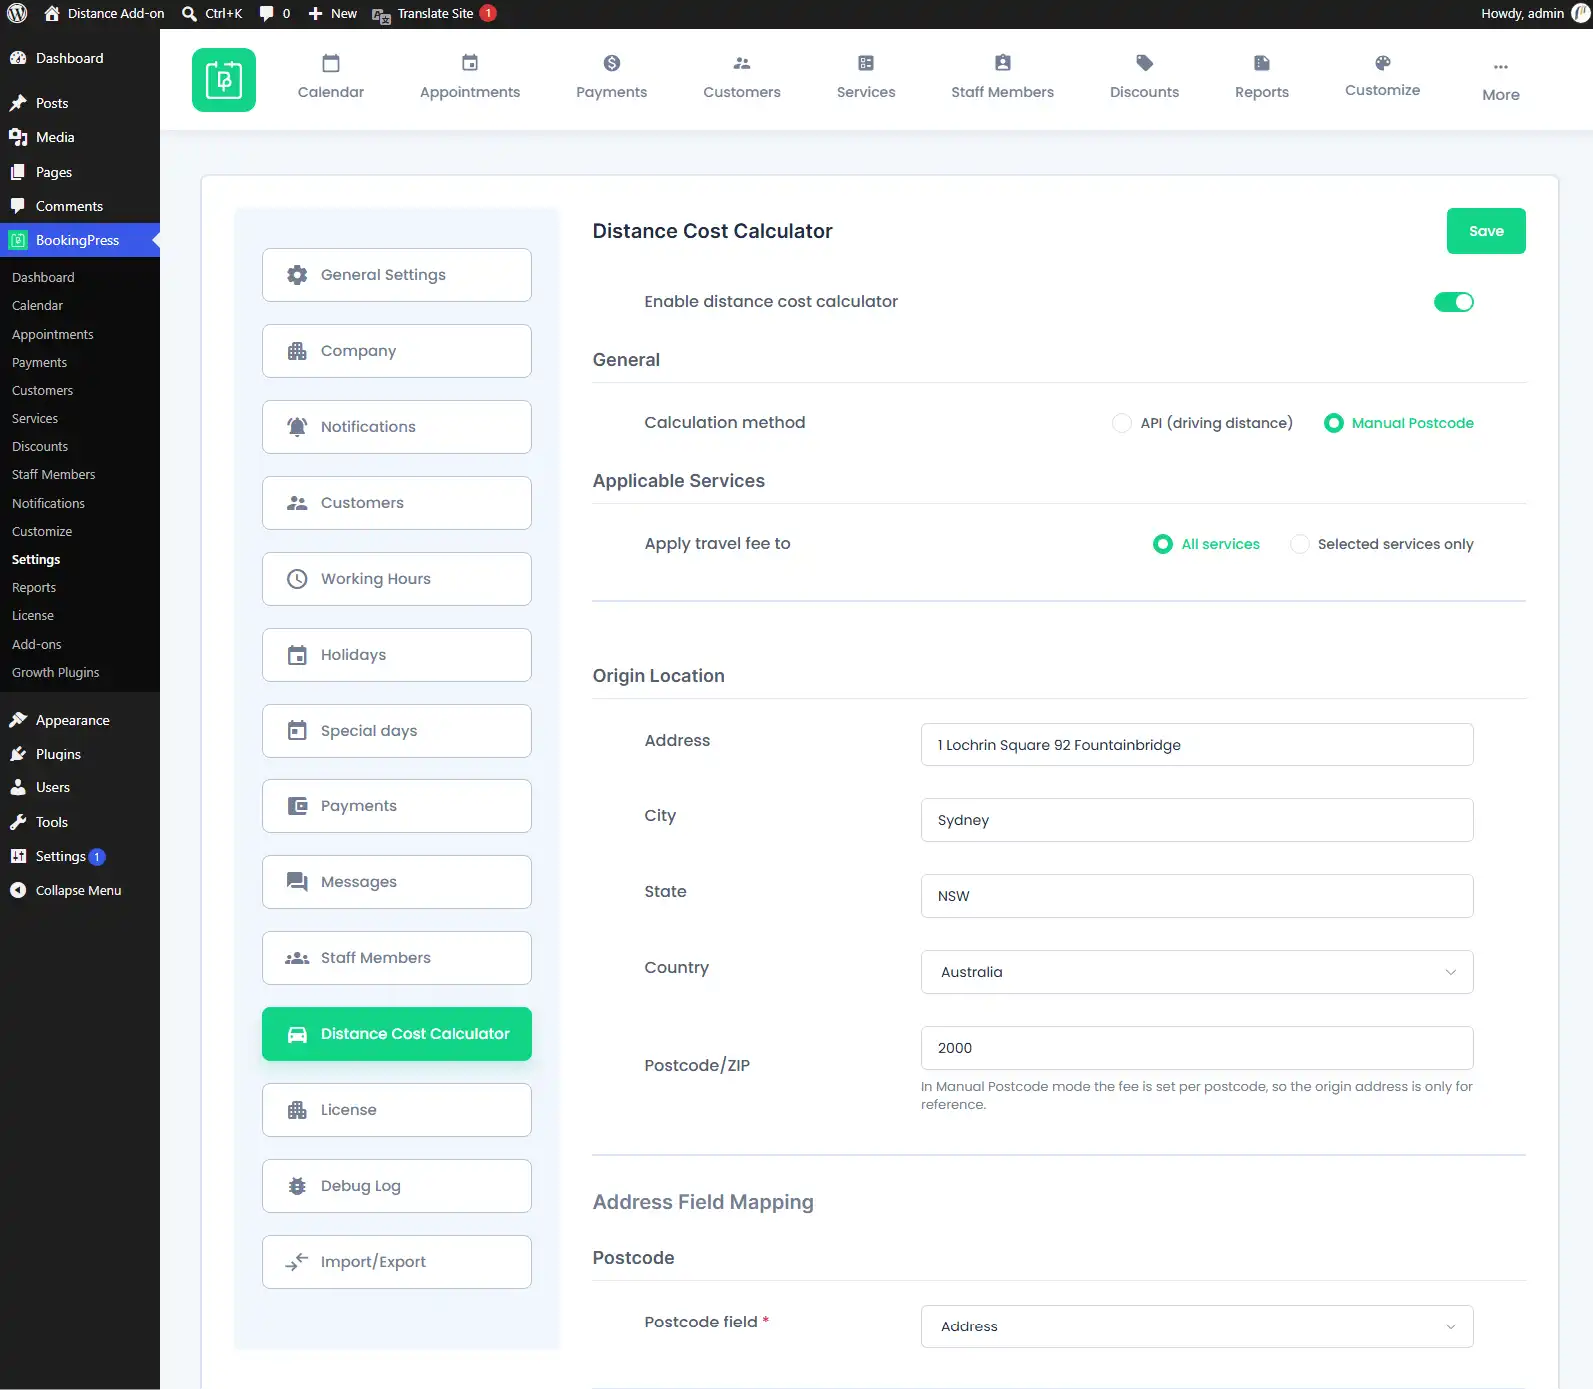
Here, you can configure applicable services, origin location of your business, pricing and distance rules, and other travel-fee related settings.
General Settings
First of all, you have to enable the Distance Cost Calculator add-on from the Distance Cost Calculator Settings and choose how you want to calculate travel fees.
- From your WordPress dashboard, go to BookingPress → Settings → Distance Cost Calculator.
- Turn on the “Enable distance cost calculator” option.
Please Note: When the “Enable distance cost calculator” option toggle off under the General settings, no travel fee is applied on the booking form. So, you must toggle it on.
Next, under “Calculation method“, choose one of the following:
- API (driving distance). Calculate travel fees using the driving distance or travel time between your business location and the customer’s address.
- Manual Postcode. Set fixed travel fees for specific postcodes or postcode zones. No need to connect any third-party map for this.
Now, based on your option you chose here, BookingPress will show the settings onwards.
Applicable Services
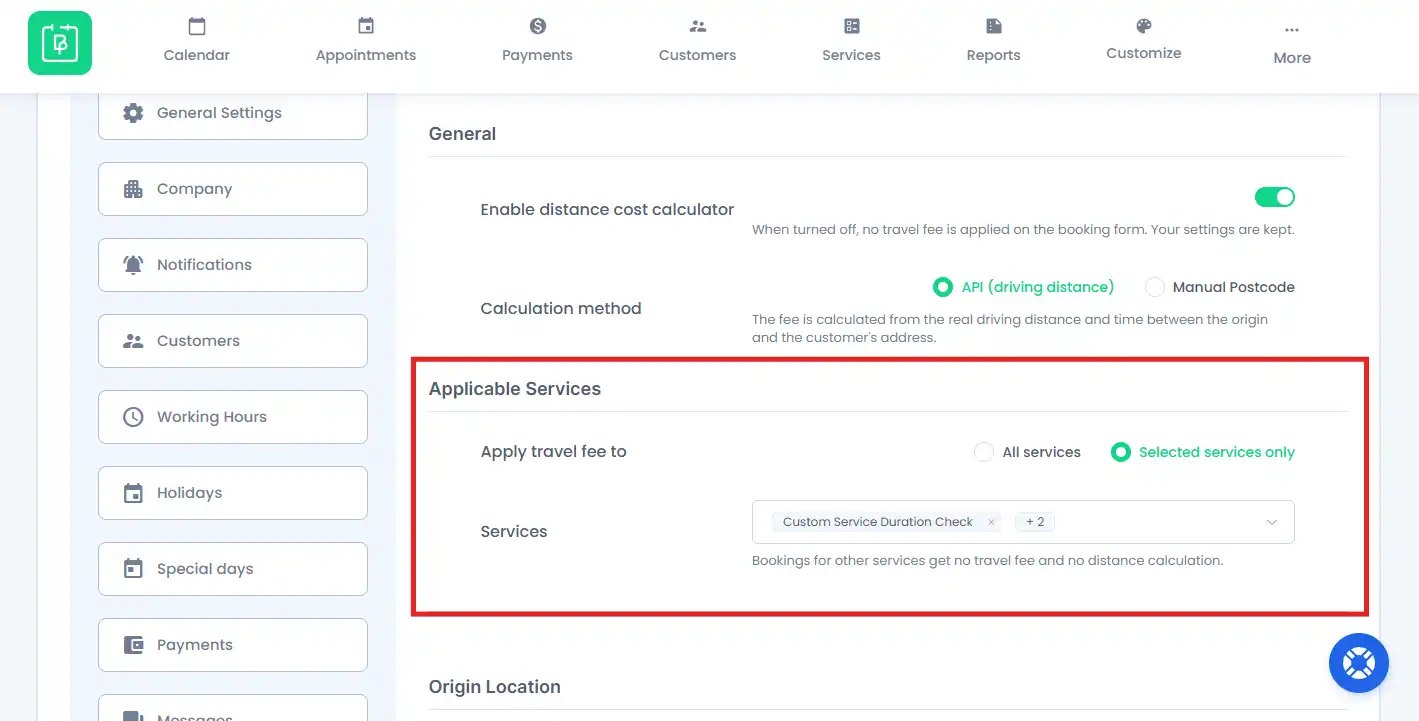
You can choose whether to apply the travel fee to all your services or only specific ones.
Under “Apply travel fee to” option, simply select one :
- All services: Apply the travel fee to every service available in your booking form.
- Selected services only: Apply the travel fee only to the services you select.
If you choose “Selected services only“, a Services list appears. From there, you can easily choose all the services you want to charge a travel fee for. This is best for businesses that offer both on-site services or on-customer address services.
Besides, you can also use the “Select all in {category}” option under the Services option to select all services in a specific category.
Please Note: Bookings for services that aren’t selected won’t include a travel fee or require a distance calculation.
Set Your Origin Location
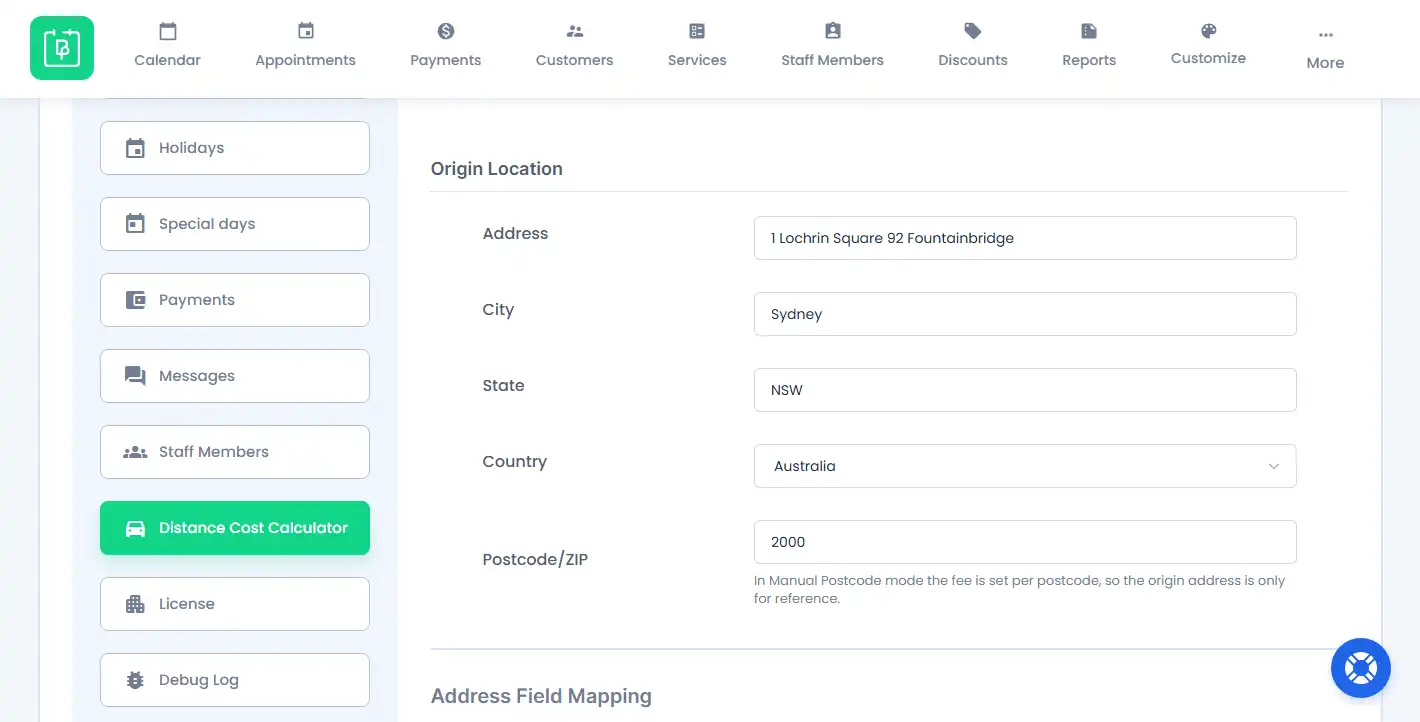
Next, you have to fill in the location your service providers will travel from. This can be your business location, too.
BookingPress uses this address as the starting point when calculating the distance and travel time to the customer’s address.
Under the Origin Location section, you just have to fill in details in this order:
- Address – Your business or service provider’s street address.
- City – The city where your business is located.
- State – Your state or region.
- Country – Select or enter your country.
- Postcode/ZIP – Enter your business postcode or ZIP code.
If you’re using the API method, the Address and Postcode/ZIP fields are required.
After you save the settings, BookingPress tries to locate your origin address on the map. If successful, you’ll see a confirmation message showing “Located at: …”.
However, if BookingPress can’t locate the address, you’ll see “Origin not located.”. Later, you can then click “Locate again” to try locating it again.
Please Note: The Country you enter here is also used when looking up customer addresses. Thus, customers don’t need to enter their country separately in the booking form. If you’re using Manual Postcode mode, the origin location is only for your reference and isn’t used to calculate the travel fee.
Map Customer Address Fields
Now, you need to tell BookingPress where to find the customer’s address in your booking form. The add-on uses the address fields you have set in the BookingPress form builder to calculate the travel fee.
The available settings depend on your selected calculation method.
For the API method:
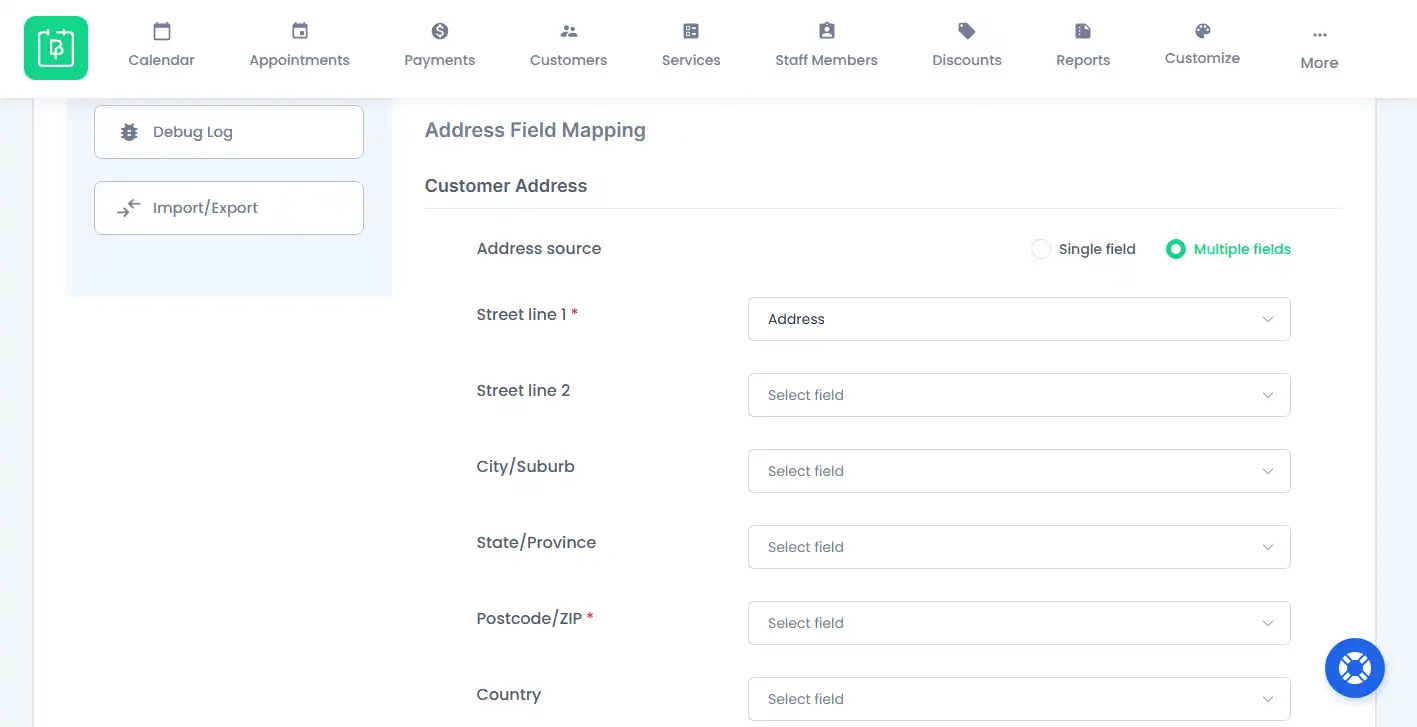
Under “Address source”, choose how the customer’s address is collected:
- Single field. Select this option if your booking form uses one field to collect the customer’s complete address.
- Multiple fields. Select this option if the customer’s address is split across separate fields.
If you select Multiple fields, map the following address details to the corresponding booking form fields:
- Street line 1
- Street line 2
- City
- State
- Postcode/ZIP
- Country
Street line 1 and Postcode/ZIP are required. For any other address part you don’t want to map, select “Select Field”.
For the Manual Postcode method:
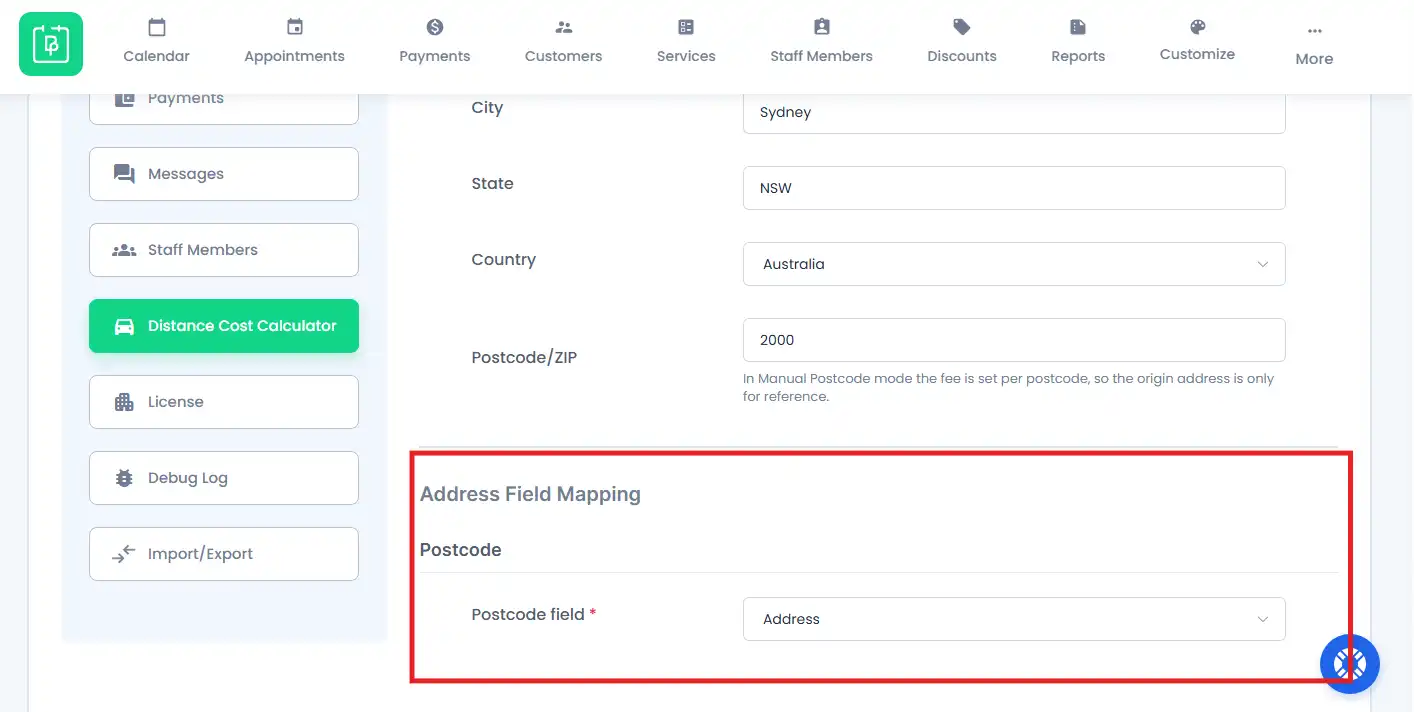
You only need to map the customer’s postcode field so simply select that field under the “Postcode field”.
Please Note: BookingPress shows a warning if a mapped field has been deleted from the form builder, is hidden on the booking form or isn’t required. Thus, make sure your mapped address fields are available to customers. It’s also recommended to make them required so customers don’t submit incomplete addresses.
Configure the API Provider
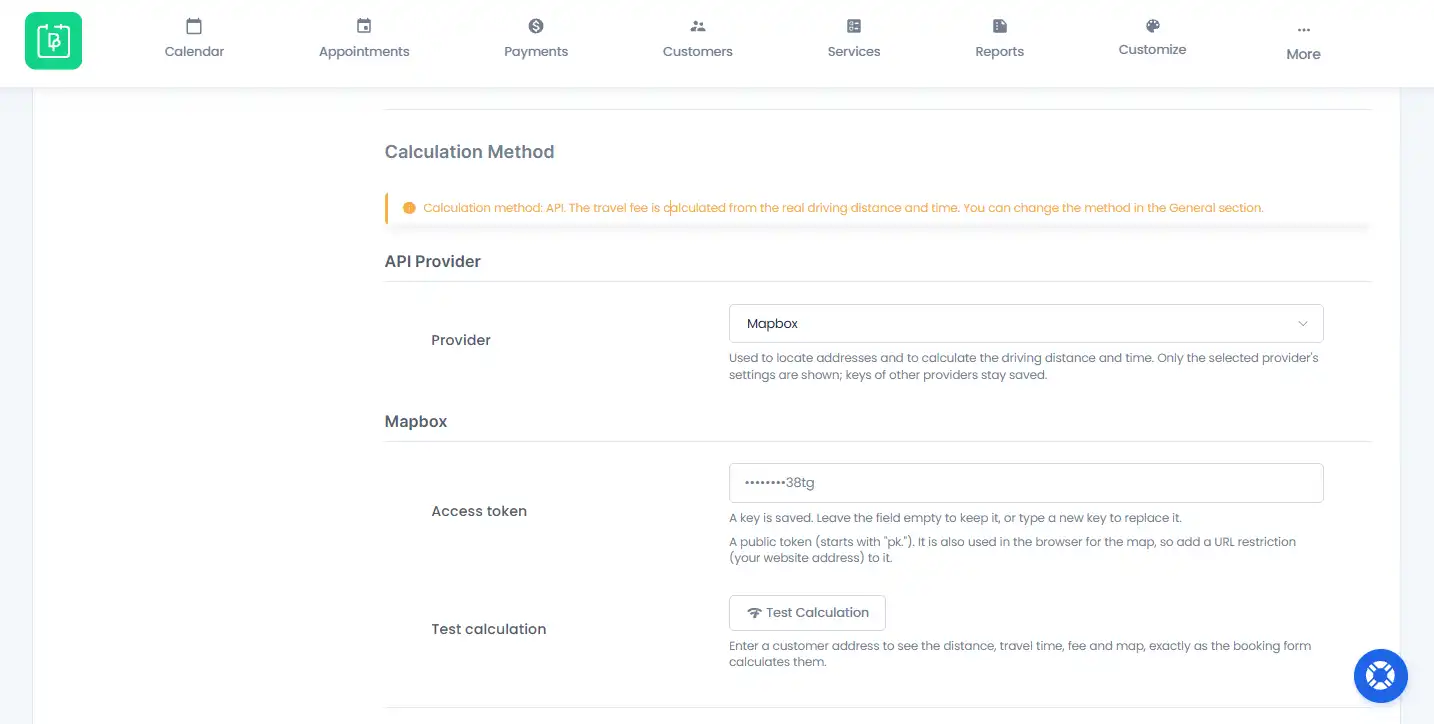
If you’ve selected API (driving distance) as your Calculation Method, you have to connect your maps provider. Then only, BookingPress will be able to calculate the driving distance or travel time.
BookingPress supports five maps providers:
- Mapbox
- HERE
- Geoapify
- OpenRouteService
Each map provider has its own API key and usage limits. Thus pick the provider you want to use, enter the required key, and click Verify.
BookingPress makes a test lookup to check whether the key works. If the verification is successful, the key is saved. Apart from that, you can also remove a verified key later using Delete Configuration.
Getting an API key from your provider
Each provider includes a “How to get your key” section with the required APIs or services, setup instructions, and a “Get API key” link.
Here’s a quick overview of what you need to enable:
| Maps provider | Required APIs or services |
| Routes API, Geocoding API, Maps JavaScript API, Places API (New) | |
| Mapbox | Directions API, Geocoding API, Maps |
| HERE | Routing API v8, Geocoding & Search API v7, Raster Tile API |
| Geoapify | Routing, Geocoding, Autocomplete, and Map Tiles |
| OpenRouteService | Directions and Geocode |
Furthermore, a few things to keep in mind when choosing a provider:
- Google. You need a Server API key and a Browser API key. The Server API key is used on the server and is never sent to the browser. The Browser API key is used to display the map and should be restricted by HTTP referrer.
- Mapbox. Use a public access token that starts with **“pk.”** You should also add a URL restriction to the token.
- HERE. You need an API key for its routing, geocoding, and map services.
- Geoapify. You can use one API key for routing, geocoding, autocomplete, and map tiles.
- OpenRouteService. You need an API key for Directions and Geocode. The map itself uses OpenStreetMap and doesn’t require a separate key.
Important: Each map provider has its own free usage allowance. Any usage above that allowance is billed by the provider to your own account, not by BookingPress. Plus, Google also needs a billing account, even when you’re using its monthly free allowance.
Important: Traffic-aware travel time (Google only). If you’re using Google as your maps provider, you’ll also find the “Traffic-aware travel time” option. If you want to calculate travel time without live traffic information, turn it off. If you want to calculate travel time using current traffic info (uses the higher priced Google Pro usage), just On it.
Set Up Travel Fee Pricing Rules
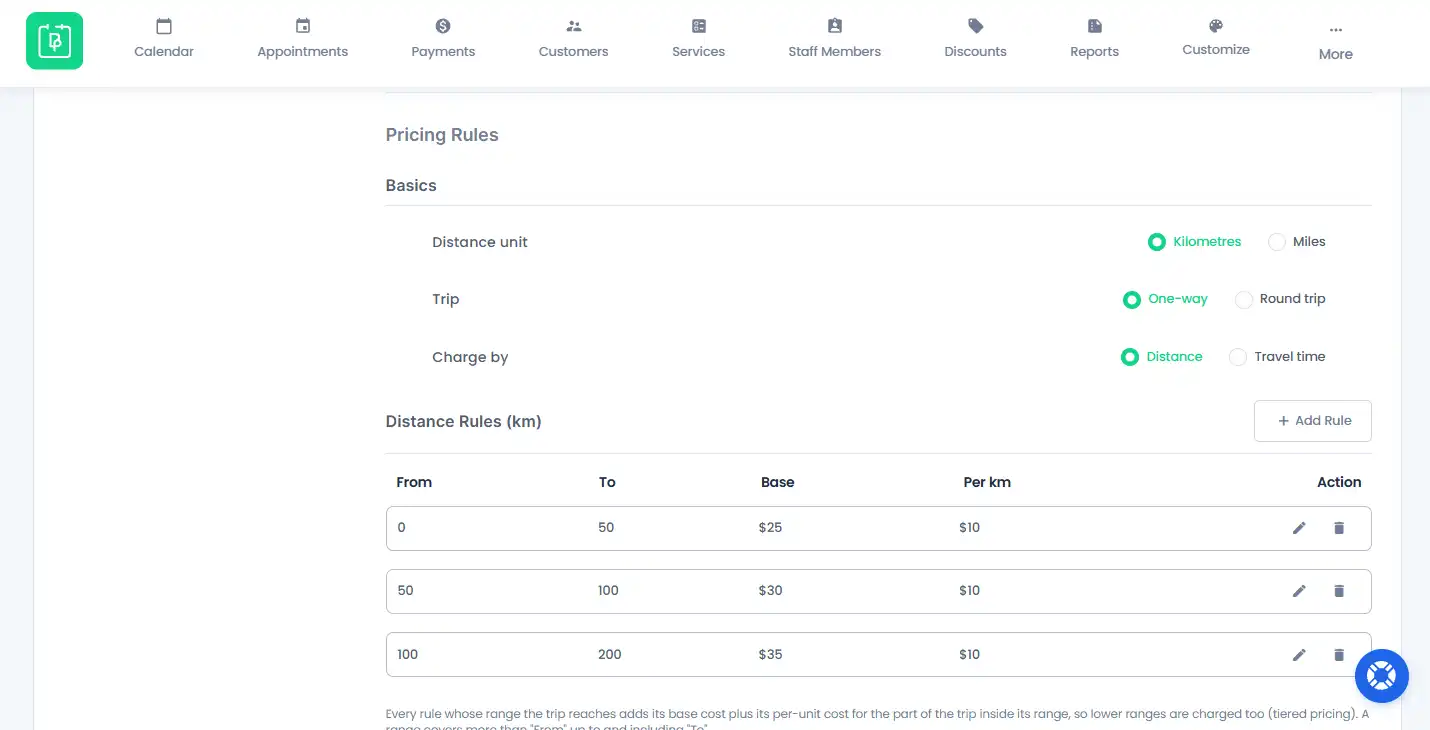
After you’ve connected your maps provider, time to decide how much to charge customers based on their travel distance or estimated travel time.
Under the Pricing Rules section, you get to set the following settings
- Distance unit. Choose your unit for distance calculation – “Kilometres” or “Miles”.
- Trip. Choose “One-way” or “Round trip” If you select Round trip, BookingPress doubles the calculated distance and travel time before applying your pricing rules.
- Charge by. Choose whether you want to charge based on “Distance” or “Travel time”.
Based on your selection, BookingPress shows either Distance Rules or Travel Time Rules.
Each rule includes the following fields:
- From. Enter the starting distance or travel time for the rule.
- To. Enter the ending distance or travel time. Leave this field empty if you don’t want to set an upper limit.
- Base. You just have to add the fixed amount to charge when the trip reaches this rule.
- Per km/mile/min. Enter the additional amount to charge for each kilometre, mile or minute within the rule’s range.
Click “Add Rule” to add another pricing rule. You can also edit or delete an existing rule using the icons beside it.
Please Note: Pricing rules work in tiers. When a customer’s trip reaches a higher range, BookingPress also applies the charges from the lower ranges. Make sure your rule ranges don’t overlap.
For a detailed explanation and a pricing example, see the How the API Fee Is Calculated section below.
Configure Postcode Rules
If you’ve selected Manual Postcode as your Calculation Method, you can set fixed travel fees for the postcodes or postcode zones you serve.
Each postcode rule includes the following settings:
- Rule Name. Enter a name for your reference, such as City centre. This field is optional.
- Postcodes. Enter the postcodes covered by this rule. You can add multiple postcodes separated by commas or new lines.
- Action. Pick whether to charge a fee or block bookings for the matching postcodes.
- Active. Turn the rule on or off.
BookingPress supports three postcode formats:
- Exact postcode. Enter a complete postcode, such as 3000 or SW1A 1AA.
- Starts with. Enter a postcode prefix followed by an asterisk (*), such as SW1*.
- Range. Enter a numeric range, such as 3000-3207. Both the starting and ending numbers are included.
Under Action, choose “Charge the fee” and simply fill in the amount you want to charge. Alternatively, you can also pick Block but only if you don’t provide services in that postcode or zone.
You can add multiple rules to cover different service areas. BookingPress checks these rules from top to bottom, and the first matching rule determines what happens to the booking.
Apart from that, you can even search your rules, use pagination and perform bulk actions. BookingPress shows a warning when the same postcode appears in more than one rule.
Import and Export Postcode Rules
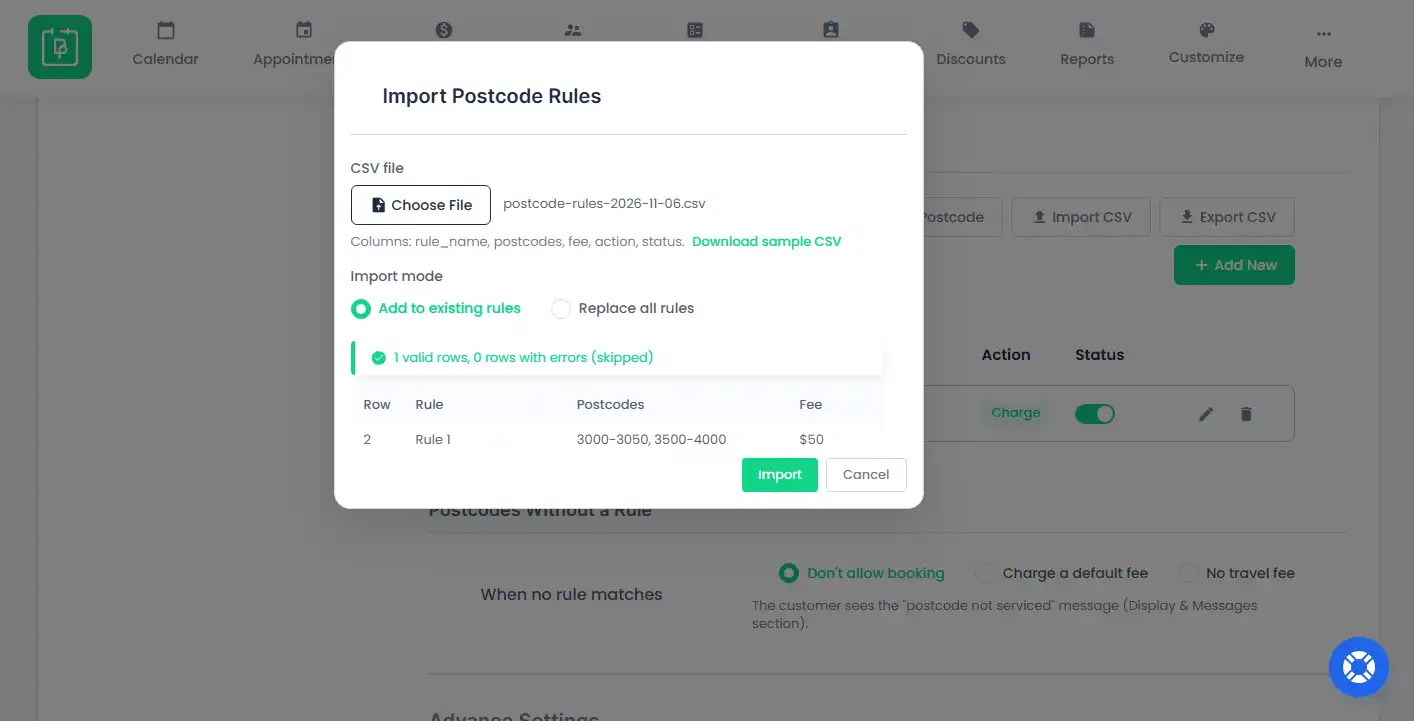
If you already have a list of service postcodes, you can easily import them using a CSV file instead of adding every rule manually.
The import and export options support the following columns:
- rule_name
- postcodes
- fee
- action
- status
You can download a sample CSV file from the import dialog to check the required format.
After you upload your CSV file, BookingPress shows a quick preview of valid rows and rows with errors. Best of all, rows with errors are skipped during import.
You can then choose whether to “Add to existing rules” or “Replace all rules””
Postcodes Without a Rule
Here, you get to decide what happens when a customer’s postcode doesn’t match any of your configured rules.
Under “Postcodes Without a Rule””, select what to do “When no rule matches”:
- Don’t allow booking
- Charge a default fee
- No Travel fee
If you select the “charge a default fee”, you have to add the default fee in the newly appeared field.
Configure Advanced Settings
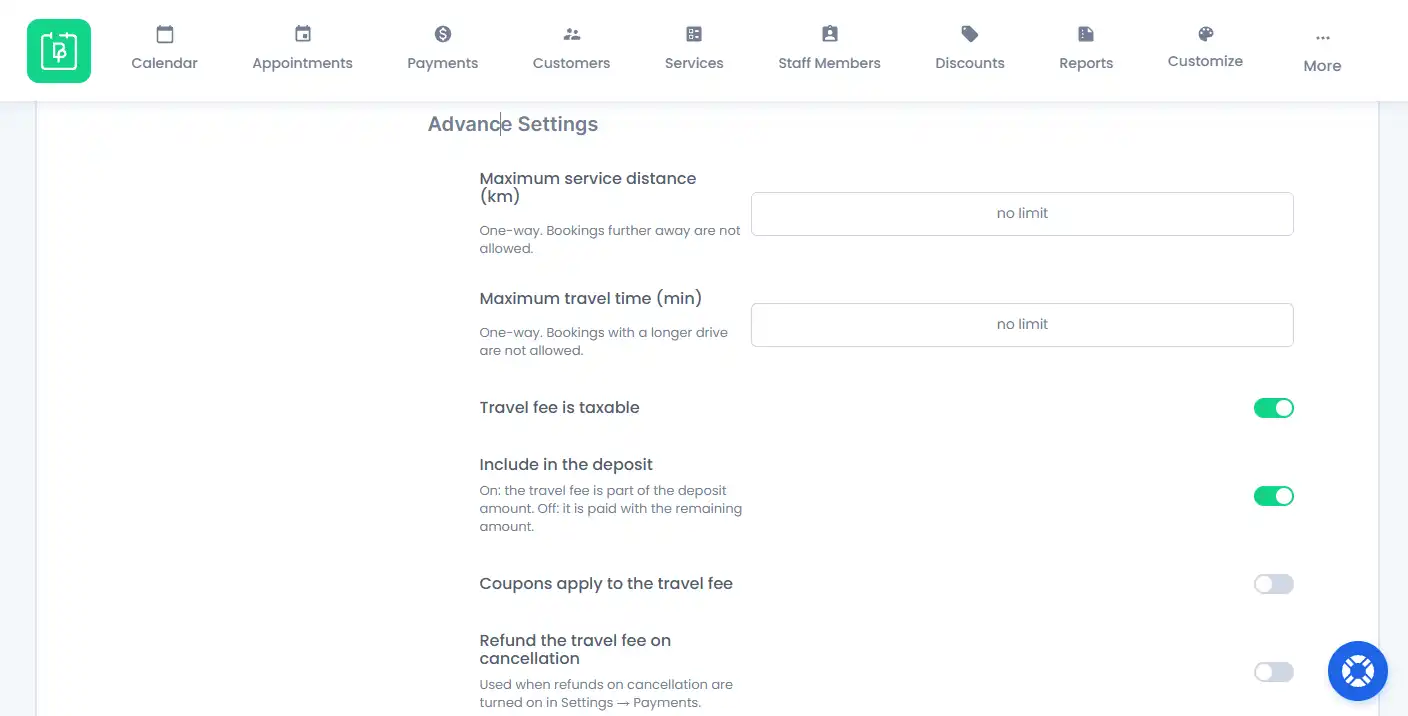
BookingPress also provides additional settings to control travel distance limits, taxes, deposits, coupons, refunds and API errors.
Worth mentioning you’ll only see this option if you have selected “API (driving distance)” as your Calculation method.
So, here’s what each option does:
- Maximum service distance. Set the maximum one-way distance you want to cover. Customers whose addresses are farther away won’t be able to book the service.
- Maximum travel time (min). Set the maximum one-way travel time. Bookings that exceed this limit won’t be allowed.
- No travel fee when no rule matches. If toggled on and no pricing rules matches, the fees will be 0. If toggled off and then no pricing rules matches, the booking will not be allowed.
- Travel fee is taxable. Enable this option if you want to charge tax on the travel fee. This setting appears only when the Tax add-on is active.
- Include in the deposit. Decide whether the travel fee should be included in the deposit amount. When enabled, the customer pays the travel fee as part of the deposit. Otherwise, it is paid with the remaining amount. This option is enabled by default when deposits are available.
- Coupons apply to the travel fee. Toggle this option if you want coupon discounts to lower the travel fee as well. This option is disabled by default.
- Refund the travel fee on cancellation. Decide whether the travel fee should be refunded when an appointment is cancelled. This setting is used when refunds on cancellation are enabled under BookingPress → Settings → Payments.
Apart from these advanced settings, you can also control and decide what happens in case your API falls back or fails.
You can set “If the API provider fails”. This option lets you choose what happens if BookingPress can’t connect to the maps provider or calculate the travel fee. You can either block the booking or select “Charge a flat fee” and enter the amount customers should pay instead.
Please Note: The maximum service distance and maximum travel time settings apply to the one-way journey, even when you’ve selected Round trip.
Customize Travel Fee Labels and Messages
Lastly, you can customize how the travel fee and its calculation details appear to customers on your booking form.
Customize Travel Fee Labels
From your WordPress dashboard, go to BookingPress → Customize → booking form and find the “Distance Calculator Labels” section.
Here, you can customize the following labels and texts:
| Setting | Default |
| “Fee Label” | Travel Fee |
| “Fee breakdown title” | How the travel fee is worked out |
| “Show distance” / “Distance text” | On / Distance: |
| “Show travel time” / “Travel time text” | On / Estimated travel time: |
| “Travel time format” | “1 h 20 min” or “80 min”. Under an hour is always shown as e.g. “23 min”. |
Apart from that, you can also use the following placeholders in your custom labels and texts:
- {distance}, Shows the calculated distance.
- {unit}, Shows the selected distance unit.
- {duration}, Shows the estimated travel time.
- {fee}, Shows the calculated travel fee.
The distance is shown with one decimal place. Plus, travel times shorter than an hour are always in minutes such as 23 min.
Customize Travel Fee Messages
BookingPress lets you change the messages customers see while the add-on calculates the travel fee or when their address can’t be processed.
From your WordPress dashboard, go to BookingPress → Settings → Messages and find the “Distance Cost Calculator Message Settings” section.
Here, you can customize the following messages:
| Message | Default text |
| While calculating | Calculating travel fee… |
| Outside the service area | Sorry, this address is outside our service area. |
| Address not found | We couldn’t find this address. Please check and try again. |
| Postcode not serviced | Sorry, we don’t service this postcode yet. |
| Calculation error | We couldn’t calculate the travel fee right now. Please try again or contact us. |
After you’ve configured the settings, don’t forget to Save at the top of the Distance Cost Calculator settings page to apply your changes.
How Is the Travel Fee Calculated?
The way BookingPress calculates the travel fee depends on the calculation method you select.
If you’re using the API method, BookingPress calculates the fee based on the customer’s driving distance or estimated travel time. If you’re using Manual Postcode, it checks the customer’s postcode against the rules you’ve configured and applies the matching fee.
Now, let’s dig a little deeper and understand this.
API-Based Travel Fee Calculation
When you select the API (driving distance), BookingPress uses the distance or travel time between your origin location and the customer’s address to calculate the fee.
The calculation depends on the pricing rules you have configured. Each rule includes a starting range, an ending range, a base amount and an additional charge per kilometre, mile or minute.
Thus, here’s how it works:
- BookingPress checks the customer’s total distance or travel time.
- It identifies all the pricing rules that the trip reaches.
- It adds the base amount and the per-unit charge for the portion of the trip covered by each rule.
It shows the final travel fee on the booking form.
For instance, you’ve set the following distance pricing rules:
| Distance range | Base amount | Per km charge |
| 0–10 km | $5 | $0 |
| 10–30 km | $0 | $1.50 |
| 30 km and above | $0 | $2 |
If a customer books a service at an address 42 km away, BookingPress calculates the fee as follows:
- First 10 km: $5 base fee
- Next 20 km (10–30 km): 20 × $1.50 = $30
- Remaining 12 km (30–42 km): 12 × $2 = $24
Total travel fee = $5 + $30 + $24 = $59
If you’ve selected Round trip, BookingPress doubles the distance and travel time before applying the pricing rules.
For example, a 42 km one-way journey becomes an 84 km round trip. Using the same pricing rules, the fee would be:
- First 10 km: $5
- Next 20 km: 20 × $1.50 = $30
- Remaining 54 km: 54 × $2 = $108
Total travel fee = $5 + $30 + $108 = $143
One-way, 8 km: only the first rule → $5.00
Worth mentioning, BookingPress even applies the charges from the lower ranges as well when a trip reaches a higher range. If no pricing rule matches the calculated distance or travel time, the travel fee is $0.
Distance-based fees are calculated to one decimal place, while travel-time calculations use whole minutes.
Manual Postcode-Based Travel Fee Calculation
If you’ve selected Manual Postcode, BookingPress doesn’t calculate the driving distance or travel time. So it checks the customer’s postcode against the postcode rules you’ve added.
The first matching rule decides the result:
- If the rule is set to “Charge the fee”, BookingPress adds the configured fixed amount to the booking
- If the rule is set to “Block”, the customer can’t continue with the booking
- If no rule matches, BookingPress follows the “When no rule matches” setting you’ve set..
Test Your Travel Fee Calculation
At last, after you’ve finally configured your calculation method and pricing rules, you can test whether BookingPress calculates the travel fee correctly before making it available to customers.
From your WordPress dashboard, go to BookingPress → Settings → Distance Cost Calculator and click the Test Calculation button.
If you’re using Manual Postcode mode, the button appears as “Test a Postcode”.
A dialog box opens where you can enter a customer’s address or postcode. And, after entering the details, BookingPress shows the calculation result along with the information used to calculate the fee.
For the API method, you can check details such as:
- Customer address and origin location.
- Distance provider used for the calculation.
- One way driving distance and travel time.
- Applied pricing values.
- Each pricing rule matched during the calculation.
- Final travel fee.
- A map showing the origin, customer location and route..
For Manual Postcode mode, you can check which postcode rule matches or what happens when no rule matches.
Please Note: The test calculation works even when the Distance Cost Calculator is disabled. This lets you check your settings before customers start paying the travel fee.
Please Note: Testing doesn’t charge customers. It only checks how the calculation works.
Note: If you’re using Google, you need a Browser API key to display the map in the test result.
Remember, test calculations count toward your map provider’s API usage. So, if you’ve made changes to the settings but haven’t saved them, BookingPress asks you to save them before running the test.
How Does the Travel Fee Appear on the Booking Form?
After the Distance Cost Calculator is all set to go, customers can see the travel fee while booking an appointment.
Here’s how it works on the booking form:
- The customer selects a service and enters their address in the mapped address field.
- BookingPress calculates the travel fee based on the selected method.
- A travel fee card appears below the address field.
- The card displays the calculated fee and, if enabled, the distance and estimated travel time.
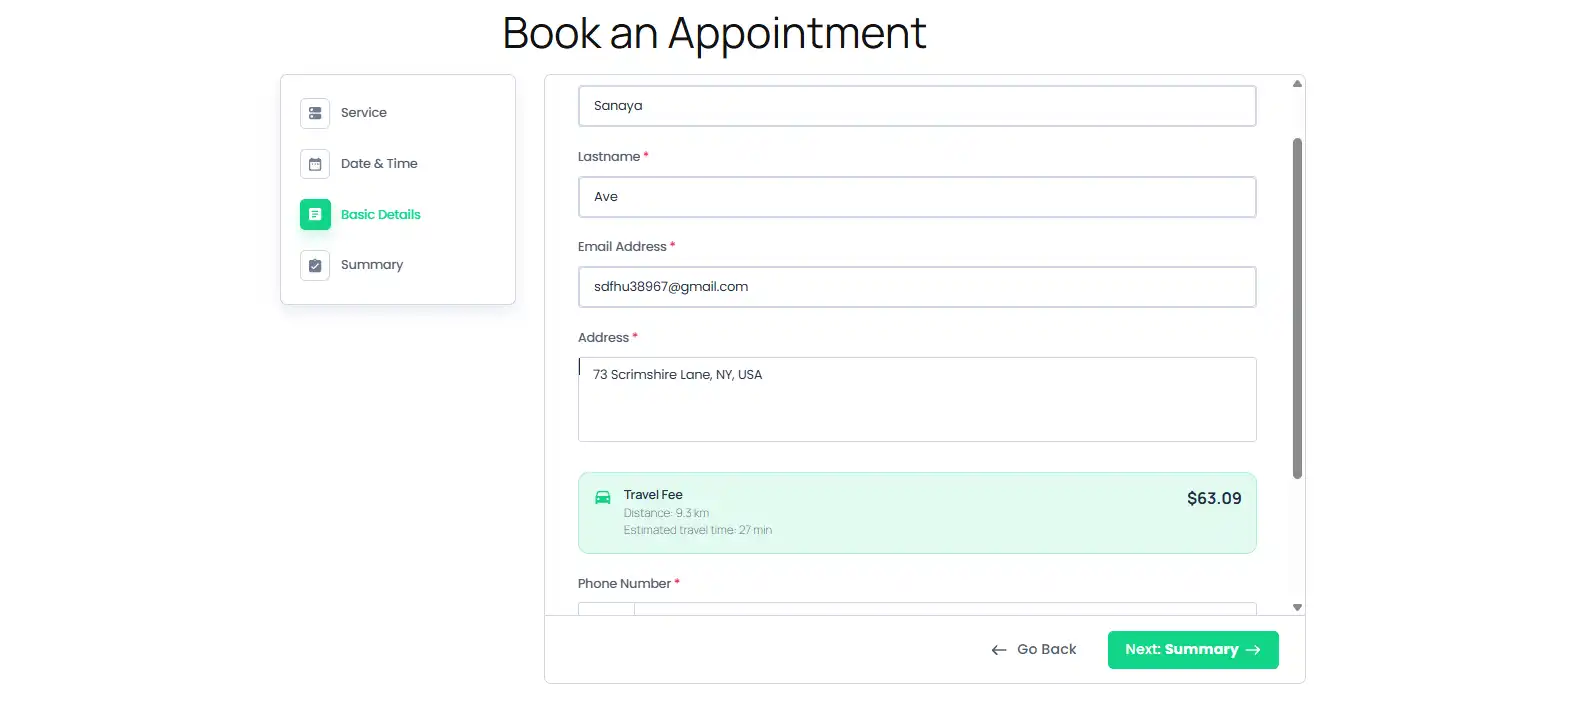
The calculation updates as customers enter their address. BookingPress waits until they’ve paused typing or moved away from the field before processing the address.
What if the customer’s address can’t be processed?
BookingPress prevents customers from continuing to the next step when:
- The address is empty or can’t be found.
- The address is outside your configured service area.
- The postcode isn’t covered by your postcode rules.
- BookingPress can’t calculate the travel fee.
In these scenarios, customers see the message you set under BookingPress → Settings → Messages.
Travel Fee in the Booking Summary
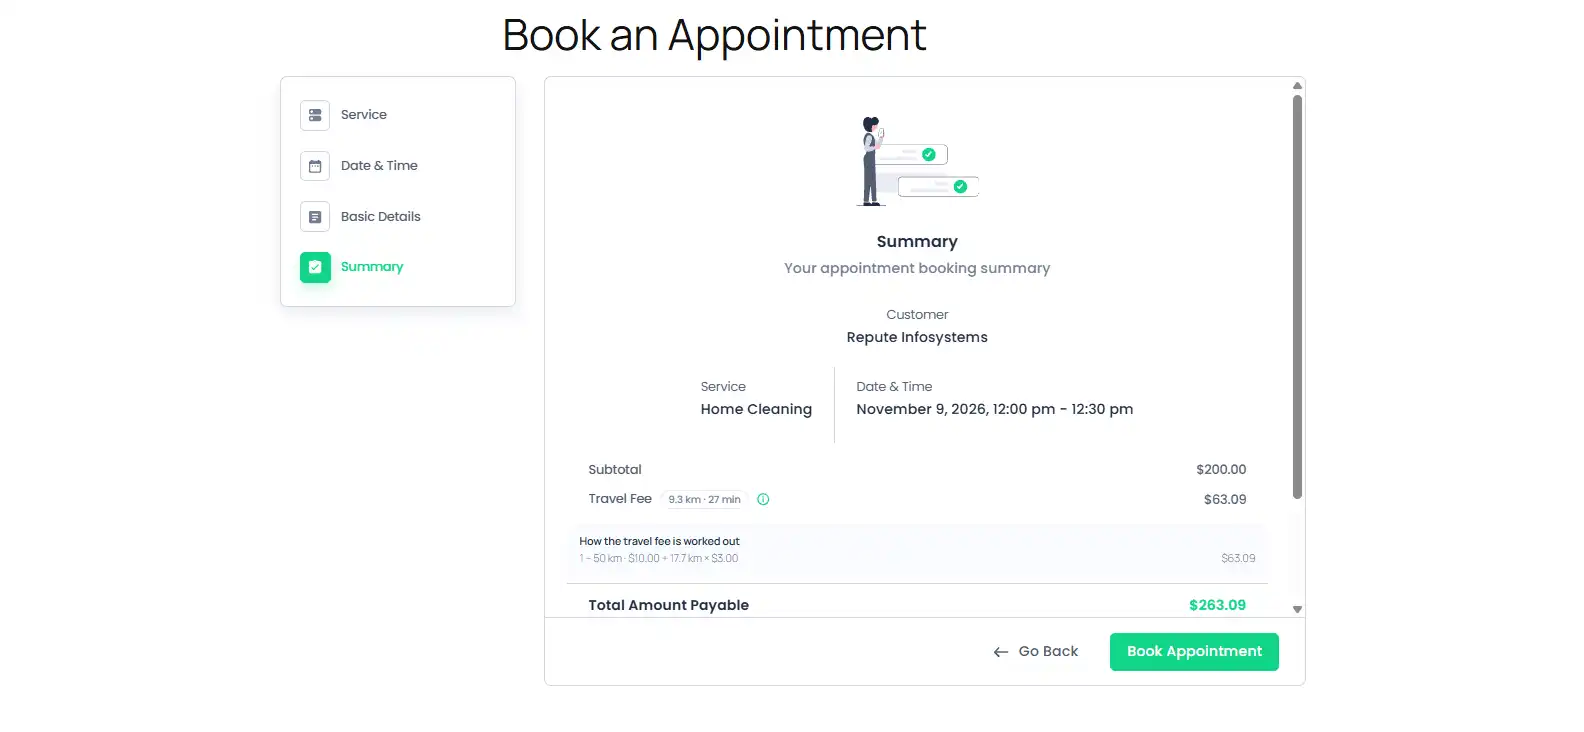
After calculating the fee, BookingPress adds it as a separate line in the booking Summary.
For example, customers can see the Travel Fee amount along with their service price and the final booking total.
If you’ve enabled the distance or travel-time details, customers can also view the fee breakdown which will get displayed while hovering or focusing on the info icon beside the “Travel Fee” title.
The travel fee is included in the total amount and follows the tax, deposit, and coupon settings you’ve configured.
Please Note: If a service isn’t included under your applicable services settings, BookingPress doesn’t show the travel fee card or calculate a travel fee for that service.
Where Can Customers and Administrators View the Travel Fee After Booking?
After a customer completes a booking, BookingPress saves the calculated travel fee with the appointment. It doesn’t calculate the fee again later, even if the customer’s address or pricing rules change.
You and your customers can view the travel fee in several places.
Thank-You Page
You can show the travel fee on your booking confirmation or thank-you page using the following shortcode:
`[bookingpress_dcc_travel_fee]`
The shortcode shows the travel fee only when a fee has been charged.
You can also use the following attributes to customize its output:
- label. Changes the label displayed with the fee. By default, it uses the Fee Label configured under Distance Calculator Labels.
- show_distance=”no”. Hides the distance and travel-time details.
- layout=”value”. Shows only the fee amount without the surrounding row.
Email Notifications
BookingPress also offers three new email placeholders that you can use in your appointment notification templates:
| Placeholder | Displays |
| %travel_fee% | The charged travel fee. |
| %travel_distance% | The calculated travel distance. |
| %travel_duration% | The estimated travel time. |
You can find these placeholders under the appointment placeholders in BookingPress → Notifications.
If an appointment doesn’t include a travel fee, these placeholders return empty values.
Please Note: For cart bookings or recurring appointments, the email placeholders display the travel fee for a single item or session, not the combined fee for the entire cart or recurring series.
My Bookings
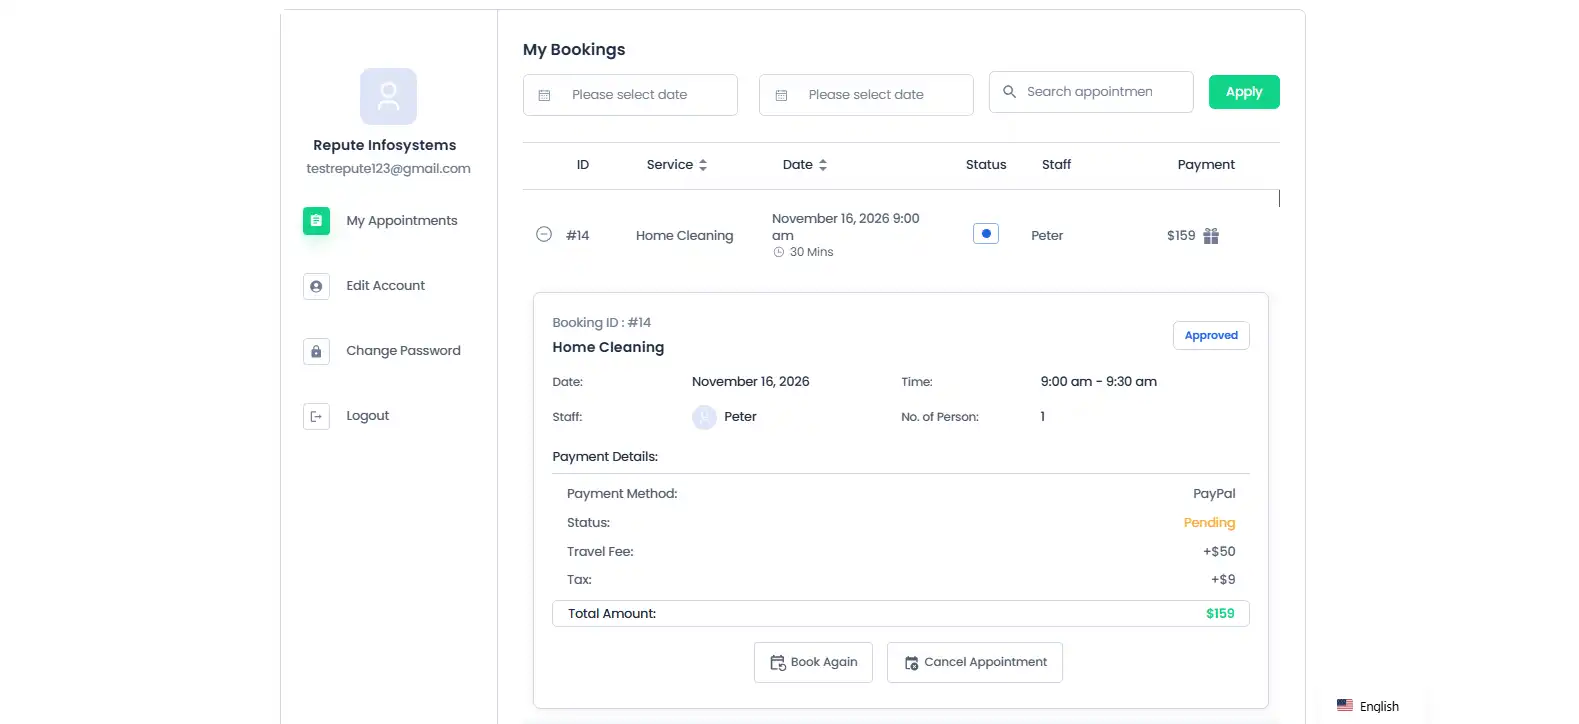
Customers can also view the travel fee in their My Bookings area.
For example, the booking details shows :
Travel Fee (32.1 km · 33 min): +$50.40
The travel fee appears above the booking total.
BookingPress Admin Dashboard
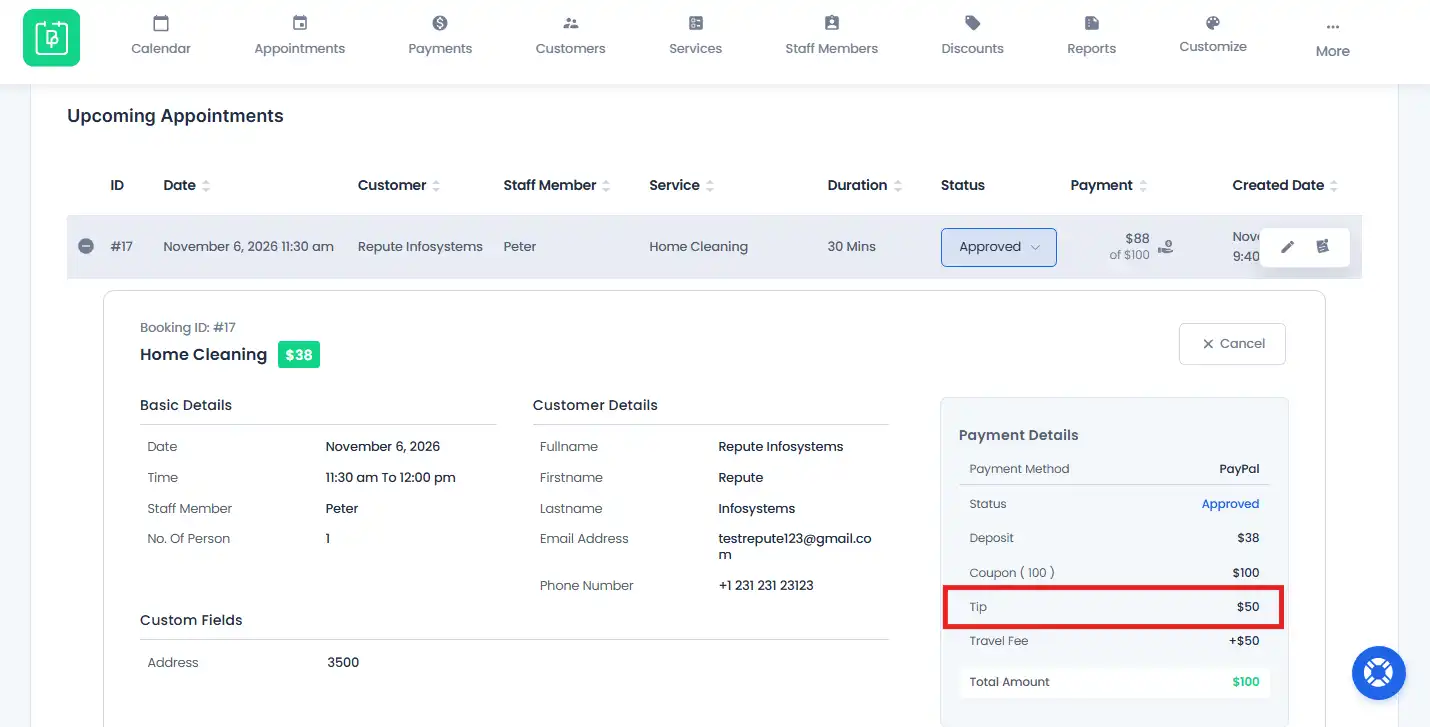
You can see the saved travel fee from the BookingPress dashboard:
- Appointments. Expand an appointment row or open its Payment Details.
- Payments. View the travel fee in the payment details.
- Appointment view. Open an appointment to check its saved travel fee information.
The fee remains saved with the appointment and isn’t recalculated when you view it later.
Payment Pages
If a customer needs to complete a pending payment, BookingPress also displays the travel fee on the Complete Payment and Waiting List payment pages.
The travel fee appears as a separate row in the payment summary and is included in the amount the customer needs to pay.
How to Manage Travel Fees When Adding Appointments from the Backend
Beyond all these, you can also use the Distance Cost Calculator when creating appointments manually from your WordPress dashboard.
From your dashboard, go to BookingPress → Appointments and add a new appointment.
When you enter the customer’s address, BookingPress calculates the applicable travel fee and adds it to the appointment total. On top of that, you got a few options to control how the travel fee is applied:
- Add travel fee to this appointment. Untick this option if you want to create the appointment without charging a travel fee.
- Book anyway without a travel fee (admin only). Enable this option if you want to create an appointment for an address that would normally be blocked for customers.
You can also click “Recalculate” to calculate the fee again and view the “Travel fee breakdown”.
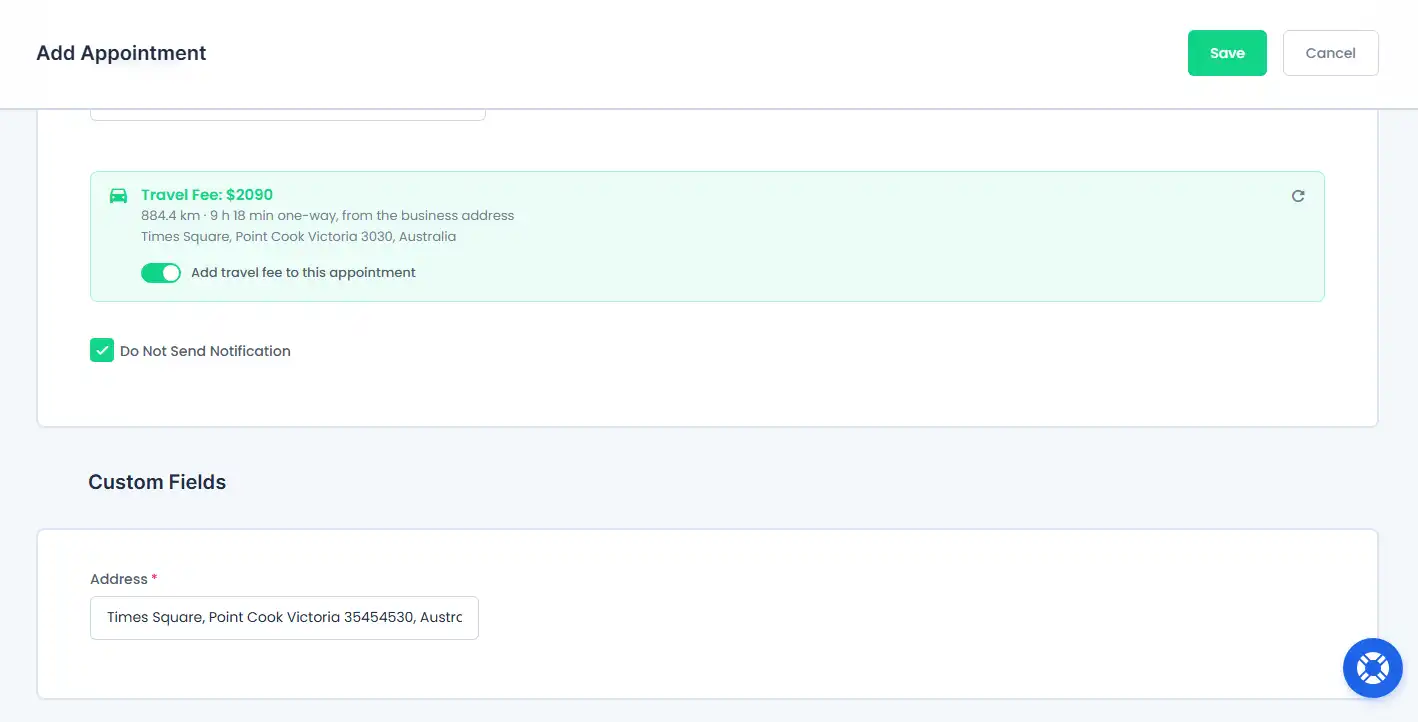
Please Note: You can’t manually edit the travel fee amount. Also, editing an existing appointment doesn’t change its saved travel fee.
How Does Distance Cost Calculator Work with Other Add-ons?
The Distance Cost Calculator also works with several other BookingPress add-ons.
Here’s how the travel fee is handled when you use them together.
| Add-on | Behaviour |
| Cart (multiple services in one booking) | The fee is charged once per in-scope service in the cart. The Summary shows “Travel Fee × N”. |
| Recurring Appointments | The fee is charged once per session. The Summary shows “Travel Fee × N”. |
| Package | A redeemed package covers the service, not the travel fee; the fee is still charged. |
| Tax | Follows “Travel fee is taxable”. |
| Deposit (Pro) | Follows “Include in the deposit” (percentage deposits). |
| Coupons (Pro) | Follows “Coupons apply to the travel fee”. |
| Waiting List | The fee is shown and charged on the waiting list payment page. |
| Google Address Autocomplete | Not required. The fee reacts to whatever ends up in the mapped address field, whether typed or filled by autocomplete. |
| Multilanguage / WPML / Polylang | The fee label, distance/time texts and messages are registered for translation. |
| Gift Card | Gift cards will lower the travel fee as well. |
| MyCRED | MYCRED reward points cover the service only, not the travel fee; the fee is still charged. |
Please Note: On the Waiting List payment page, coupon discounts don’t reduce the travel fee, even when “Coupons apply to the travel fee” is enabled.
Manage Distance Calculator Logs and Protect API Information
From your WordPress dashboard, go to BookingPress → Settings → Debug Log and find the “Distance Cost Calculator Debug Logs” section. Here, you’ll see:
- API Request Logs
- Debug log
Check API Request Logs
The API Request Logs section shows the status of each provider request. You can filter the entries by provider, status and date.
The available request statuses include:
- Success. The API request completed successfully
- Error. The API request failed
- Fallback. BookingPress used the configured fallback behavior
- From cache. BookingPress returned a previously saved result.
- Skipped. The API request was skipped
On top of that, you can even download the logs as a CSV file if you need to review or share the request details.
Important: API request logs older than 7 days are deleted automatically.
Protect Your API Keys and Customer Information
When connecting a maps provider, just make sure you follow the provider’s recommendations for protecting your API keys.
- Your Google Server API key is used on the server and is never sent to the browser.
- Your Google Browser API key should be restricted using HTTP referrers.
- Your Mapbox public access token should have a URL restriction.
- BookingPress masks API keys in its request logs so the complete keys aren’t displayed in log entries.
Best of all, BookingPress caches provider results for 24 hours to reduce repeated API requests. But, Mapbox address lookups aren’t cached because of the provider’s terms.
Need a hand?
Our world-class support team is happy to help. Send us a message and we’ll take it from there
 14-day money-back guarantee